
Office Blog
How do I Collaborate and Share Notebooks in OneNote?

OneNote is a versatile note-taking application that allows users to collaborate and share their notebooks with others. In this step-by-step guide, we will walk you through the process of collaborating and sharing notebooks in OneNote.
Step 1: Launch OneNote
Start by launching the OneNote application on your device.
Step 2: Open or Create a Notebook
Open an existing notebook or create a new one by clicking on the “File” tab and selecting “New“.
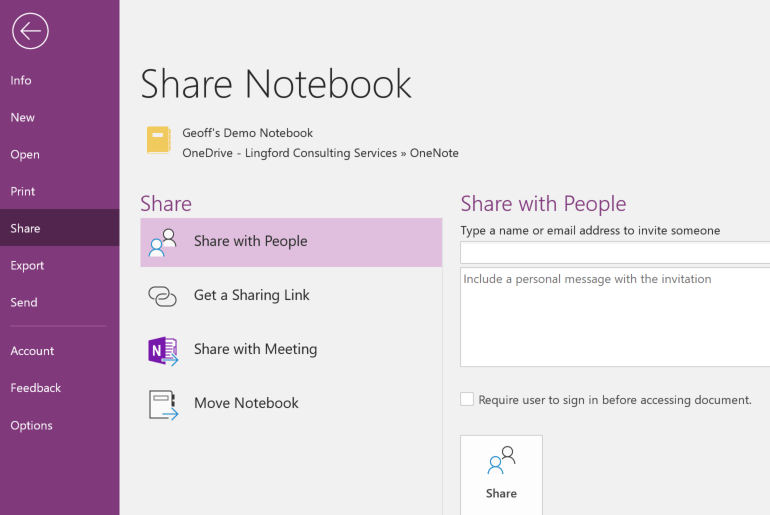
Step 3: Add Collaborators
To collaborate with others, click on the “Share” button located at the top right corner of the OneNote window. Enter the email addresses of the people you want to collaborate with and specify their permission level.
Step 4: Set Permission Levels
Choose the appropriate permission level for each collaborator. The options include “Can Edit” for full editing access, “Can View and Edit” for read and edit access, and “Can View” for read-only access.
Step 5: Send Invitations
Click on the “Share” button to send invitations to the selected collaborators. They will receive an email with a link to access the shared notebook.
Step 6: Accept Invitations
Collaborators should open the email invitation and click on the provided link to accept the invitation. They will be directed to the shared notebook in their OneNote application.
Step 7: Start Collaborating
Once all collaborators have accepted the invitation and opened the shared notebook, they can start collaborating in real-time. Each person’s edits and additions will be synchronized across all devices and visible to others.
Step 8: Add and Edit Content
Collaborators can add and edit content within the shared notebook. They can create new sections and pages, insert text, images, and tables, and format the content as needed.
Step 9: Use Comments and Tags
Collaborators can use comments to leave feedback on specific sections or pages. They can also use tags to categorize and prioritize information within the notebook.
Step 10: Sync and Save Changes
OneNote automatically syncs changes made by collaborators. However, it is a good practice to manually sync the notebook by clicking on the “Sync” button to ensure all changes are saved and up to date.
Step 11: Stop Sharing
If you need to stop sharing the notebook, click on the “Share” button and select “Stop Sharing“. Confirm your decision in the dialog box that appears.
By following these step-by-step instructions, you can collaborate and share notebooks in OneNote. Enjoy seamless teamwork and productivity with this powerful note-taking tool.
Need an Excel license? Look no further. Acquire one from our website, which is included in the Office Suite with options such as Office 2016, Office 2019, and Office 2021.