
Office Blog
How to add a bullet point from the keyboard in Word?

Incorporating bullet points into your Microsoft Word document is an effective way to enhance the organization and readability of information. Our comprehensive guide will provide you with a step-by-step approach to seamlessly add bullet points using specific keyboard commands in Microsoft Word. By following our instructions, you can efficiently structure your content and present it in a concise and visually appealing manner.
Bullet points offer several benefits, particularly when it comes to organizing and presenting information. They allow you to break down complex ideas into easy-to-digest points, improving the clarity and comprehension of your document. Whether you are creating a report, presentation, or any other type of document, utilizing bullet points can enhance its overall readability and ensure that key details stand out.
Our guide will equip you with the necessary knowledge to quickly add bullet points to your Microsoft Word document using specific keyboard commands. These commands offer a convenient and time-saving alternative to manually formatting each bullet point. With our step-by-step instructions, you can effortlessly create well-structured documents that effectively convey your message and engage your readers. Embrace the power of bullet points in Microsoft Word and elevate the impact of your written materials.
Step 1: Open Microsoft Word and create a new document or open an existing one.
- Launch Microsoft Word on your computer.
- Create a new document or open the existing document in which you want to add bullet points.

Step 2: Position the cursor at the desired location.
- Place the cursor at the point where you want to add a bullet point.
Step 3: Press the “Alt” key and the “7” or “9” keys on the numeric keypad.
- Hold down the “Alt” key on your keyboard.
- On the numeric keypad, press either the “7” key to insert a solid bullet point or the “9” key to insert an open bullet point.
Step 4: Release the keys.
- Release the “Alt” key and the numeric keypad keys.
Step 5: Start typing after the bullet point.
- Begin typing the text you want to add after the bullet point.
- Press “Enter” to create a new bullet point if needed.
Step 6: Repeat steps 2 to 5 for additional bullet points.
- Position the cursor at the desired location for the next bullet point.
- Repeat steps 3 to 5 to add more bullet points in your document.
Step 7: Customize the bullet points if desired.
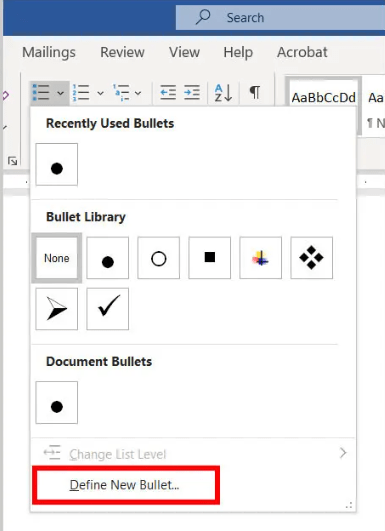
- To change the appearance of the bullet points, select the bullets and click the “Bullets” button in the “Paragraph” group on the “Home” tab.
- Choose a different bullet style from the Bullet Library or click “Define New Bullet” to create a custom bullet.
Step 8: Save your document.
- Click on “File” and select “Save” to save your document with the added bullet points.
- Choose a location on your computer and provide a name for the file.
- Click on “Save” to save the document.
Conclusion:
By following these simple steps and using the specific keyboard commands provided, you can quickly and efficiently add bullet points to your Microsoft Word documents. Use these bullet points to organize and present information in a visually appealing manner. Saving time and effort, you can now easily format your documents with bullet points using your keyboard.
Time to secure your Word license! Visit our website and explore hassle-free options including cheap Office 2016 cd keys, Office 2019 cd keys, and the cheapest Office 2021 cd keys.