
Office Blog
How can I Change the Default Email Font in Outlook?

Customizing the default email font in Outlook is a simple yet impactful way to infuse personality and professionalism into your email communications. Our detailed guide will walk you through the process of changing the default email font in Outlook, enabling you to tailor the visual presentation of your messages to align with your personal style or branding preferences. By adjusting the font style, size, and color of your emails, you can create a cohesive and visually appealing email signature that reflects your unique identity.
Personalizing the default email font in Outlook not only adds a touch of creativity to your messages but also helps in enhancing readability and engagement. A well-chosen font can convey the tone and emphasis of your message effectively, making your emails more engaging and impactful. Whether you prefer a classic serif font for a formal touch or a modern sans-serif font for a contemporary look, customizing the default email font in Outlook allows you to make a lasting impression on your recipients while maintaining a consistent brand image across your communications.
By following the step-by-step instructions provided in our guide, you can easily navigate Outlook’s settings to adjust the default email font according to your preferences. From selecting the desired font type to fine-tuning the formatting options, you will gain the confidence to create visually appealing and personalized email messages that leave a lasting impression on your recipients. Embrace the power of customization and elevate your email communication with a customized default font in Outlook.
Step 1: Open Outlook
Launch the Outlook application on your computer.
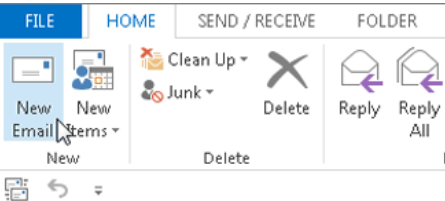
Step 2: Go to the Options menu
Click on “File” at the top left corner of the Outlook window and select “Options.”
Step 3: Access the Mail tab
In the Outlook Options window, click on the “Mail” tab.
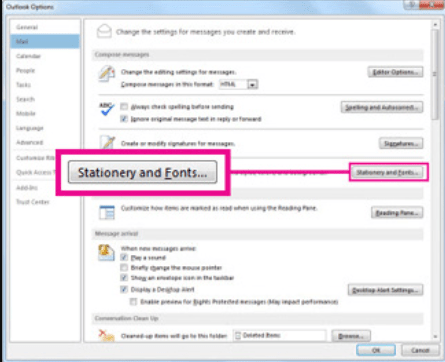
Step 4: Find the Stationery and Fonts button
Under the Compose messages section, locate the button labeled “Stationery and Fonts” and click on it.
Step 5: Select the Personal Stationery tab
In the Signatures and Stationery window, navigate to the “Personal Stationery” tab to access font options.
Step 6: Modify the font setting
Within the Personal Stationery tab, click on the “Font” button to customize your font settings.
Step 7: Choose desired font settings
In the Font window, select the font type, size, color, and other formatting options according to your preference. Once done, click “OK” to save the changes.
Step 8: Apply changes to all email messages
To apply the font changes to all your outgoing email messages, check the box that says “New mail messages” under the “Use this stationery by default” section. If you only want to apply the changes to replies and forwards, select the corresponding checkboxes.
Step 9: Save and exit
Click “OK” in the Signatures and Stationery window, and then click “OK” in the Outlook Options window to save the changes and exit the settings.
By following these steps, you can easily change the default email font in Outlook and personalize your emails to suit your style and enhance your communication. Experiment with different font settings to find the perfect look for your messages.
Visit our website and explore the array of cheap Microsoft Office licenses available, designed to meet your database management needs. Whether you prefer cost-effective Office 2016 keys, user-friendly Office 2019 cdkeys, or the most economical Office 2021 cd keys, we have the perfect fit for you.