
Office Blog
OneNote for Beginners: Organizing and Sharing Notes

OneNote is a versatile tool for organizing and sharing your notes effectively. If you don’t have OneNote, first you need to download and install it to start organizing and sharing your notes effectively. Follow these step-by-step instructions to get started with OneNote:
Step 1: Install OneNote
- Visit the Microsoft Office website or your app store to download and install the OneNote application.
- Once installed, launch the OneNote app on your device.
Step 2: Create a New Notebook
- Open OneNote and click on File in the top-left corner.
- Select New from the dropdown menu.
- Choose Notebook and give it a name.
- Select the desired location to save your notebook, such as OneDrive or your computer.
Step 3: Create Sections and Pages
- Within your new notebook, click on the Add Section button on the right-hand side.
- Name the section based on a specific topic or category.
- Click on the Add Page button to create a new page within the selected section.
- Give the page a meaningful title to help you easily identify its content.
Step 4: Customize Your Notes
- Use the various formatting tools in the toolbar to customize your notes. For example:
- Use bold or italic to emphasize important information.
- Create lists using bullets or numbers for itemization.
- Adjust font styles and sizes as needed.
- Utilize the drawing tools to sketch, highlight, or annotate your notes.
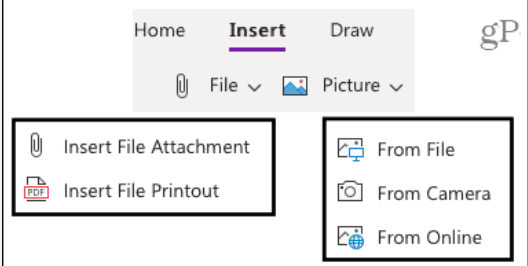
Step 5: Add Attachments and Media
- Click on the Insert tab in the toolbar.
- To attach a file, click on the File Attachment button and select the desired file from your device.
- To insert images or videos, click on the respective buttons under Pictures or Online Pictures and follow the prompts to insert the media.
Step 6: Share and Collaborate on Notes
- Click on the Share tab in the toolbar.
- Enter the email addresses of the individuals you want to share your notes with, or select from your contacts.
- Choose the desired sharing permissions, such as view-only or editing access.
- Optionally, add a message to accompany the sharing invitation.
- Click on Share, and the recipients will receive an email with a link to your shared notes.
Step 7: Sync and Access Across Devices
- To ensure your notes are available on multiple devices, sign in with your Microsoft account.
- Click on File and then Account.
- Enable syncing by enabling the switch for Sync notebooks.
- Your notes will now sync across all devices where OneNote is installed.
By following these step-by-step instructions, you can get started with OneNote and become proficient in organizing, customizing, and sharing your notes effectively.
Discover cheap Microsoft Office keys on our website, tailor-made to suit your specific database management needs. With a selection that includes cheap Office 2016 keys, convenient Office 2019 keys, and the cheapest Office 2021 cd keys, finding the perfect fit is a breeze.