
Office Blog
How to Justify Text in Microsoft Word?

Justifying text in Microsoft Word is a straightforward process that can significantly enhance the appearance of your document. This formatting option aligns text evenly along both the left and right margins, creating a polished and professional look. In this comprehensive tutorial, we’ll walk you through the step-by-step process of justifying text using specific commands in Microsoft Word.
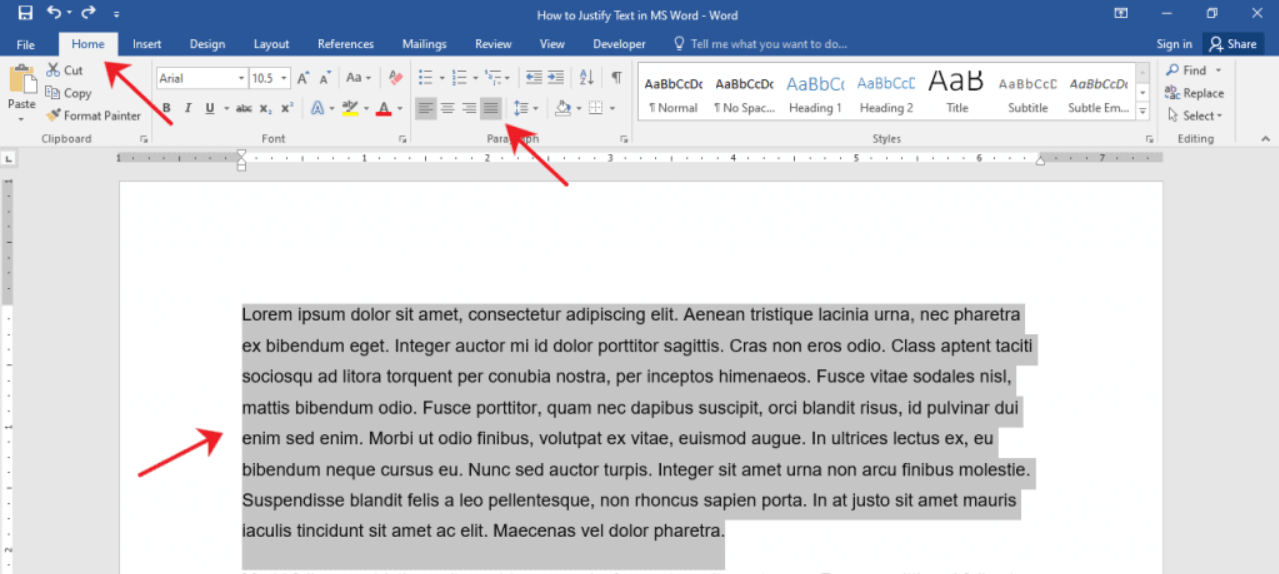
To begin, open your Word document and select the text you want to justify. Then, navigate to the “Home” tab in the Word ribbon. Locate the alignment options group, which typically includes icons for aligning text left, center, right, and justified. Click on the “Justify” icon to apply the justification formatting to the selected text. Alternatively, you can use the keyboard shortcut Ctrl + J to justify the text.
Once justified, the selected text will now appear evenly aligned along both the left and right margins of your document. This formatting option is particularly useful for documents such as reports, newsletters, and formal letters, where a clean and professional appearance is desired. By following these simple steps, you can effectively justify text in Microsoft Word, enhancing the readability and visual appeal of your document.
Step 1: Open Microsoft Word and create a new document.
- Launch Microsoft Word on your computer.
- Click on “File” in the top-left corner and select “New Blank Document” to create a new document.
Step 2: Type your text.
- Start typing or paste your text into the document.
Step 3: Select the text you want to justify.
- Use your mouse cursor to drag and select the text you want to justify.
- Alternatively, press “Ctrl+A” to select the entire document.
Step 4: Go to the “Home” tab.
- Locate the “Home” tab in the ribbon at the top of the screen.
- Click on the “Home” tab to access the necessary commands for text formatting.

Step 5: Justify the text.
- Within the “Paragraph” group, click on the small arrow in the bottom-right corner. This will open the paragraph settings window.
- In the paragraph settings window, locate the “Alignment” dropdown menu.
- Click on the dropdown menu and select “Justify” from the options.
Step 6: Adjust additional formatting options (optional).
- In the paragraph settings window, you can adjust additional formatting options such as the indentation, line spacing, and spacing before or after paragraphs.
- Modify these options according to your preferences, or leave them as default.
Step 7: Apply the changes.
- Once you are satisfied with the text alignment and formatting options, click on the “OK” button in the paragraph settings window.
- The selected text will now be justified in your Word document.
Step 8: Save your document.
- Click on “File” and select “Save” to save your document with the justified text.
- Choose a location on your computer and provide a name for the file.
- Click on “Save” to save the document.
Conclusion:
Justifying text in Microsoft Word can help create a polished and professional look for your documents. By following the step-by-step instructions and using the specific commands provided, you can easily justify text in your Word document. Experiment with different formatting options to find the alignment that best suits your needs. Enhance the visual appeal of your documents and make a positive impression with well-justified text.
Get the cheapest Microsoft Office 2021 Pro Plus from our website. Unlock the full potential of this powerful suite, including Word, Excel, PowerPoint, and more, at an unbeatable price. With all the essential productivity tools at your fingertips, you can boost your efficiency and accomplish your tasks with ease. Don’t miss out on this amazing deal – visit our website now to purchase your license and elevate your work experience with Microsoft Office 2021 Pro Plus.