
Windows Blog
How do I set up a VPN in Windows 10?

Setting up a VPN (Virtual Private Network) in Windows 10 is crucial for ensuring a secure and private internet connection. By establishing a VPN, you can shield your online activities from prying eyes and safeguard sensitive information. Are you wondering how to set up a VPN in Windows 10? Look no further! Our comprehensive step-by-step guide will walk you through the process, making it easy and hassle-free.
To begin, we will explain what a VPN is and why it is important. Understanding the benefits of a VPN will help you grasp its significance in today’s digital landscape. Our guide will then provide you with clear instructions on how to configure a VPN connection in Windows 10, regardless of whether you are using a built-in VPN protocol or a third-party VPN service.
We will cover every aspect of the setup process, including selecting the VPN protocol, entering the necessary configuration details, and troubleshooting common issues that may arise. Additionally, we will discuss the importance of choosing a reliable VPN provider and offer tips for optimizing your VPN settings to maximize performance and security.
Don’t compromise your online privacy and security any longer. Follow our step-by-step guide to set up a VPN in Windows 10 and enjoy the peace of mind that comes with knowing your internet connection is protected. Enhance your privacy, access geo-restricted content, and protect your sensitive data with the help of our comprehensive guide. Let’s get started on configuring your VPN connection in Windows 10!
Step 1: Access VPN settings
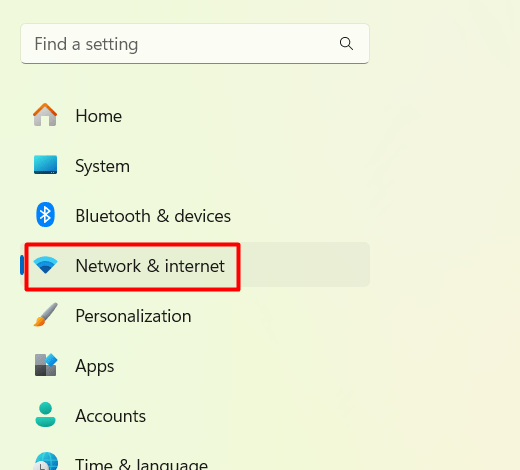
- Click on the Start menu and select “Settings” (the cogwheel icon).
- In the Settings window, click on “Network & Internet.”
Step 2: Add a VPN connection
- In the Network & Internet settings, click on “VPN” from the left-hand menu.
- Click on the “Add a VPN connection” option.

Step 3: Configure VPN connection details
- In the VPN settings, provide the necessary information for the connection:
- For “VPN provider,” choose the preferred VPN service or select “Windows (built-in)” for a specific protocol.
- In the “Connection name” field, enter a name to identify the VPN connection.
- For “Server name or address,” input the server address provided by your VPN service.
- Choose the VPN type, such as PPTP, L2TP/IPsec, SSTP, or IKEv2.
- Enter the username and password provided by your VPN service.
- Toggle the “Remember my sign-in info” switch if desired.
Step 4: Save and connect to the VPN
- Click on the “Save” button to save the VPN connection settings.
- To connect to the VPN, click on the Network icon in the system tray.
- Select the VPN connection you created and click on the “Connect” button.
- Enter your username and password if prompted.
Step 5: Modify advanced VPN settings (optional)
- In the VPN settings, click on “Advanced options” under the VPN connection you created.
- Here, you can modify settings such as encryption protocols, DNS settings, and more.
Step 6: Disconnect from the VPN
- To disconnect from the VPN, click on the Network icon in the system tray.
- Select the VPN connection you are currently connected to and click on the “Disconnect” button.
Conclusion:
By following these step-by-step instructions, you can easily set up a VPN in Windows 10. A VPN connection provides enhanced security and privacy while browsing the internet or accessing remote resources. Ensure your online activities are protected and encrypted by configuring a VPN connection in Windows 10.
Unlock the full potential of your device without spending a fortune. Purchase cheap Windows 10 keys from our website and upgrade economically and smartly.