
Office Blog
How do I Archive and Backup Outlook Data?

In today’s digital era, your Outlook data holds valuable information, including emails, contacts, and important calendar events. To protect your data from loss or corruption, it’s essential to learn how to archive and backup your Outlook information. In this step-by-step guide, we will walk you through the process of archiving and backing up your Outlook data to ensure its safety and easy access.
Step 1: Accessing Outlook Options
Launch Outlook and locate the “File” tab at the top-left corner of the screen. Click on it to open the menu options. From the menu, select “Options” to access Outlook’s settings.
Step 2: Navigating to Advanced Options
In the Options menu, choose the “Advanced” tab located on the left side. This tab provides various advanced settings for Outlook.
Step 3: Finding the Export Option
Scroll down within the Advanced settings until you find the “Export” section. Click on it to explore the export options available.
Step 4: Initiate the Export Process
In the Export section, click on “Export” to begin the process of archiving and backing up your Outlook data.
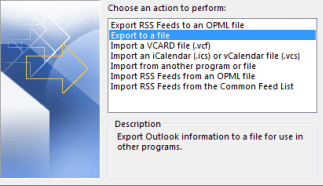
Step 5: Choosing Export to a File
The Import and Export Wizard window will appear. Here, select “Export to a file” and click “Next” to proceed.
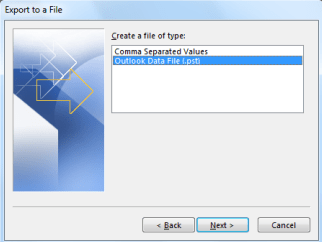
Step 6: Selecting Outlook Data File
Choose “Outlook Data File (.pst)” as the file type you want to export. This format ensures that all your data, including emails, contacts, and calendar events, is included in the backup. Click “Next” to continue.
Step 7: Selecting Folders to Archive
Now, choose the folders you want to include in the backup and archive. You can select individual folders or opt to include the entire mailbox for comprehensive backup. Click “Next” after making your selection.
Step 8: Specifying Backup Location
Browse your computer to select a location where you want to store the backup file. Give the backup file a descriptive name that highlights its contents. Once done, click on “Finish“.
Step 9: Initiating Backup Process
Outlook will start creating a backup archive file (.pst) of your selected folders. The duration of this process will vary based on the size of your data. Ensure you let it complete before moving to the next step.
Step 10: Accessing Archived Data
To access your archived data, return to the “File” tab and select “Open & Export“. From there, choose the “Open Outlook Data File” option and browse your computer to locate and open the backup archive file.
Step 11: Setting Up AutoArchive (Optional)
To automate the archiving process, you can set up AutoArchive using the following steps. Go back to the “File” tab and select “Options“. Within the Options menu, click on “Advanced” and then choose “AutoArchive Settings“. Customize the settings based on your preferences, such as archiving frequency, folders to archive, and retention policy. Click “OK” to save your changes and activate the AutoArchive feature.
By following this step-by-step guide, you can ensure that your valuable Outlook data is protected through both manual archiving and regular backups.
Don’t have an Excel license yet? No worries. Visit our website to acquire one, bundled with the Office Suite, including Office 2016, Office 2019, and Office 2021.