
Office Blog
How can I use the Selection Pane to Manage Objects in PowerPoint?

Managing objects in PowerPoint can be a challenge, especially when you have multiple layers of content. The Selection Pane in PowerPoint is a powerful tool that allows you to easily manage and manipulate objects on your slides. In this step-by-step guide, we will walk you through the process of using the Selection Pane in PowerPoint to efficiently handle objects.
Step 1: Open PowerPoint and Access the Selection Pane:
- Launch Microsoft PowerPoint on your computer.
- Open the presentation that contains the objects you want to manage.
- Navigate to the “Home” tab at the top of the PowerPoint window.
Step 2: Open the Selection Pane:
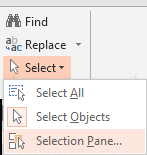
- In the “Editing” group, click on the “Select” button (or arrow) to reveal the drop-down menu.
- From the drop-down menu, select “Selection Pane” to open the Selection Pane window.
Step 3: View and Navigate the Selection Pane:
- The Selection Pane window will appear on the right side of the PowerPoint interface.
- The pane will display a list of all the objects on the current slide.
- To navigate through the objects, scroll through the list or use the arrow keys.
Step 4: Reorder Objects:
- To change the stacking order of objects, click and drag an object’s name up or down in the Selection Pane.
- Objects higher in the list will appear in front of objects lower in the list.
Step 5: Show or Hide Objects:
- To hide an object, click on the eye icon next to its name in the Selection Pane.
- To show a hidden object, click on the empty space where the eye icon was.
Step 6: Rename Objects:
- Double-click on the name of an object in the Selection Pane to activate the editing mode.
- Type a new name for the object and press “Enter” to confirm.
Step 7: Select and Edit Objects:
- Click on an object’s name in the Selection Pane to select it.
- Once selected, you can edit the object’s properties, move, resize, or delete it.
Step 8: Close the Selection Pane:
- To close the Selection Pane, click on the “X” button in the top-right corner of the Pane.
Get the best deal on Microsoft Office exclusively on our website and unleash the full potential of this productivity suite.