
Office Blog
How can I use the Mailbox Cleanup Feature to Manage Mailbox Size in Outlook?

As time goes by, your Outlook mailbox can accumulate a significant amount of clutter, leading to storage limitations and slow performance. To effectively manage your mailbox size and maintain optimal performance, Microsoft Outlook provides the Mailbox Cleanup feature. In this step-by-step guide, we will walk you through the process of using the Mailbox Cleanup feature in Outlook.
Step 1: Open Microsoft Outlook and Access the Mailbox Cleanup Feature
Launch Microsoft Outlook on your computer and navigate to the File tab located at the top left corner of the window. Click on it to access the drop-down menu, then select “Options.”
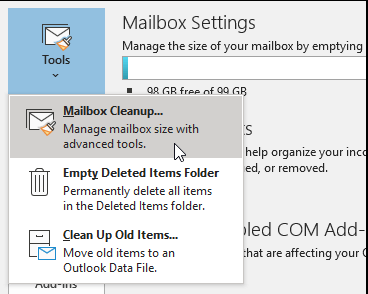
Step 2: Find and Open the Mailbox Cleanup Tool
Within the Options window, locate the “Advanced” tab on the left-hand side. Click on it, and then choose the “Mailbox Cleanup” button. This will open the Mailbox Cleanup tool.
Step 3: View Mailbox Size and Storage Information
In the Mailbox Cleanup tool, you will see an overview of your mailbox size and storage usage. This includes the size of your mailbox, the number of items, and the storage amount used.
Step 4: Clean Up Deleted Items
To free up some space, click on the “View Deleted Items Size” button. This will display a list of emails and items that have been deleted but are still taking up storage space. You can review the list and select items to permanently delete by clicking on the “Empty” button.
Step 5: Manage the Size of Other Folders
Click on the “View Mailbox Size” button in the Mailbox Cleanup tool. This will show a breakdown of the size of each folder within your mailbox. To reduce the size of a specific folder, click on it and select “Find items.” From there, you can delete or move unnecessary emails or items.
Step 6: Archive Old Items
If you have emails or items you want to keep but don’t need immediate access to, archiving is a useful option. To archive, go back to the main Mailbox Cleanup tool and click on the “Archive” button. Choose the folder you want to archive, select the date range, and click “OK” to initiate the archiving process.
Step 7: Use AutoArchive to Manage Emails Automatically
For ongoing mailbox management, consider enabling the AutoArchive feature. To do this, exit the Mailbox Cleanup tool and navigate back to the Options menu. Click on “Advanced,” then “AutoArchive Settings.” Configure the settings according to your preferences, such as the frequency and specific folders to archive.
By following these steps and utilizing the Mailbox Cleanup feature in Outlook, you can efficiently manage your mailbox size, keep your emails organized, and maintain optimal performance.
Get access to exclusive deals on Microsoft Office with the best price available on our website, enabling you to tap into the full power of this productivity suite.