
Office Blog
How can I Troubleshoot and fix Synchronization Issues in Outlook?

Microsoft Outlook is a popular email client that allows you to stay connected and organized. However, synchronization issues can sometimes arise, causing inconvenience and frustration. In this step-by-step guide, we will explore how you can troubleshoot and fix synchronization issues in Outlook.
Step 1: Check your Internet Connection
Before diving into troubleshooting, ensure that you have a stable internet connection. Verify that you can access other websites or online services to rule out any potential network issues.
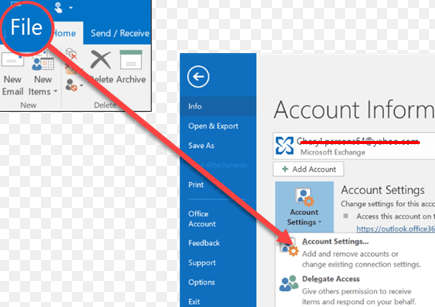
Step 2: Update Outlook
Outdated versions of Outlook can sometimes cause synchronization problems. To check for updates, open Outlook and click on the “File” tab. From there, select “Office Account” and then click on “Update Options” followed by “Update Now.“
Step 3: Restart Outlook and your Device
Sometimes a simple restart can resolve synchronization issues. Close Outlook completely and restart it. Additionally, consider restarting your device to further ensure a fresh start.
Step 4: Check Sync Settings
In Outlook, go to the “File” tab, then select “Options” and choose “Advanced.” Under the “Send and Receive” section, click on “Send/Receive.” Ensure that the “Include this group in Send/Receive” option is checked and that the necessary email accounts are selected.
Step 5: Repair Outlook Data Files
Outlook data files are susceptible to corruption, which can impact synchronization. To repair them, open the Control Panel on your computer and navigate to “Programs and Features.” Locate Microsoft Office in the list, right-click on it, and select “Change.” Choose the repair option and follow the on-screen instructions.
Step 6: Disable Add-ins
Third-party add-ins can sometimes interfere with Outlook’s synchronization process. To disable add-ins, open Outlook and go to the “File” tab. Select “Options” and then choose “Add-ins.” From there, click on “Go” beside the “Manage: COM Add-ins” option. Uncheck any add-ins that are enabled and click “OK.”
Step 7: Create a New Outlook Profile
If the above steps fail to resolve the synchronization issue, you can create a new Outlook profile. To do this, open the Control Panel, navigate to “Mail,” and click on “Show Profiles.” Click on “Add,” provide a name for the new profile, and follow the prompts to set it up. Once created, select the new profile as the default.
Step 8: Contact Microsoft Support
If none of the previous steps resolve the synchronization issue, it may be necessary to seek assistance from Microsoft Support. They can provide further guidance and troubleshoot the problem in more detail.
Get the best deal on Microsoft Office exclusively on our website and unlock its full potential to boost your productivity to new heights.