
Office Blog
Word’s Mail Merge: From Simple Letters to Complex Documents

Word’s Mail Merge feature is a versatile tool that streamlines the process of creating personalized documents with ease. By following our step-by-step guide in this blog post, you can harness the full potential of Mail Merge to produce customized letters and complex documents tailored to your specific needs. Whether you are sending out personalized invitations, generating individualized form letters, or creating custom marketing materials, Mail Merge offers a seamless solution for optimizing your document creation process.
The key advantage of using Word’s Mail Merge feature is its ability to merge information from a data source, such as a spreadsheet or database, into a template document. This allows you to create multiple copies of a document with personalized content, such as recipient names, addresses, and other details. By automating the customization process, Mail Merge not only saves you time and effort but also ensures accuracy and consistency across all your documents.
With our detailed instructions and practical tips, you will learn how to effectively navigate Word’s Mail Merge feature to create professional and polished documents efficiently. From setting up your data source to merging fields and previewing the final results, our blog post will walk you through each step of the process, empowering you to leverage the full capabilities of Mail Merge in your document production workflow.
Step 1: Prepare your Data Source
- Open Microsoft Word and create a new document.
- Click on the “Mailings” tab in the ribbon.
- Select “Select Recipients” and choose the type of data source you want to use, such as an Excel spreadsheet or an Outlook Contacts list.
- Browse and locate your data source file.
- Map the data fields in your data source to the corresponding placeholders in your Word document.
Step 2: Customize the Main Document
- Design your document template with the desired formatting, layout, and placeholders for variable data.
- Insert fields from your data source into the document by clicking on “Insert Merge Field” in the “Write & Insert Fields” section of the ribbon.
Example: To insert the recipient’s name, use the command<<Name>>. - Arrange and format the content as needed using Word’s formatting options.
Step 3: Preview and Edit Individual Records
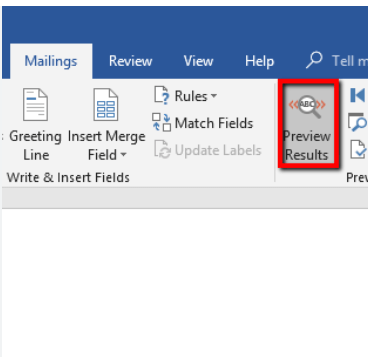
- Click on “Preview Results” in the “Preview Results” section of the ribbon.
- Use the navigation arrows to browse through each record for a preview of how the merged document will look.
- Make any necessary edits or corrections to individual records by clicking on “Edit Recipient List” and selecting the desired record to modify.
Step 4: Filter and Sort Data (Optional)
- If you want to filter or sort your data before merging, click on “Filter Recipients” in the “Start Mail Merge” section of the ribbon.
- Define the criteria or choose a specific range to filter or sort the records as per your requirements.
Step 5: Complete the Mail Merge
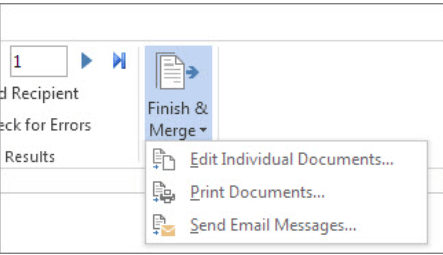
- Once you are satisfied with the preview, click on “Finish & Merge” in the “Finish” section of the ribbon.
- Choose the desired output, such as printing the merged documents, creating individual files, or sending the documents via email.
- Follow the prompts and specify the relevant options for the selected output type.
Step 6: Review the Merged Documents
- Review the merged documents to ensure that the variable data has been populated correctly.
- Make any necessary adjustments or corrections to the merged documents if required.
Conclusion:
Word’s Mail Merge feature empowers users to create personalized letters and complex documents efficiently. By following the step-by-step instructions above, you can seamlessly combine your data source with a customizable document template to generate tailor-made outputs. Unlock the potential of Mail Merge, and effortlessly produce professional and personalized documents in Word.
Remember, practice and experimentation are essential for mastering and harnessing the full capabilities of Word’s Mail Merge feature!
Streamlining your database management tasks has never been easier! Check out our website for affordable cheap Office 2016 keys, Office 2019 keys, and cheapest Office 2021 keys.