
Office Blog
What is the Purpose of the Query Design Feature in Access?

Microsoft Access stands as a versatile database management tool, equipped with a plethora of features designed to streamline data organization and manipulation tasks. Among these features, the Query Design tool stands out as a crucial component, offering users the ability to create, modify, and execute custom queries to extract precise information from their databases. This feature empowers users to perform complex data retrieval operations, filter records, calculate aggregate values, and perform various data manipulation tasks with ease.
The primary purpose of the Query Design feature in Access is to provide users with a flexible and intuitive interface for constructing queries tailored to their specific data requirements. Whether you’re searching for specific records, summarizing data, or performing data analysis tasks, Query Design enables you to define the criteria and parameters for extracting relevant information from your database tables. By leveraging this feature, users can retrieve data that meets specific conditions, enabling them to gain valuable insights and make informed decisions based on their data analysis.
In this article, we’ll delve into the functionality of the Query Design feature in Access and provide practical guidance on its utilization to enhance efficiency and productivity in data management tasks. We’ll explore the various components of Query Design, including the Query Design grid, criteria rows, and query properties, and demonstrate how to create and execute different types of queries, such as select queries, parameter queries, and action queries. By mastering the Query Design feature, users can unlock the full potential of their Access databases, enabling them to extract valuable insights and optimize their data management processes effectively.
Step 1: Understanding Queries
Before we dive into the Query Design feature, let’s take a moment to understand what queries are. Queries are a way of extracting specific information from your database based on certain criteria or conditions. This can be incredibly useful when you need to find specific data quickly, such as all contacts in a certain age range or all orders from a particular month.
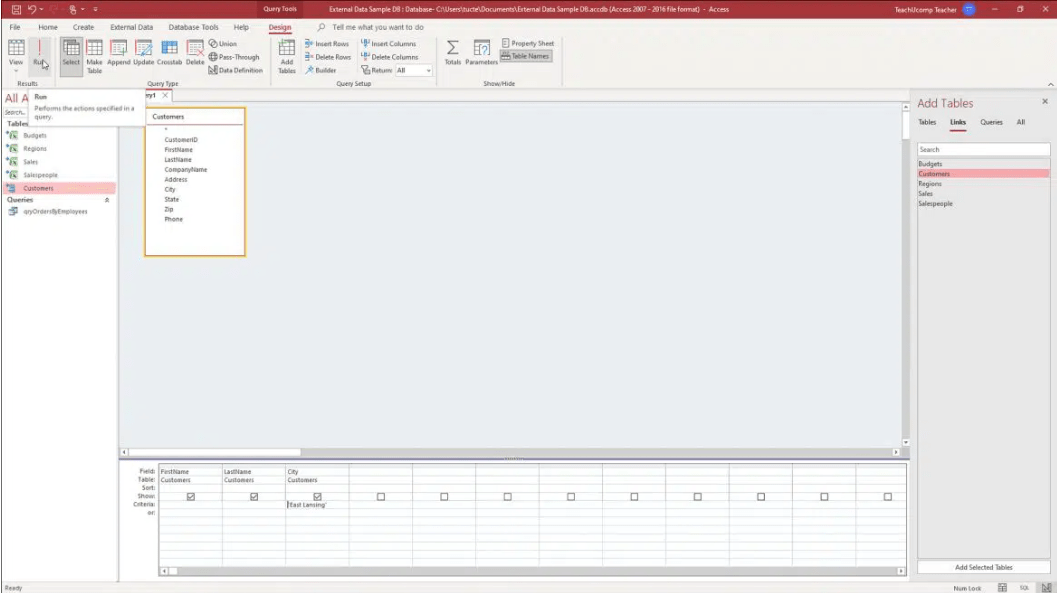
Step 2: Opening Query Design
To start using the Query Design feature in Access, first, open your database. Then, click on the “Create” tab in the ribbon at the top of the screen and select “Query Design“. This will open up the Query Design interface, which allows you to create and modify queries visually.

Step 3: Adding Tables
The first step in creating a query is to add the tables that contain the data you want to work with. To do this, click on the “Show Table” button in the “Tables” section of the ribbon. This will open up the “Show Table” dialog box, where you can select the tables you want to include in your query.
Step 4: Adding Fields
Once you have added your tables, you can start adding fields to your query. To do this, simply click and drag the fields you want to work with from the “Field List” onto the “Query Design” pane. You can also double-click on fields in the “Field List” to add them to your query.
Step 5: Configuring Criteria and Sorting
With your tables and fields added, you can start configuring your query criteria and sorting options. This is where the power of the Query Design feature really comes into play, as it allows you to specify detailed criteria for extracting specific data from your tables.
To configure criteria, simply click on the “Criteria” row for the field you want to filter and enter your criteria. For example, you might enter “>50” to filter for records where the value in a certain field is greater than 50.
To configure sorting, click on the “Sort” row for the field you want to sort by and select either “Ascending” or “Descending” from the dropdown.
Step 6: Running the Query
Once you have configured your query to your liking, you can run it to extract the desired information from your database. To do this, click on the “Run” button in the “Results” section of the ribbon. This will display the results of your query in a new table.
Step 7: Saving and Reusing Queries
Finally, it’s worth noting that Query Design allows you to save your queries for later use. Simply click on the “Save” button in the “Query” tab of the ribbon and give your query a name. You can then reopen and modify your query as needed, or simply rerun it to extract updated results.
By following these steps, you can start using Query Design to work more efficiently with your data and take your database management to the next level.
Find the ideal Microsoft Office CD keys for your database management needs on our website. Choose from the cheapest Office 2016, Office 2019, and Office 2021 to suit your specific requirements.