
Office Blog
Outlook’s Advanced Features for Email Productivity
Outlook is a powerful email client that provides users with a wide range of advanced features. These features are designed to help users stay organized, save time, and increase productivity. In this step-by-step guide, we will delve into some of Outlook’s top features and provide detailed instructions on how to leverage them effectively.
By following these instructions, you will be able to streamline your email management process and enhance your overall productivity. Get ready to unlock the full potential of Outlook and take your email productivity to new heights.
Step 1: Create Folders and Categories
- Open Outlook and select your email account.
- Right-click on your Inbox and choose “New Folder.”
- Name the folder according to your desired category or topic.
- Drag and drop emails into the appropriate folder for better organization.
- Right-click on an email, select “Categorize,” and assign a color-coded category.
Step 2: Set Up Rules for Email Management
- Click on the “File” tab and select “Manage Rules & Alerts.”
- In the Rules and Alerts window, click on “New Rule.”
- Choose the desired conditions and actions for your rule (e.g., move emails from a specific sender to a designated folder).
- Review and customize the rule settings, and click “Finish” to activate the rule.
Step 3: Utilize Quick Steps for Automation
- Look for the Quick Steps section on the Outlook ribbon.
- Click on “Create New” to define a new Quick Step.
- Choose an action (e.g., move emails, forward messages, or flag important emails).
- Customize the settings based on your preferences and save the Quick Step.
Step 4: Utilize Search Folders
- In Outlook, go to the “Folder” tab and click on “New Search Folder.”
- Select a folder template that matches your search criteria (e.g., unread emails, flagged emails, or emails from specific people).
- Customize the search folder settings and click “OK” to create the search folder.
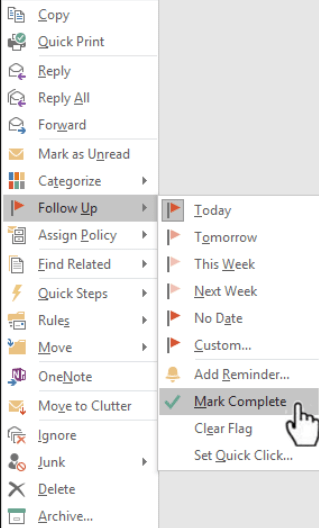
Step 5: Use Flags and Reminders
- Open an email or select it in your Inbox.
- Click on the flag icon in the toolbar to mark it with a flag.
- Right-click on the flagged email and set a reminder for follow-up.
- Outlook will remind you to take action on the flagged email at the designated time.
Step 6: Schedule Emails
- Compose a new email or reply to an existing one.
- In the email message window, go to the “Options” tab and click on “Delay Delivery.”
- Set the desired date and time for the email to be sent.
- Click “Close” to save the delay delivery option.
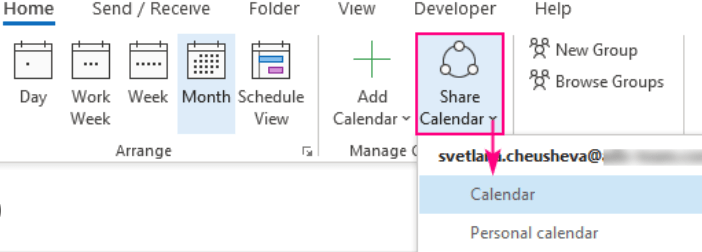
Step 7: Collaborate with Calendar Sharing
- Go to the Calendar section in Outlook.
- Right-click on your calendar and select “Share” and then “Calendar Permissions.”
- Choose the person you want to share your calendar with and set their permissions.
- Click “Send” to share your calendar and collaborate with others.
Step 8: Use Ignore and Clutter Features
- If you receive unwanted or low-priority emails, select one and click on the “Ignore” button in the toolbar to remove future emails from the sender.
- Utilize the “Clutter” feature to automatically filter low-priority emails.
- Right-click on an email and select “Move to Clutter” or “Move to Inbox” to train Outlook’s Clutter feature.
Conclusion:
Outlook’s advanced features provide users with a wealth of options to enhance email productivity. By following these step-by-step instructions and utilizing specific commands, you can effectively manage your emails, automate tasks, collaborate efficiently, and increase overall productivity. Unlock the full potential of Outlook’s advanced features to optimize your email management and streamline your workflow in no time.
Streamline your database management with the perfect Microsoft Office license from our website. Explore our offerings, such as Office 2016 Pro Plus keys, Office 2019 Pro Plus keys, and Office Pro Plus 2021 keys, and find the ideal solution for your database needs.