
Office Blog
Organizing Your Email: Outlook Folders and Categories
Managing and organizing your emails can often be a daunting task, but with the help of Outlook’s folders and categories, it becomes effortless and efficient. In this comprehensive step-by-step guide, we will take you on a journey of mastering the art of email management using Outlook’s powerful features. From setting up your email account to creating folders and categories, we will provide you with the knowledge and skills to streamline your email workflow. Learn how to create custom folders to categorize and prioritize your emails based on specific criteria, such as clients, projects, or urgency. Discover how to assign categories to your emails, giving you the ability to visually identify and sort them with ease. We will also explore advanced techniques such as creating rules and filters to automate email organization, flagging important emails for follow-up, and utilizing Outlook’s search functions to quickly locate specific emails. By the end of this guide, you will feel empowered and in control of your email inbox, saving valuable time and enhancing your productivity. So, let’s dive in and unlock the full potential of Outlook’s organizing features to make your email management effortless and effective.
Step 1: Create Folders:
- Open Outlook and click on the “Folder” tab in the top menu.
- Select “New Folder” and give it a descriptive name.
- Use the “Move” or “Copy” command to move emails into the newly created folder for better organization.
Step 2: Subfolders and Hierarchy:
- To create subfolders, right-click on an existing folder and select “New Folder”.
- Name the subfolder and drag it under the desired parent folder.
- Use hierarchy to create a clear structure for your email organization.
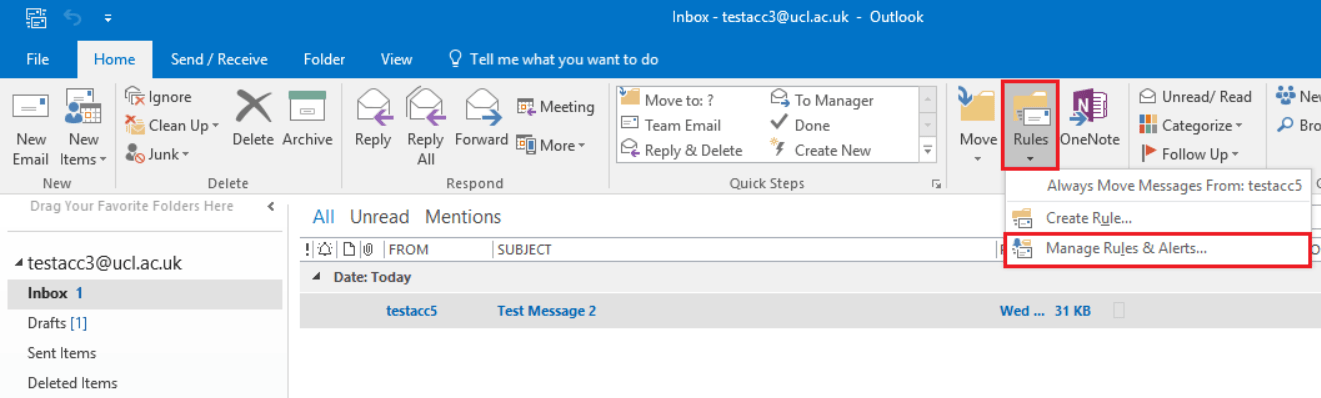
Step 3: Sorting Emails Automatically:
- Go to the “Rules” tab and click on “Manage Rules & Alerts”.
- Click on “New Rule” and select the desired condition for sorting emails automatically.
- Choose the folder to which the emails should be moved or organized.
Step 4: Categorizing Emails:
- Select an email and click on the “Categorize” button in the top menu.
- Choose a color category from the drop-down list, or create a new one.
- Assign categories to relevant emails for quick identification and sorting.
Step 5: Filtering and Searching:
- Use the search bar at the top of Outlook to find specific emails or keywords.
- Apply filters to narrow down search results by sender, subject, date, or other criteria.
- Save frequently used filters for future use.
Step 6: Archive Old Emails:
- Select emails that you no longer need in your main inbox.
- Click on the “Move” command in the top menu and choose “Archive”.
- Create a separate archive folder, if necessary, for storing old emails.
Conclusion:
With Outlook’s folders and categories, organizing your email has never been easier. By creating folders, sorting emails automatically, categorizing them, applying filters, and archiving old emails, you can efficiently manage your inbox and find important messages with ease. Start implementing these steps today and enjoy a clutter-free and organized email experience.
Visit our website and explore the diverse range of Microsoft Office licenses available to meet your database management needs. With choices like cheap Office 2016 keys, Office 2019 keys, and cheapest Office 2021 keys, finding the right fit is effortless.