
Office Blog
What Features does Microsoft Outlook offer for email Organization and Management?
Managing a large volume of emails efficiently is crucial for productivity and organization. Microsoft Outlook, a powerful email client, provides a range of features designed to simplify email organization and management. In this step-by-step guide, we will explore the various tools and functions that Outlook offers to help you stay organized and maintain control over your inbox. From creating folders and applying rules to categorizing emails and using filters, Outlook provides a comprehensive suite of options to streamline your email workflow. Let’s dive in and discover the helpful features that Outlook offers for effective email organization and management.
Step 1: Creating Folders
- Launch Microsoft Outlook and open your email account.
- Click on the “Folders” tab in the navigation pane.
- Right-click on the desired location in the folder list (e.g., Inbox) and select “New Folder.”
- Enter a name for the folder and press Enter to create it.
Step 2: Organizing Emails
- Select an email or multiple emails that you want to move to a folder.
- Right-click on the email(s) and choose “Move” or use the “Move” option from the ribbon.
- Select the desired folder to move the email(s) to.
Step 3: Applying Rules
- Click on the “File” tab in the Outlook ribbon and select “Rules and Alerts.”
- Click on “New Rule” to create a new rule.
- Choose the conditions and actions for your rule.
- Give the rule a name and click “Finish.”
- Outlook will automatically organize incoming emails based on the rule you created.
Step 4: Categorizing Emails
- Select an email or multiple emails that you want to categorize.
- Right-click on the email(s) and select “Categorize.”
- Choose from the available color categories or create a new one.
- The emails will be color-coded based on the category selected.
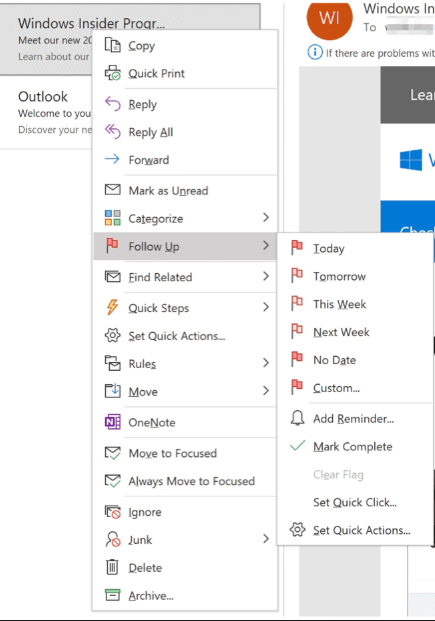
Step 5: Flagging Emails
- Select an email or multiple emails that you want to flag.
- Right-click on the email(s) and choose “Follow Up” or use the “Follow Up” option from the ribbon.
- Select the desired flag option (e.g., Today, Tomorrow, This Week) or set a custom date.
- The flagged emails can be easily found and managed using the “Follow Up” folder.
Step 6: Using Filters and Search
- Click on the “Search” tab in the Outlook ribbon.
- Enter keywords or specific criteria in the search bar to filter emails.
- Apply additional filters such as sender, date, attachments, etc., using the search tools.
- Outlook will display the search results based on the specified filters.
Step 7: Archive and AutoArchive
- Click on the “File” tab in the Outlook ribbon and select “Options.”
- Navigate to the “Advanced” section.
- Under the “AutoArchive” settings, choose the frequency and location for archiving emails.
- Enable AutoArchive to automatically move older emails to the designated archive folder.
By utilizing these features, Microsoft Outlook offers efficient email organization and management capabilities, ensuring a streamlined and clutter-free communication experience.
Discover the lowest prices on Microsoft Office at our website, offering unbeatable value for acquiring the essential suite of productivity tools for personal or professional use.