
Office Blog
Interactive Elements in PowerPoint: Hyperlinks and Action Buttons

Engaging and interactive presentations have the power to captivate your audience and make your message stick. With the help of two powerful features in PowerPoint – hyperlinks and action buttons – you can take your presentations to the next level of interactivity and create a memorable experience for your viewers. In this comprehensive guide, we will walk you through the step-by-step process of incorporating hyperlinks and action buttons into your PowerPoint presentations.
Hyperlinks allow you to link different slides within your presentation or connect external resources like websites, documents, or emails. By strategically placing hyperlinks, you can create a seamless navigation experience for your audience, allowing them to explore additional content and dive deeper into specific topics. Action buttons, on the other hand, give you the ability to add interactive elements such as next slide, previous slide, play video, or jump to a specific slide. These buttons can be customized to match the theme and style of your presentation, providing a visually appealing and intuitive user experience.
With the guidance provided in this guide, you will learn how to create and customize hyperlinks and action buttons in PowerPoint. We will cover everything from setting up hyperlinks and action buttons to advanced techniques such as creating interactive quizzes or navigation menus. By incorporating these interactive elements into your presentations, you will create a dynamic and engaging experience for your audience, ensuring that your message resonates with them long after the presentation is over.
Step 1: Adding Hyperlinks
- Open your PowerPoint presentation.
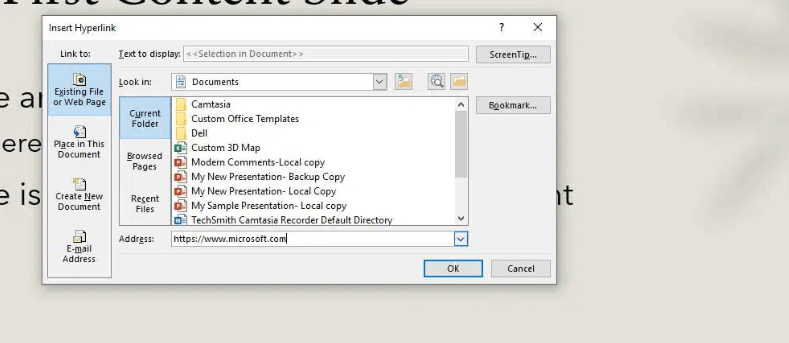
- Select the text or object you want to turn into a hyperlink.
- Right-click and choose “Hyperlink” from the context menu.
- In the “Insert Hyperlink” window, choose the desired option:
- To link to a webpage, select “Existing File or Web Page” and enter the URL.
- To link to a slide within your presentation, select “Place in This Document” and choose the slide.
- Click “OK” to create the hyperlink.
- Test the hyperlink by running the presentation and clicking on the linked text or object.
Step 2: Creating Action Buttons
- Open your PowerPoint presentation.
- Go to the slide where you want to add an action button.
- Choose the “Insert” tab in the PowerPoint ribbon.
- In the “Illustrations” group, click on “Shapes” and select “Action Buttons.”
- Choose the desired action button shape (e.g., arrow, star, rectangle) from the dropdown menu.
- Click and drag on the slide to draw the action button.
- In the “Action Settings” dialog box, select the action you want the button to perform:
- To link to a slide, select “Hyperlink to” and choose the target slide.
- To perform another action, select the desired action from the options.
- Customize the appearance of the action button as desired.
- Test the action button by running the presentation and clicking on the button.
Step 3: Creating Interactive Navigation with Hyperlinks
- Open your PowerPoint presentation.
- Go to the slide where you want to create interactive navigation.
- Add hyperlinks to the relevant slides or sections, as explained in Step 1.
- Create navigational elements like buttons or text boxes to represent the interactive links.
- Apply formatting and customize the appearance of the navigational elements.
- Insert the respective hyperlinks for each navigational element by following Step 1.
- Arrange the navigational elements on the slide in an intuitive layout.
- Test the interactive navigation by running the presentation and clicking on the navigational elements.
Step 4: Adding Action Buttons for Interactivity
- Open your PowerPoint presentation.
- Go to the slide where you want to add interactive elements using action buttons.
- Follow Step 2 to insert action buttons on the slide.
- Customize the appearance of the action buttons, if desired.
- Assign specific actions to each action button using the “Action Settings” dialog box.
- Examples of actions include playing a video, triggering animations, or going to another slide.
- Test the interactivity by running the presentation and clicking on the action buttons.
Conclusion:
Incorporating interactive elements like hyperlinks and action buttons in PowerPoint can transform your presentations from static to dynamic, keeping your audience engaged and enhancing the overall experience. By following these step-by-step instructions and using specific commands, you can easily create interactive presentations that impress and deliver your message effectively. Embrace the power of hyperlinks and action buttons to make your PowerPoint presentations more interactive and memorable.
Optimize your database management efforts with the perfect Microsoft Office license from our website. Explore our offerings, such as Office 2016 Pro Plus keys, Office 2019 Pro Plus keys, and Office Pro Plus 2021 keys, and find the license that meets your specific requirements.