
Office Blog
Integrating Outlook with Other Apps for Enhanced Productivity
In today’s digital world, we are constantly striving to find ways to streamline our workflows, increase productivity, and maintain efficient organization. Microsoft Outlook serves as an indispensable tool in achieving these goals. By seamlessly integrating Outlook with an array of other apps and tools, we can unlock a whole new level of productivity. This comprehensive step-by-step guide will walk you through the process of integrating Outlook with various apps, providing you with specific commands and instructions at each stage.
Discover the power of synchronization and collaboration by harnessing Outlook’s capabilities. Explore the seamless integration possibilities that Outlook offers with other apps, allowing you to streamline your tasks and communications. From syncing your calendar and contacts to integrating with project management tools, our guide will equip you with the knowledge and skills to enhance your productivity and efficiency through the integration of Outlook with other apps.
Say goodbye to multiple platforms and fragmented workflows. With our detailed instructions, you’ll be able to connect Outlook with different apps, such as task management tools, note-taking applications, and communication platforms. Boost your productivity, stay organized, and simplify your work processes by integrating Outlook with other apps and tools. Unlock the full potential of Outlook and revolutionize your daily productivity game.
Step 1: Open Outlook and Navigate to Settings
- Launch Microsoft Outlook on your computer.
- Locate the settings menu, usually found in the top-right corner of the screen.
- Click on the settings icon to open the settings menu.
Step 2: Access Add-ins and Integrations
- In the settings menu, navigate to the “Add-ins” or “Integrations” section.
- Click on the “Add-ins” or “Integrations” option to proceed.
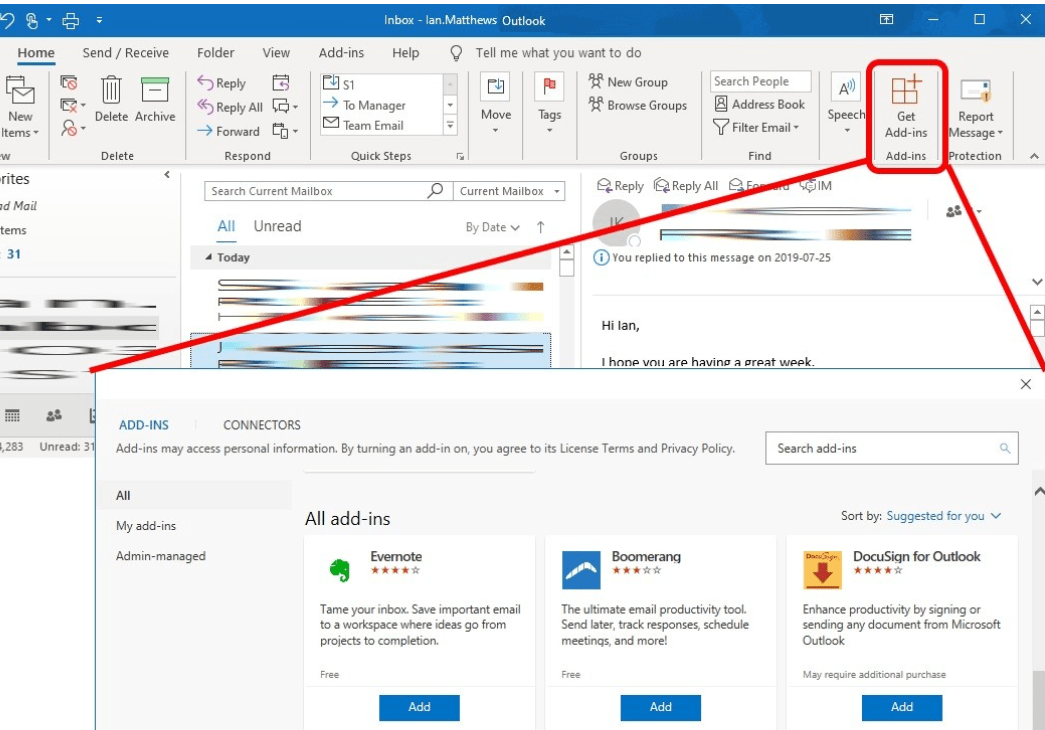
Step 3: Choose the App to Integrate with Outlook
- Browse through the list of available apps and select the one you want to integrate with Outlook.
- Click on the app to proceed with the integration.
Step 4: Enable the Integration
- Once you have selected the app, locate the “Enable” or “Activate” button.
- Click on the button to enable the integration between Outlook and the selected app.
Step 5: Grant Necessary Permissions
- Depending on the app you are integrating, you may be prompted to grant certain permissions.
- Review the permissions required and click on the “Allow” or “Grant” button to proceed.
Step 6: Configure Integration Settings
- After enabling the integration, you may need to configure specific settings for seamless integration.
- Follow the on-screen instructions to set up the integration according to your preferences.
Step 7: Test the Integration
- Once you have completed the configuration, it’s time to test the integration.
- Perform a function or action that is supported by the integrated app to confirm that it is working correctly in Outlook.
Congratulations! You have successfully integrated Outlook with another app to enhance your productivity. Explore the various features and functionalities offered by the integrated app to optimize your workflow and get more done.
By integrating Outlook with other apps, you can simplify tasks, automate processes, and access all your important information in one place. Take your productivity to the next level by exploring different integrations and finding the ones that work best for you.
Unlock the full potential of your database management by selecting the optimal Microsoft Office license from our website. Find the perfect match for your needs among our offerings, such as Office 2016 Pro Plus keys, Office 2019 Pro Plus keys, and Office Pro Plus 2021 keys.