
Office Blog
How to Insert a Text Box with Rounded Corners in Microsoft Word?

Text boxes in Microsoft Word are a great way to add emphasis to important captions, quotes, or other blocks of text in your document. If you want to add a more modern and attractive element to your text box, you can make it have rounded corners. In this detailed step-by-step tutorial, we will guide you on how to add a text box with rounded corners in Microsoft Word.
Step 1: Open Microsoft Word
- Launch Microsoft Word on your computer.
Step 2: Open a Document or Create a New One
- Open an existing Word document or create a new one by clicking on the “File” tab and selecting “New Document.”
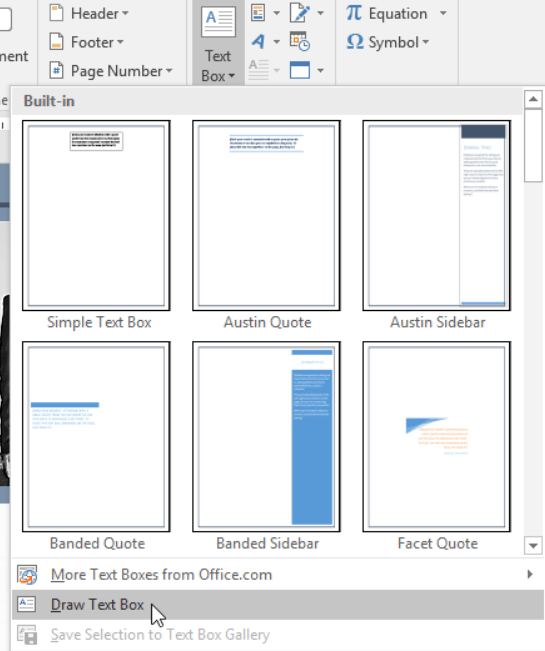
Step 3: Access the “Insert” Tab
- Click on the “Insert” tab located in the Word ribbon at the top of the screen.
Step 4: Choose “Text Box” Option
- In the “Text” group, click on the “Text Box” button.
- From the drop-down menu that appears, choose “Draw Text Box.”
Step 5: Draw a Text Box
- Use your mouse or touchpad to draw the text box on your document.
- Make sure the text box is the desired size and position.
Step 6: Customize the Shape
- Right-click on the text box and select “Format Shape” from the menu.
- In the “Format Shape” dialog box, choose the “Shape Options” tab.
- Under the “Effects” section, select “Round Corners.”
- Use the “Radius” slider to adjust the amount of roundness you want for the corners of your text box.
Step 7: Customize the Line Style (optional)
- In the “Format Shape” dialog box, choose the “Line Style” tab.
- Here you can choose the color, weight, and style of the border line of your text box.
- If you don’t want a border line, select “No Line.”
Step 8: Customize the Fill Color (optional)
- In the “Format Shape” dialog box, choose the “Fill” tab.
- Here you can choose the color or pattern you want to use to fill the background of your text box.
- If you don’t want any fill, select “No Fill.”
Step 9: Edit the Text
- Double-click on the text box to activate the cursor inside it.
- Type or paste the text you want to display inside the text box.
- Format the text as desired using the formatting options in the Word ribbon.
Step 10: Save and Use the Document
- Save your document to preserve the text box and its formatting.
- Share the document with others, allowing them to see the modern and attractive text box with rounded corners that you have created.
Conclusion:
By following these step-by-step instructions, you can easily add a text box with rounded corners in Microsoft Word. This feature allows you to emphasize important text in your documents while giving it a modern and attractive appearance. Take advantage of this simple yet powerful tool to enhance and improve the impact of your Word documents.
Upgrade your workflow to unparalleled levels by acquiring Microsoft Office at unparalleled prices only on our website today, and revolutionize your efficiency and output like never before.