
Office Blog
How to Insert a Row in a Table in Word?

Incorporating a new row into a table within your Microsoft Word document serves as a fundamental tool for organizing and updating data effectively. Whether you’re managing information for a report, compiling statistics for analysis, or creating a structured document, the ability to insert rows seamlessly is essential for maintaining clarity and coherence. In this comprehensive tutorial, we will meticulously guide you through the process of inserting a new row using specific commands in Microsoft Word, empowering you to manage your data with precision and efficiency.
Microsoft Word provides intuitive commands and features that streamline the task of inserting rows into tables, enabling users to manipulate data with ease. By following the step-by-step instructions outlined in this guide, you’ll gain a comprehensive understanding of the process, from selecting the appropriate location within the table to executing the insertion command effectively. Whether you’re a seasoned Word user or a novice seeking to enhance your document editing skills, mastering the art of inserting rows empowers you to maintain control over your data presentation and facilitate seamless updates as needed.
Furthermore, the ability to insert rows into tables dynamically enhances the versatility and functionality of your documents, allowing you to adapt to evolving data requirements and refine your document structure as necessary. Whether you’re collaborating on a project, conducting research, or preparing a presentation, the proficiency in inserting rows in Microsoft Word equips you with the tools to organize and update data efficiently, thereby enhancing the overall quality and effectiveness of your document creation process.
Step 1: Open Microsoft Word and create a new document or open an existing one.
- Launch Microsoft Word on your computer.
- Create a new document or open an existing document that contains the table you want to modify.
Step 2: Navigate to the table.
- Locate the table within your document.
- Place your cursor within the table to activate the necessary commands for table editing.
Step 3: Select the row above which you want to insert a new row.
- Click on the row number located on the left side of the table to select the entire row.
- Alternatively, place your cursor anywhere within the row and right-click to access the context menu. From the menu, choose “Select > Row.”
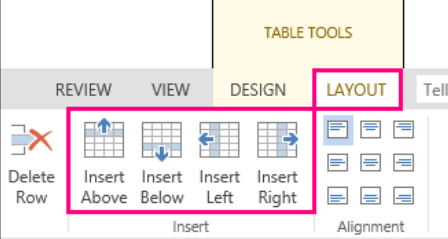
Step 4: Access the table tools.
- When the row is selected, the “Layout” tab will appear in the ribbon at the top of the screen.
- Click on the “Layout” tab to access the table tools.
Step 5: Insert a new row.
- In the “Rows & Columns” group, click on the “Insert Above” button.
- Another option is to right-click on the selected row and choose “Insert > Insert Rows Above” from the context menu.
- A new row will be inserted above the selected row, pushing the existing rows down.
Step 6: Populate the new row with data.
- With the new row inserted, you can start entering data into the cells.
- Click within a cell and type the desired content, or copy and paste from another source.
Step 7: Repeat as needed.
- If you need to insert multiple rows, repeat steps 3 to 6 accordingly.
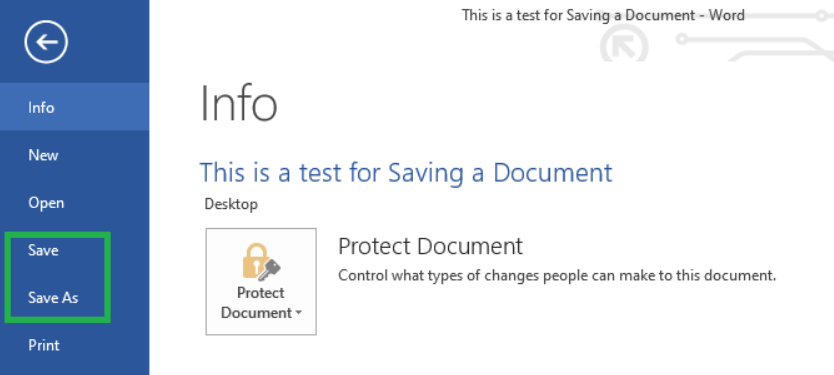
Step 8: Save your document.
- Click on “File” and select “Save” to save your document with the inserted row(s) in the table.
- Choose a location on your computer and provide a name for the file.
- Click on “Save” to save the document.
Conclusion:
Inserting a row in a table in Microsoft Word helps you maintain data organization and improve document readability. By following our step-by-step guide and using the specific commands provided, you can effortlessly insert new rows into your Word table. Take advantage of this feature to efficiently update and modify tables, enhancing the overall structure and appearance of your documents.
Get your work done efficiently and effectively with cheap Microsoft Office licenses available on our website. Access all the essential tools for creating documents, spreadsheets, and presentations with ease. Shop now and elevate your productivity to the next level!