
Office Blog
How to Insert a Copyright Symbol in Microsoft Word?

Incorporating a copyright symbol into your Microsoft Word documents is a simple yet effective way to assert ownership and protect your intellectual property. This symbol serves as a clear indication that the content within the document is protected by copyright law, thereby deterring unauthorized use or reproduction. In this comprehensive tutorial, we’ll guide you through the step-by-step process of inserting a copyright symbol using specific commands in Microsoft Word.
To begin, open your Word document and position your cursor at the location where you want to insert the copyright symbol. Typically, this would be at the bottom of the document or next to the title or author name. Once you’ve selected the appropriate spot, navigate to the “Insert” tab in the Word ribbon.
Next, click on the “Symbol” option within the “Symbols” group. From the dropdown menu that appears, select “More Symbols.” In the Symbol dialog box, choose the “Special Characters” tab and locate the copyright symbol (©). Click on it to select it, then click “Insert” followed by “Close.” The copyright symbol will now be inserted at the desired location in your Word document. By following these simple steps, you can easily insert a copyright symbol to assert ownership and protect your work in Microsoft Word documents.
Step 1: Open Microsoft Word and open your document.
- Launch Microsoft Word on your computer.
- Open the document you want to add the copyright symbol to by clicking on “File” in the top-left corner and selecting “Open.”
Step 2: Place the cursor where you want the copyright symbol to appear.
- Scroll to the specific location in your document where you want to insert the copyright symbol.
- Click to place the cursor at that position.
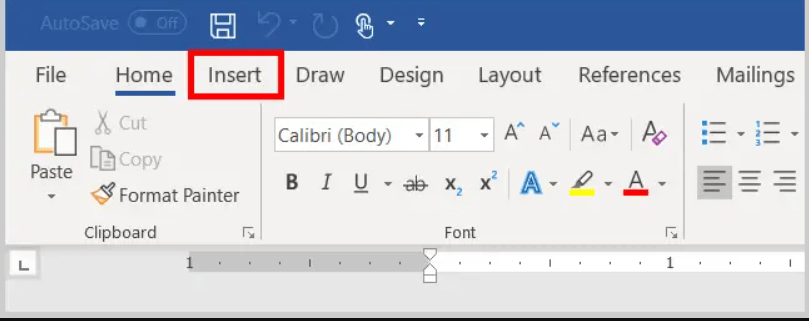
Step 3: Navigate to the “Insert” tab.
- Locate the “Insert” tab in the ribbon at the top of the screen.
- Click on the “Insert” tab to access the necessary commands for inserting special characters.
Step 4: Click on “Symbol” and select “More Symbols.”
- Within the “Insert” tab, find the “Symbols” group.
- Click on the “Symbol” button and select “More Symbols” from the dropdown menu.
Step 5: Choose the copyright symbol.
- In the “Symbol” dialog box, select the “Symbols” tab.
- Use the “Font” dropdown menu and choose a font that includes the copyright symbol, such as Arial or Times New Roman.
- Scroll through the list of symbols or use the search bar to locate the copyright symbol (©).
- Click on the copyright symbol to select it.
Step 6: Insert the copyright symbol.
- After selecting the copyright symbol, click on the “Insert” button in the dialog box.
- The copyright symbol (©) will be inserted into your document at the specified location.
Step 7: Close the “Symbol” dialog box.
- Once the copyright symbol is inserted, click on the “Close” button in the “Symbol” dialog box to exit.

Step 8: Save your document.
- Click on “File” and select “Save” to save your document with the inserted copyright symbol.
- Choose a location on your computer and provide a name for the file.
- Click on “Save” to save the document.
Conclusion:
Inserting a copyright symbol in Microsoft Word is a straightforward process that can help you indicate ownership and protect your work. By following our step-by-step guide and using the specific commands provided, you can effortlessly add the copyright symbol (©) to your Word documents. Take advantage of this feature to ensure proper attribution and safeguard your intellectual property.
Need a cheap Word license? Visit our website and find the version that suits you best – Office 2016, Office 2019, and Office 2021.