
Office Blog
How do I Export a PowerPoint Presentation to a Video File?

PowerPoint offers a convenient feature that allows you to export your presentation as a video file. This can be useful when you want to share your presentation with others who may not have PowerPoint installed on their computer, or when you want to upload the presentation to a video-sharing platform. In this step-by-step guide, we will walk you through the process of exporting a PowerPoint presentation to a video file.
Step 1: Open your PowerPoint Presentation
Launch Microsoft PowerPoint on your computer and open the presentation that you want to export as a video.
Step 2: Access the File Menu
At the top-left corner of the PowerPoint window, you will find the File menu. Click on it to open a drop-down menu.
Step 3: Navigate to the Export Options
In the File menu, scroll down and select the “Export” option. This will display a list of options related to exporting your presentation.
Step 4: Choose the Create a Video Option
Among the export options, locate and select the “Create a Video” option. This will open the settings for exporting your presentation as a video.
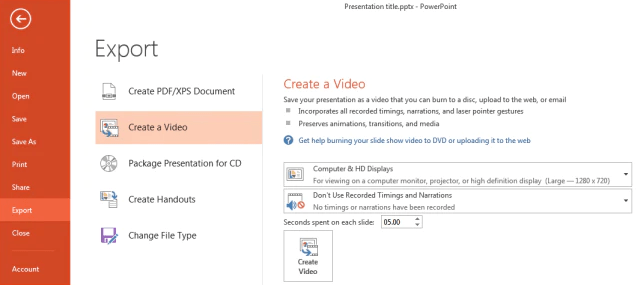
Step 5: Select Video Quality and Timing
In the Create a Video settings, you can choose the video quality and the amount of time each slide will display. You can select between options like “Ultra HD (4K)“, “Full HD (1080p)“, or “Standard (480p)“.
Step 6: Set Presentation Timings (Optional)
If you have set specific timings for your presentation, you can choose whether to use those timings for the video by selecting the appropriate option. If you do not have timings set, you can leave this option unchecked.
Step 7: Include Narrations and Laser Pointer Movements (Optional)
If you have recorded narrations or used a laser pointer during your presentation, you can choose whether to include them in the video by checking the respective options.
Step 8: Choose the Output and Folder Location
Next, you need to specify the output file name and the folder location where you want to save the video file. Click on the “Browse” button next to “Save as” to select the desired destination.
Step 9: Export the Presentation as a Video
Once you have configured all the settings, click on the “Create Video” button to begin the export process. PowerPoint will start rendering your presentation as a video file.
Step 10: Wait for the Rendering Process to Complete
The time it takes to render the video will depend on the size and complexity of your presentation. Wait for the process to complete, and do not close PowerPoint or interrupt the rendering.
Step 11: Play the Video and Verify Quality (Optional)
After the rendering process is finished, you can double-click on the video file to play it and verify that everything looks as desired. If needed, you can repeat the process with different settings to achieve the desired results.
By following the step-by-step guide outlined in this article, you can easily convert your presentation into a video format and ensure that your message reaches a wider audience.
Unlock unparalleled savings on Microsoft Office by visiting our website, where the best price awaits you, opening up its full potential.