
Office Blog
How can I Organize and Filter Emails using Folders in Outlook?
In today’s fast-paced digital world, managing emails efficiently is essential for staying organized and productive. Microsoft Outlook provides the option to create folders to help you categorize and filter your emails effectively. In this step-by-step guide, we will walk you through the process of organizing and filtering emails using folders in Outlook.
Step 1: Launch Microsoft Outlook and Open your Inbox
Start by opening Microsoft Outlook on your computer and navigating to your Inbox. This is where your emails are stored by default.
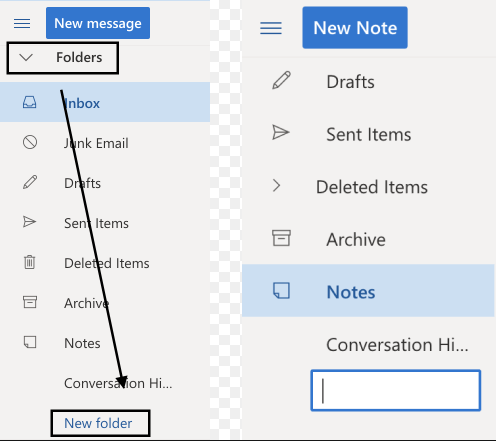
Step 2: Create a New Folder
To create a new folder, right-click on your Inbox or any existing folder in the left panel. From the context menu that appears, select the “New Folder” option.
Step 3: Name the New Folder
A dialog box will appear, prompting you to enter a name for your new folder. Type in a descriptive name that reflects the category or purpose of the folder, and then click “OK.”
Step 4: Move Emails to the New Folder
To organize your emails, select the email(s) you want to move by clicking on them. You can select multiple emails by holding down the Ctrl key while making your selections. Once selected, right-click on one of the emails and choose the “Move to Folder” option.
Step 5: Select the Destination Folder
From the list of folders that appears, select the folder you created in Step 3 as the destination for your selected emails. Click on the folder to move the emails into it.
Step 6: Create Subfolders (Optional)
If you need further categorization, you can create subfolders within your main folder. Follow Step 2 and Step 3 to create subfolders, and then repeat Step 4 and Step 5 to move emails into the subfolders.
Step 7: Enable Filters and Rules
To automatically filter incoming emails into specific folders, you can create rules. Go to the “Home” tab in the Outlook ribbon, click on the “Rules” drop-down arrow, and select “Create Rule.” Follow the on-screen instructions to set up rules based on criteria such as sender, subject, or content.
Step 8: Customize Folder View (Optional)
You can customize the view of your folders to make it easier to locate and manage your emails. Right-click on the folder you want to customize, select “Properties,” and navigate to the “Home Page” tab. From there, you can select different views, such as Compact or Organized by Date.
Step 9: Use Quick Steps for Automation (Optional)
Outlook’s Quick Steps feature allows you to automate repetitive tasks. To set up a Quick Step, go to the “Home” tab, click on the “Quick Steps” drop-down arrow, and select “Create New.” Follow the prompts to configure the desired action, such as moving emails to a specific folder or forwarding them to a colleague.
Step 10: Maintain and Review Folder Organization Regularly
As you receive new emails, periodically review and move them to the appropriate folders. This will help you keep your Inbox organized and ensure that important emails are easily accessible.
By following these step-by-step instructions, you can effectively organize and filter your emails using folders in Outlook. Take control of your inbox and streamline your email management process for enhanced productivity and efficiency.
Don’t settle for anything less than the best price for Microsoft Office. Visit our website and unleash the full potential of this productivity suite like never before.