
Office Blog
How do I Add a Bullet Point With a Custom Symbol in Microsoft Word?

Bullet points make your documents visually appealing and easier to read. In Microsoft Word, you can add custom symbols to bullet points to further personalize your documents. This step-by-step guide will walk you through the process of adding a bullet point with a custom symbol in Microsoft Word.
Step 1: Open Microsoft Word
- Launch Microsoft Word on your computer.
Step 2: Open an Existing Document or Create a New One
- Open the document where you want to add a bullet point with a custom symbol.
- Alternatively, create a new document by clicking on the “File” tab and selecting “New Document.”
Step 3: Select the Paragraph
- Click and drag your cursor to select the paragraph where you want to add the custom bullet point.
Step 4: Access the “Bullets” Option
- In the Home tab, locate the “Paragraph” section.
- Click on the small arrow next to the “Bullets” icon to access additional bullet point options.
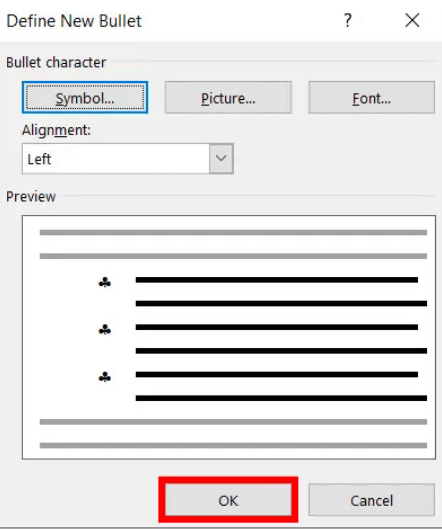
Step 5: Choose the “Define New Bullet” Option
- At the bottom of the bullet point options, click on the “Define New Bullet” option.
- A new dialog box will appear, allowing you to customize the bullet point further.
Step 6: Select a Custom Symbol
- In the “Define New Bullet” dialog box, click on the “Symbol” button.
- Choose a custom symbol from the available symbol library or click on the “More Symbols” option for additional choices.
Step 7: Adjust Indentation and Alignment (optional)
- If needed, you can adjust the indentation and alignment of the bullet point by clicking on the “Format” button in the “Define New Bullet” dialog box.
- Make the necessary changes and click “OK.”
Step 8: Apply the Custom Bullet Point
- Click “OK” in the “Define New Bullet” dialog box to apply the custom symbol as the bullet point.
- The selected paragraph will now have the custom bullet point.
Step 9: Repeat for Other Paragraphs (optional)
- If you want to apply the custom bullet point to other paragraphs in your document, repeat steps 3 to 8 for each paragraph.
Conclusion:
By following these step-by-step instructions, you can easily add a bullet point with a custom symbol in Microsoft Word. Personalizing your documents with custom bullet points enhances visual appeal and improves readability. Experiment with different symbols to create unique and engaging documents that stand out.
Upgrade your workflow to unparalleled levels by acquiring Microsoft Office at unparalleled prices only on our website today, and revolutionize your efficiency and output like never before.