
Office Blog
How can I set up Email Encryption in Outlook for Added Security?
In today’s digital world, email security is of utmost importance. Encrypting your emails in Microsoft Outlook adds an extra layer of protection to your sensitive information. This step-by-step guide will walk you through the process of setting up email encryption in Outlook.
Step 1: Open Outlook and Access File Options:
- Launch the Microsoft Outlook application on your computer.
- Click on the “File” option in the top left corner of the window.
- From the drop-down menu, select “Options”.
Step 2: Navigate to Trust Center Settings:
- In the “Outlook Options” window, click on “Trust Center” in the left sidebar.
- Choose “Trust Center Settings” to access the security options.
Step 3: Enable Email Encryption:
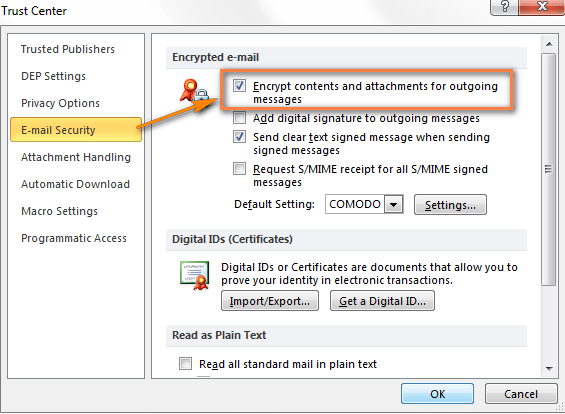
- In the “Trust Center” window, select “Email Security” from the left sidebar.
- Check the box next to “Encrypt contents and attachments for outgoing messages” to enable email encryption.
- Optionally, you can also check the box for “Add digital signature to outgoing messages” to ensure the authenticity of your emails.
- Click “OK” to save the changes and close the window.
Step 4: Set Encryption Options:
- Back in the “Outlook Options” window, click on “Trust Center” in the left sidebar again.
- This time, select “Automatic Download” from the left sidebar.
- Check the box next to “Don’t download pictures automatically in HTML email messages or RSS items” to prevent potential security risks associated with external content.
- Click “OK” to save the changes and close the window.
Step 5: Compose Encrypted Emails:
- To send an encrypted email, create a new message in Outlook.
- In the “Message” tab, click on the “Options” tab.
- Click on “Encrypt” to encrypt the email before sending it.
- Alternatively, if you enabled digital signature, you can click on “Sign” to add a digital signature to the email.
- Compose your message, attach any necessary files, and send it as you would with a regular email.
Step 6: Receiving Encrypted Emails:
- When you receive an encrypted email in Outlook, the contents and attachments will be automatically decrypted and displayed.
- You can reply, forward, or perform any other actions on the email as you would with regular emails.
- Outlook will ensure that the security of the encrypted email is maintained throughout the communication.
By following these step-by-step instructions, you can easily set up email encryption in Microsoft Outlook. Safeguard your sensitive information and communicate securely with encrypted emails.
Don’t settle for anything less than the best price for Microsoft Office. Visit our website and unleash the full potential of this productivity suite like never before.