
Office Blog
How do I Import and Export Contacts in Outlook?

Importing and exporting contacts in Microsoft Outlook is a convenient way to transfer your contact list between devices or share it with others. In this step-by-step guide, we will walk you through the process of importing and exporting contacts in Outlook.
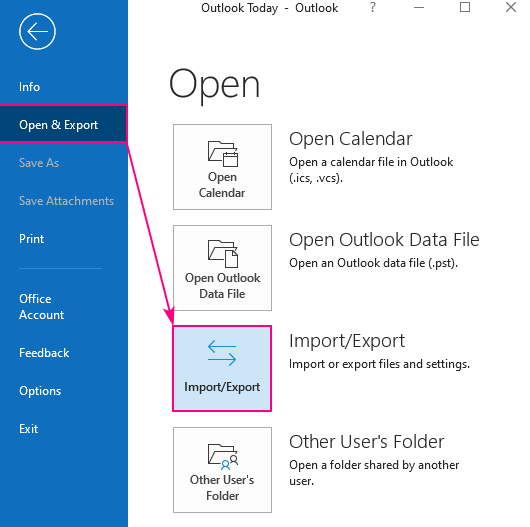
Step 1: Launch Microsoft Outlook and Access Contacts:
- Open Microsoft Outlook application on your computer.
- Click on the “File” tab in the top left corner of the window.
- From the drop-down menu, select “Open & Export”, then choose “Import/Export”.
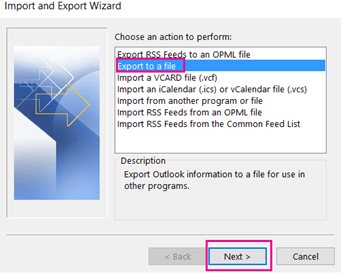
Step 2: Choose Import or Export Option:
- In the “Import/Export Wizard” window, select “Export to a file” option if you want to export your contacts.
- Alternatively, select “Import from another program or file” if you want to import contacts from a file or another email program.
- Click “Next” to proceed.
Step 3: Select File Type for Import/Export:
- In the “Import/Export Wizard” window, choose “Comma Separated Values” (CSV) if you want a universal format that is compatible with various applications.
- Select “Outlook Data File” (PST) if you want to retain more advanced features like email folders and calendar items.
- Click “Next” to continue.
Step 4: Choose Contacts Folder:
- In the “Import/Export Wizard” window, select the “Contacts” folder from which you want to import or export the contacts.
- If you have multiple contact folders, make sure to select the appropriate one.
- Click “Next” to proceed.
Step 5: Import/Export Settings:
Export:
- If you selected “Export to a file”, choose a destination where you want to save the exported file.
- Customize the export settings such as the file name, location, and advanced options if necessary.
- Click “Finish” to initiate the export process.
Import:
- If you selected “Import from another program or file”, browse and select the file containing the contacts you want to import.
- Select the appropriate options for handling duplicates and other import settings.
- Click “Finish” to start the import process.
Step 6: Verify and Update Contacts:
- After the import or export process completes, launch the “Contacts” section in Outlook to verify the imported or exported contacts.
- Ensure that all the contacts are present and correctly organized.
- Make any necessary updates or edits to the contact list as needed.
By following these step-by-step instructions, you can easily import and export contacts in Microsoft Outlook. Transfer your contact list between devices, share it with others, or simply back it up for safekeeping.
Unlock unparalleled savings on Microsoft Office by visiting our website, where the best price awaits you to open up the full potential of this productivity suite.