
Office Blog
How can I Merge Cells Vertically in a Table in Word?

Merging cells in a table within Microsoft Word is a useful technique for improving the organization and presentation of data in your documents. This feature allows you to combine adjacent cells to create larger cells, which can be particularly handy for creating headers, subheadings, or spanning data across multiple columns. In this comprehensive guide, we’ll walk you through the step-by-step process of merging cells vertically using specific commands in Microsoft Word.
To begin, open your Word document containing the table you wish to modify. Locate the cells you want to merge vertically within the table. Ensure that these cells are adjacent to each other in the same column. Select the cells by clicking and dragging your cursor over them to highlight them.
Once the cells are selected, navigate to the “Layout” tab in the Word ribbon. Here, you’ll find the “Merge Cells” option within the “Merge” group. Click on this option to merge the selected cells vertically. Word will automatically combine the cells into a single, larger cell spanning the selected columns. Repeat this process as needed to merge additional cells vertically within the table. By following these simple steps, you can effectively merge cells vertically in a table in Microsoft Word, enhancing the organization and presentation of your document’s data.
Step 1: Open Microsoft Word and create a new document or open an existing one.
- Launch Microsoft Word on your computer.
- Create a new document or open an existing document that contains the table you want to modify.
Step 2: Navigate to the table.
- Locate the table within your document.
- Place your cursor within the table to activate the necessary commands for table editing.
Step 3: Select the cells you want to merge.
- Click and drag to select the cells you want to merge vertically.
- Alternatively, hold the “Shift” key and use the arrow keys to select the cells.
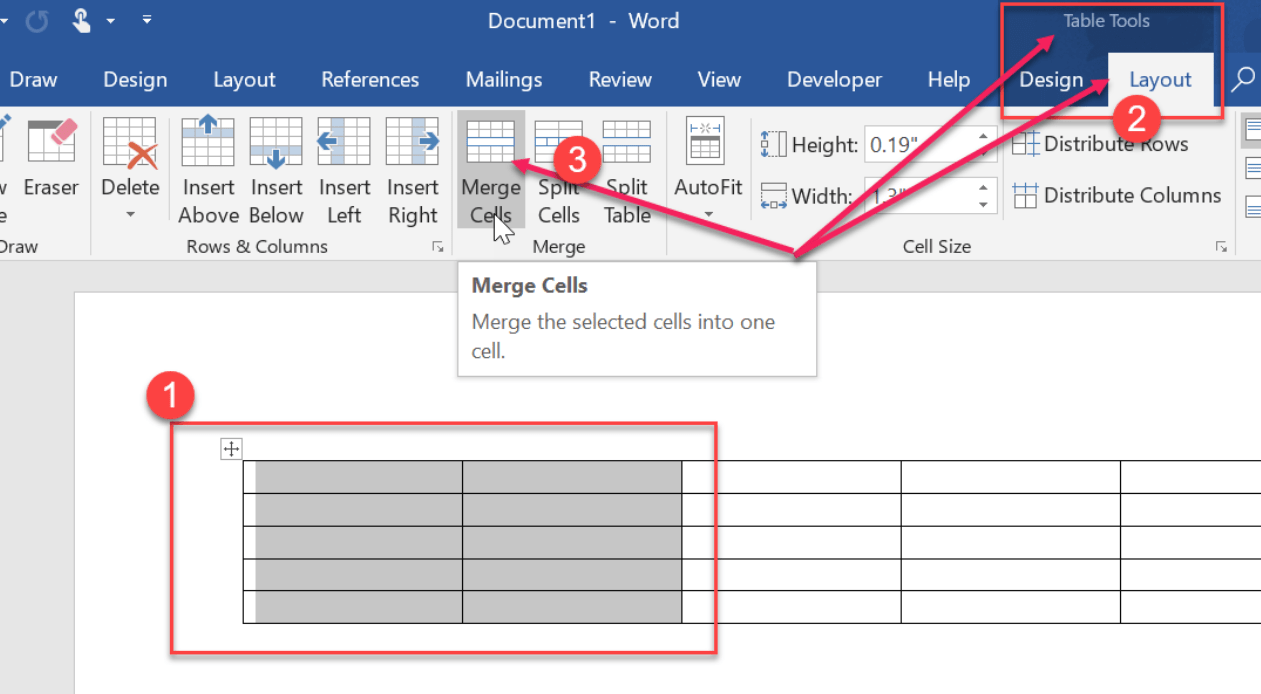
Step 4: Access the table tools.
- When the cells are selected, the “Layout” tab will appear in the ribbon at the top of the screen.
- Click on the “Layout” tab to access the table tools.

Step 5: Merge the selected cells vertically.
- In the “Merge” group, click on the “Merge Cells” button.
- From the dropdown menu, select “Merge Cells > Merge Cells Vertically.”
- The selected cells will be merged vertically, creating a single cell that spans multiple rows.
Step 6: Adjust the merged cell appearance.
- Once the cells are merged, you can modify the appearance of the merged cell.
- Use the table tools in the “Layout” tab to change the alignment, borders, shading, and other formatting options as desired.
Step 7: Repeat as needed.
- If you have additional cells or rows to merge vertically, repeat steps 3 to 6.
Step 8: Save your document.
- Click on “File” and select “Save” to save your document with the merged cells in the table.
- Choose a location on your computer and provide a name for the file.
- Click on “Save” to save the document.
Conclusion:
Merging cells vertically in a table in Microsoft Word can help you create a visually appealing and well-organized document. By following our step-by-step guide and using the specific commands provided, you can easily merge cells in your Word table to better present and structure your data. Experiment with different formatting options to achieve the desired look for your tables, and save time and effort by efficiently merging cells in a vertical manner.
Want a Word license? Visit our website to find your perfect fit among Office 2016, Office 2019, and Office 2021 options.