
Office Blog
How to Create a Drop-down List With Dependent Choices in Microsoft Word?

Creating drop-down lists with dependent choices can make data entry more efficient and organized in Microsoft Word. Whether you’re creating a questionnaire or a form, this step-by-step guide will walk you through the process of creating a drop-down list with dependent choices in Microsoft Word.
Step 1: Open Microsoft Word
- Launch Microsoft Word on your computer.
Step 2: Open an Existing Document or Create a New One
- Open the document where you want to create the drop-down list with dependent choices.
- Alternatively, create a new document by clicking on the “File” tab and selecting “New Document.”
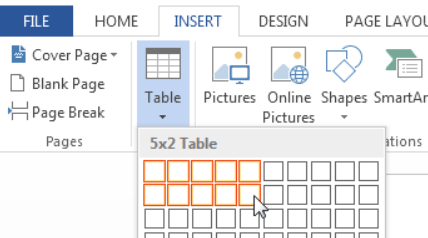
Step 3: Insert a Table
- Click on the “Insert” tab and choose the “Table” option.
- Select the desired number of columns and rows for your table, and Word will insert it into your document.
Step 4: Set Up the First Column
- In the first column of your table, enter the categories or main choices for your drop-down list.
- For example, if you want to create a drop-down list for different countries, enter the list of countries in the first column.
Step 5: Set Up the Second Column
- In the second column of your table, enter the dependent choices or options for each category.
- For example, if the first column contains countries, the corresponding second column should contain cities within each country.
Step 6: Select the Cells for the Drop-down List
- Click and drag to select the cells in the second column where you want to create the drop-down list.
- Make sure to select all the cells that correspond to the dependent choices.
Step 7: Access the “Developer” Tab
- If the “Developer” tab is not visible in the Word ribbon, right-click on the ribbon and select “Customize the Ribbon.”
- In the Word Options dialog box, enable the “Developer” check box and click “OK” to apply the changes.
Step 8: Enable Content Controls
- In the “Developer” tab, locate the “Controls” group.
- Click on the “Insert” button to enable content controls for the selected cells.
Step 9: Create the Drop-down List
- With the desired cells still selected, click on the “Drop-Down List Content Control” button under the “Controls” group.
- A drop-down list will now be created in each of the selected cells.
Step 10: Edit the Drop-down List Choices
- Right-click on any cell with the drop-down list and select “Properties.”
- In the “Content Control Properties” dialog box, click on the “Add…” button.
- Enter the dependent choices for that specific category, such as cities for a selected country.
- Click “OK” to save the choices.
Step 11: Test the Drop-down List
- Click on each cell with a drop-down list to verify that the dependent choices change correctly based on the category.
- Select different categories from the drop-down lists to see the corresponding dependent choices.
Step 12: Save and Share the Document
- After creating the drop-down list with dependent choices, save your document by clicking on the “File” tab and selecting “Save” or pressing Ctrl+S.
- Share the document with others, ensuring they have access to the drop-down list functionality.
Conclusion:
By following these step-by-step instructions, you can create a drop-down list with dependent choices in Microsoft Word. This feature is particularly useful for forms and questionnaires, making data input more organized and user-friendly. Enhance the efficiency of your document creation by implementing this technique in your projects.
Supercharge your work efficiency and output with Microsoft Office available at unparalleled prices on our website. Upgrade your workflow today and witness a productivity revolution.