
Office Blog
How do you Mark an Email as Confidential in Outlook?

To Mark an email as confidential in Outlook is a crucial step to ensure sensitive information is treated with the appropriate level of privacy. Here’s a detailed guide to help you achieve this in a few easy steps.
Step 1: Open Outlook
- Launch Outlook: Open the Microsoft Outlook application on your computer or through Office 365 online.
- Sign In: Ensure you are signed into your account using your credentials.
Step 2: Create a New Email
- Compose a New Email: Click on the “New Email” button located in the Ribbon at the top of the Outlook window.
- On a desktop, this button is normally on the Home tab.
- In Outlook Web, you can find it in the “New message” section.
Step 3: Set the Sensitivity Level
- Access Properties Window:
- In the new email window, click on the “Tags” section in the Ribbon.
- Click on “More options” (…), usually found at the bottom right of the Tags group to open more settings.
- Open Properties:
- Select “Properties” from the dropdown.
- Alternatively, you can go to the “Options” tab in the Ribbon and click on the dialog box launcher in the “More Options” group.
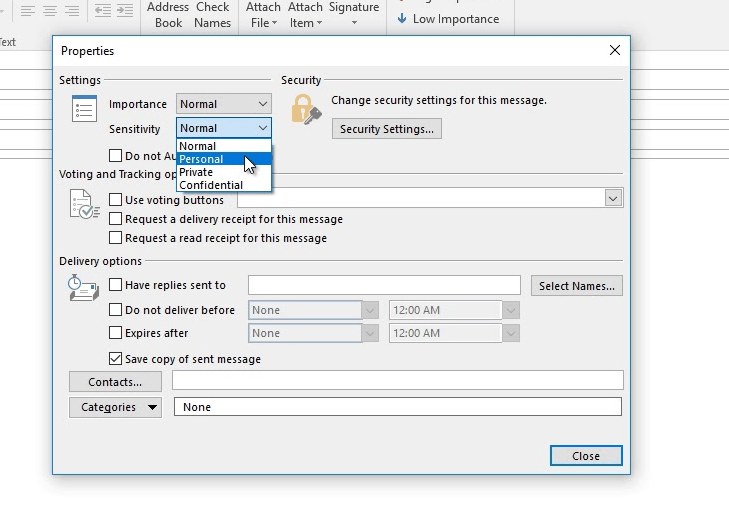
- Choose Sensitivity Level: In the “Properties” window:
- In the “Settings” section, locate the “Sensitivity” dropdown.
- Choose “Confidential” from the options available (Normal, Personal, Private, Confidential).
Step 4: Address and Compose Your Email
- Add Recipients: Enter the email addresses of your recipients in the “To,” “Cc,” or “Bcc” fields.
- Add a Subject: Enter a relevant subject line in the “Subject” field, indicating the nature of the email if necessary.
- Draft Your Message: Compose your email content in the body section. Ensure the confidentiality level aligns with the sensitivity of the information being shared.
Step 5: Send the Email
- Review Your Email: Double-check the recipients, subject, and body for accuracy.
- Send the Email: Click on the “Send” button to dispatch your confidential email.
Step 6: Verify Sensitivity Setting
- Check Sent Items: Navigate to the “Sent Items” folder to verify that your email was sent with the correct sensitivity label.
- Open the Sent Email:
- Open the email you just sent.
- Check the top bar of the email window to ensure it indicates “Confidential.”
Get genuine Office Keys at unbeatable prices on our website, offering fast and secure transactions for instant software activation.