
Office Blog
How do I Set Up and Manage Multiple Email Accounts in Outlook?

In today’s digital age, many people manage multiple email accounts for work, personal, and other purposes. Microsoft Outlook provides a convenient solution for managing all your emails in one place. In this step-by-step guide, we will walk you through the process of setting up and managing multiple email accounts in Outlook.
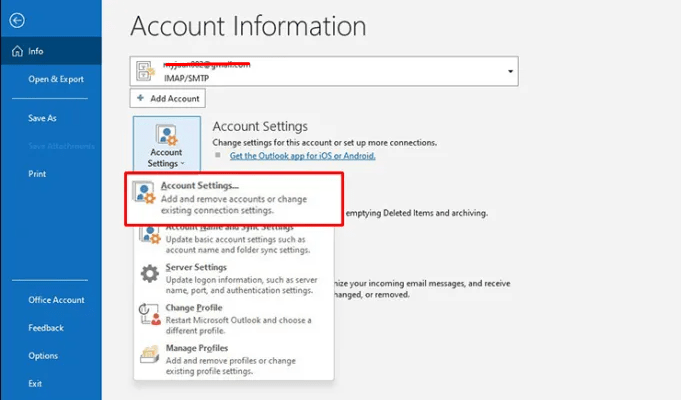
Step 1: Open Outlook and Access Account Settings:
- First, launch Microsoft Outlook on your computer.
- Once the application opens, click on the “File” tab in the top left corner of the window.
- In the “Info” category, click on “Account Settings” and select “Account Settings” from the drop-down menu.
Step 2: Add a New Email Account:
- In the “Account Settings” window, go to the “Email” tab and click on the “New” button.
- Select “Email Account” and click “Next”.
- Enter your name, email address, and password in the respective fields.
- Click “Next” to let Outlook automatically configure the email account settings. If you prefer to manually configure the account, select “Manual setup” and follow the on-screen prompts.
Step 3: Configure Advanced Account Settings:
- Once the account setup is complete, you can click on the “More Settings” button to configure advanced account settings.
- In the “Internet Email Settings” dialog box, you can customize options such as the server settings, outgoing server authentication, and folder settings.
- Make any necessary adjustments and click “OK” when finished.
Step 4: Repeat Steps 2-3 for Additional Accounts:
- To add more email accounts, simply repeat Steps 2 and 3 for each account.
- Outlook will automatically synchronize all your email accounts, providing a unified inbox and access to all your emails and folders.
Step 5: Manage Multiple Email Accounts:
- Now that you have set up multiple email accounts in Outlook, you can easily manage them from one central location.
- To switch between accounts, click on the “File” tab, then the “Account Settings” dropdown, and select “Change Profile”.
- Select the desired profile/account and click “OK”.
- Outlook will switch to the selected account, displaying the email and folder settings associated with that particular account.
Step 6: Customize Account Settings:
- To further customize account settings, go to “File” > “Account Settings” > “Account Settings”.
- Select the account you want to modify and click on “Change”.
- In the “Account Settings” window, you can update email addresses, server settings, and other details as needed.
Step 7: Manage Folders and Rules:
- Outlook allows you to organize your emails by creating folders and setting up rules.
- Right-click on your email account in the left pane and select “New Folder” to create a new folder.
- To set up rules for managing incoming emails, go to “File” > “Manage Rules & Alerts” and follow the on-screen instructions.
Conclusion:
By following these step-by-step instructions, you can easily set up and manage multiple email accounts in Microsoft Outlook. Enjoy the convenience of having all your emails in one place, while also customizing account settings and organizing your messages efficiently. Say goodbye to the hassle of switching between email clients and streamline your communication with Outlook’s multiple account management feature.
Get the best deal for Microsoft Office exclusively on our website and tap into the full potential of this productivity suite like never before.