
Office Blog
How do I Create a Custom Animation path in PowerPoint?

PowerPoint allows you to add dynamic visual effects to your presentations through custom animation paths. In this step-by-step guide, we will show you how to create a custom animation path in PowerPoint to bring your slides to life.
Step 1: Open PowerPoint and Select a Slide:
1. Launch Microsoft PowerPoint on your computer.
2. Open the presentation where you want to create a custom animation path.
3. Choose the slide where you want to apply the animation.
Step 2: Access the Animations Tab:
1. Click on the “Animations” tab in the Ribbon menu at the top of the PowerPoint window. This will display various animation options.
Step 3: Select an Object:
1. Choose the object you want to apply the custom animation path to. It could be a text box, image, or shape on the slide.
2. Click on the object to select it.
Step 4: Add an Animation Effect:
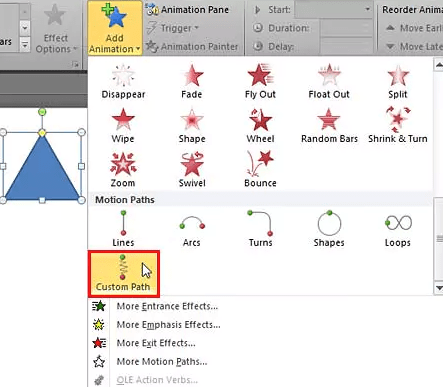
1. In the “Animations” tab, click on the “Add Animation” button to reveal a drop-down list of animation effects.
2. Select the desired animation effect from the list. For example, choose “Fly In” to make the object enter the slide.
Step 5: Customize the Animation Path:
1. With the object still selected, click on the “Effect Options” button located next to the “Add Animation” button.
2. In the drop-down menu, choose “Path Options”.
3. This will open the “Custom Animation Pane” on the right side of the PowerPoint window.
Step 6: Create the Custom Animation Path:
1. In the “Custom Animation Pane”, click on the “Add Animation Path” button. This will change the cursor to a crosshair.
2. Click and drag the cursor to draw the desired path for the animation.
3. Release the mouse button to finish creating the animation path.
Step 7: Adjust the Animation Path:
1. To refine and shape the animation path, click and drag the circular nodes along the path.
2. You can add additional nodes by right-clicking on the path and selecting “Edit Points” from the context menu.
Step 8: Preview and Fine-tune the Animation:
1. To preview the animation path, click on the “Play” button in the “Custom Animation Pane”.
2. Make adjustments to the path or effects as needed to achieve the desired animation.
Step 9: Apply Animation to Multiple Objects (optional):
1. If you want to apply the same custom animation path to other objects on the slide, select those objects.
2. In the “Animations” tab, click on the “Animation Painter” button.
3. Click on each additional object to apply the custom animation path.
Discover unbeatable deals and the best price for Microsoft Office on our website, allowing you to unlock the full potential of this productivity suite.