
Windows Blog
How do I Enable or Disable Hibernate Mode in Windows 10?

Hibernation mode is a useful feature in Windows 10 that allows you to save your current session and power down your computer, while resuming exactly where you left off later. In this article, we will guide you on how to enable or disable hibernate mode in Windows 10, using step-by-step instructions.
Step 1: Open Command Prompt as an Administrator
- Press the Windows key on your keyboard.
- Type “Command Prompt” in the search bar.
- Right-click on the Command Prompt app, and select “Run as Administrator”.
Step 2: Check the Current Hibernate Setting
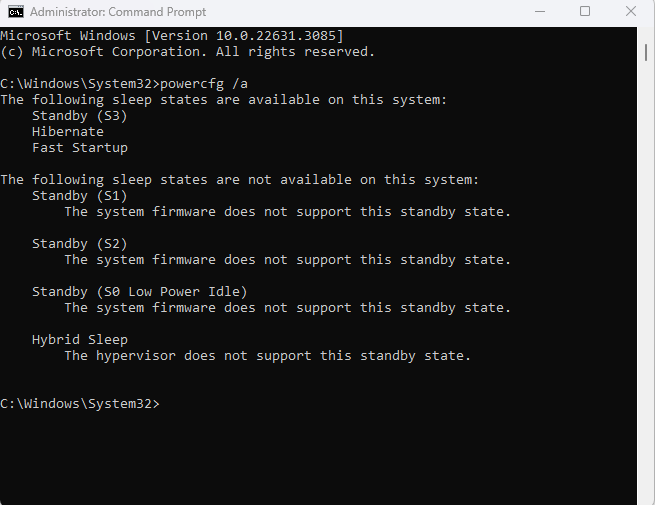
- In the Command Prompt window, type
powercfg /aand press Enter. - Look for the “Hibernation” section in the results.
- If it says “The hypervisor does not support this standby state.”, you cannot enable hibernation.
Step 3: Enable Hibernate Mode
- In the Command Prompt window, type
powercfg /hibernate onand press Enter. - If successful, you should see the message “Hibernation has been enabled.”
Step 4: Disable Hibernate Mode
- In the Command Prompt window, type
powercfg -h offand press Enter. - If successful, you should see no output or feedback.
Step 5: Verify Hibernate Settings
- In the Command Prompt window, type
powercfg /aand press Enter. - Look for the “Hibernation” section in the results.
- If it says “The hypervisor does not support this standby state.”, hibernation is disabled.
- If it says “Hibernation is allowed”, hibernation is enabled.
Conclusion:
Enabling or disabling hibernate mode in Windows 10 is a straightforward process that can help you manage power consumption on your computer. By following the steps provided above, you can easily customize whether or not you want your system to enter hibernation mode.
Currently, on our website, we have a limited-time offer featuring an unbeatable price for purchasing a genuine Windows 10 cheap key.