Office Blog
How can I use the Form Wizard in Access to Create a Form?
Microsoft Access provides users with a convenient Form Wizard tool, designed to streamline the creation of forms for interacting with databases. This intuitive feature simplifies the form-building process, enabling users to generate functional forms quickly and efficiently without the need for extensive technical expertise. In this comprehensive tutorial, we will guide you through the step-by-step process of utilizing the Form Wizard in Access, empowering you to create forms that meet your specific data management needs with ease.
To begin creating a form using the Form Wizard, users can navigate to the “Create” tab in Microsoft Access and select the “Form Wizard” option. From there, the Form Wizard prompts users to choose the table or query they wish to base the form on, as well as the fields they want to include in the form layout. Users can select individual fields or opt to include all fields from the chosen data source, depending on their preferences and requirements.
Once the necessary selections have been made, the Form Wizard generates a default form layout based on the chosen data source and field selections. Users have the option to customize the form further by rearranging fields, adjusting formatting, and adding additional elements such as labels, buttons, and controls. With the Form Wizard’s guided approach and user-friendly interface, creating functional forms in Microsoft Access becomes a straightforward task, allowing users to efficiently interact with their databases and streamline data management processes.
Step 1: Open Access and Select the Table
Launch Microsoft Access and open the database that contains the table you want to create a form for. Identify the table you want to base your form on, as the Form Wizard will use the structure and fields of this table to create the form.
Step 2: Access the Form Wizard
Click on the “Create” tab in the ribbon at the top of the screen. In the “Forms” section, select “Form Wizard.” This will initiate the Form Wizard and guide you through the form creation process.

Step 3: Choose the Table Fields
In the first screen of the Form Wizard, you will be prompted to select the fields you want to include in your form. You can choose specific fields or select all fields from the table. You can also rearrange the fields’ order according to your preference.
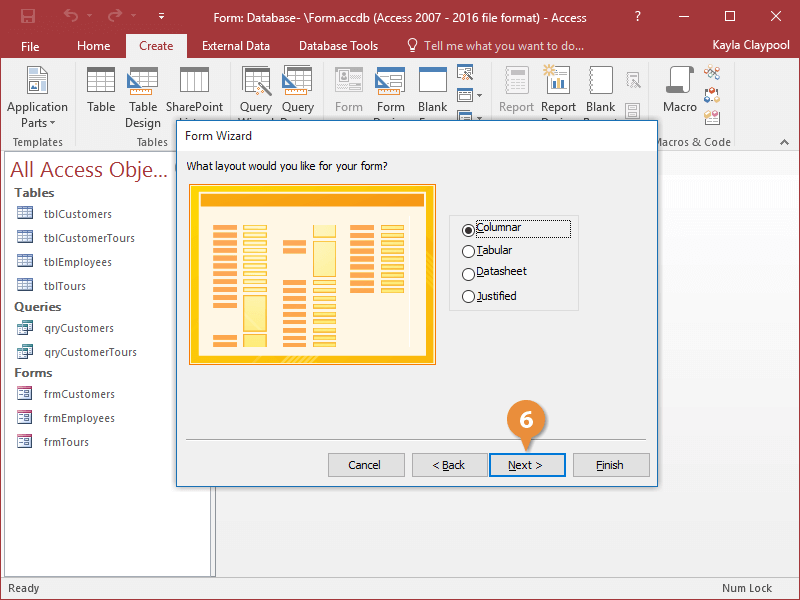
Step 4: Select or Customize the Form Layout
The next screen allows you to choose from a variety of form layout options provided by the Form Wizard. Select the layout that fits your requirements and click “Next” to proceed. Alternatively, you can select the “Custom Layout” option to manually design the form.

Step 5: Specify a Form Style
In this step, you can choose a style for your form from the available options. The selected style will determine the form’s appearance and formatting. Once you have made your selection, click “Next” to proceed.
Step 6: Provide a Form Title
Now, you can give a title to your form. The title will be displayed at the top of the form and help users identify the purpose of the form. Enter a descriptive title in the provided field and click “Finish” to complete the Form Wizard.
Step 7: Review and Modify the Form
After clicking “Finish,” Access will generate the form based on your selections. Take a moment to review the form’s layout and design. You can make modifications to the form by using the various design and formatting tools available in the “Form Design” tab of the ribbon.
Step 8: Save and Use the Form
Once you are satisfied with the form’s appearance, save it by clicking on the “Save” button in the Quick Access Toolbar or by pressing Ctrl + S. Give the form a meaningful name and specify the location to save it.
By following these simple steps, you can leverage the power of the Form Wizard to expedite the process of form creation in Microsoft Access.
Find the ideal Access license for your database management needs on our website. Choose from Office 2016 CD Keys, Office 2019 CD Keys, and Office 2021 CD Keys to suit your specific requirements.

