
Excel Blog
Building and Using Forms in Excel

When it comes to collecting and organizing data, Excel forms prove to be an incredibly powerful and efficient resource. In this comprehensive step-by-step guide, we will take you on a journey, unveiling the intricacies of building and utilizing forms in Excel. From the initial stage of creating a form tailored to your specific data collection needs to understanding the various form controls and customizations available, we will equip you with the knowledge and skills necessary to effortlessly navigate through the entire form-building process. Moreover, we’ll delve into the art of utilizing the collected data by demonstrating insightful analysis techniques that will help you draw meaningful conclusions and make informed decisions. By the time you reach the end of this guide, you’ll have the confidence and expertise to leverage Excel forms to their fullest potential, effectively streamlining your data collection and organization workflow.
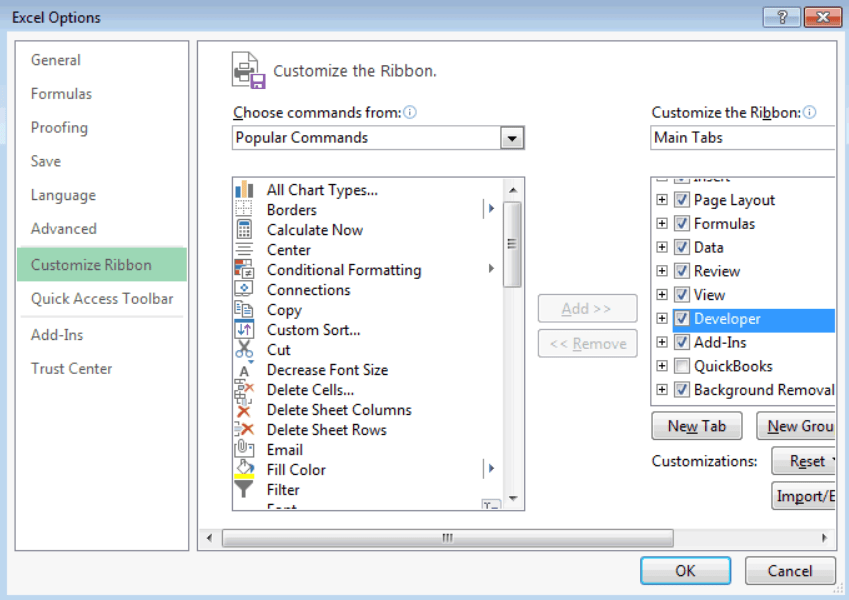
Step 1: Enable the Developer Tab
- Open Excel and click on File.
- Select Options and navigate to the Customize Ribbon tab.
- Check the box next to Developer and click OK.
Step 2: Create the Form
- Click on the Developer tab.
- Select Insert in the Controls group and choose the desired form control, such as a Text Box or Check Box.
- Click and drag on the worksheet where you want to place the form control.
Step 3: Customize the Form Control
- Right-click on the form control and select Edit Text or Edit Options.
- Modify the default text or options according to your needs.
Step 4: Add Labels and Instructions
- Click on the Developer tab and select Insert.
- Choose a Label control and click and drag next to the form control.
- Right-click on the label and select Edit Text to provide clear instructions to the user.
Step 5: Link Form Controls to Cells
- Right-click on the form control and select Format Control.
- Go to the Control tab and specify the Input range by selecting the relevant cells.
- Click OK to link the form control to the specified cell.
Step 6: Protect the Worksheet
- Click on the Review tab.
- Select Protect Sheet and set a password if desired.
- Choose the elements you want to allow users to edit, such as Select unlocked cells or Edit objects.
Step 7: Use the Form
- Share the protected worksheet with users.
- Instruct users to fill out the form by entering data into the designated form controls.
- The data will be automatically entered into the linked cells.
Step 8: Analyze and Manage the Data
- Once the data is collected, you can use Excel’s built-in tools for data analysis and management.
- Sort, filter, or create pivot tables to gain insights from the collected data.
By following these steps, you can easily build and use forms in Excel to gather and organize data efficiently. Forms provide a user-friendly interface for data entry, ensuring accuracy and ease of use. Start leveraging the power of Excel forms today.
Dive into our website and explore the plethora of Microsoft Office licenses available, catered to meet your database management needs. Take advantage of our selection, offering cheap Office 2016 cd keys, user-friendly Office 2019 cd keys, and the cheapest Office 2021 cd keys, guaranteeing satisfaction.