
Office Blog
Can I Customize the Ribbon and Toolbar in Microsoft Office Applications?

Microsoft Office applications come with pre-defined toolbars and ribbons, but did you know that you can customize them to suit your specific needs? In this step-by-step guide, we’ll explore how to personalize the ribbon and toolbar in Microsoft Office applications.
Step 1: Accessing the Ribbon and Toolbar Options
- Launch Microsoft Office: Open the desired Microsoft Office application, such as Word, Excel, or PowerPoint.
- Locate the Ribbon: The ribbon is the horizontal bar at the top containing various tabs, such as “Home,” “Insert,” and “View.”
- Access Toolbar Options: Click on the File tab in the top-left corner, then select Options.
Step 2: Rearranging Commands on the Ribbon
- Customizing Tabs: In the Options window, click on the Customize Ribbon tab.
- Adding or Removing Tabs: To add or remove tabs, check or uncheck the respective boxes under the Customize the Ribbon section.
- Rearranging Commands: In the right-hand column, select a tab and click the Up or Down arrow to move it within the ribbon.
- Creating New Tabs: Click the New Tab button, provide a name, and assign groups containing desired commands.
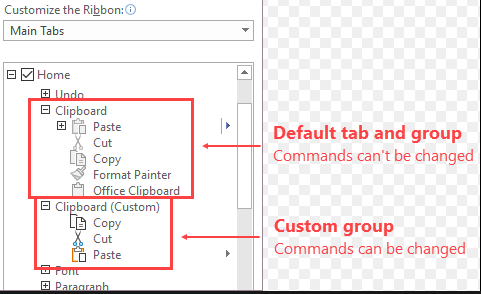
Step 3: Adding, Removing, and Rearranging Commands
- Adding Commands: Under the Customize the Ribbon section, select a tab and click the New Group button to add a new group. Choose commands by selecting a command category from the left column and click the Add>> button.
- Removing Commands: Select a tab and group, highlight the command in the right-hand column, and click the Remove button.
- Rearranging Commands: For commands within a group, use the Up or Down arrow buttons to change their position.
Step 4: Customizing the Quick Access Toolbar
- Accessing Quick Access Toolbar Options: In the Options window, click on the Quick Access Toolbar tab.
- Adding Commands: From the Choose commands from dropdown, select a command category, highlight desired commands, and click the Add>> button.
- Removing Commands: In the Customize Quick Access Toolbar section, highlight a command and click the Remove button.
- Rearranging Commands: Use the Up or Down arrow buttons to change the position of commands on the Quick Access Toolbar.
Step 5: Saving and Applying Customizations
- Saving Customizations: Click the OK button in the Options window to save your customizations.
- Exporting and Importing Customizations: In the Options window, select the Import/Export button. From there, you can save your customizations to a file or import customizations from a previously saved file.
Experiment with different layouts and command combinations to optimize your workflow and make your daily tasks more efficient. Personalize your Office experience to suit your unique needs and improve productivity in your work or personal projects.
Get your hands on an Excel license from our website, included in the Office Suite. Choose from Office 2016, Office 2019, or Office 2021 based on what suits you.