Office Blog
How do you Manage Document Properties in Word?
Document properties in Microsoft Word provide essential metadata about your document, such as its title, author, and keywords. Managing these properties helps you organize, search, and maintain consistency across your documents. Here’s a step-by-step guide to managing document properties in Word.
Step 1: Open the Document
Begin by opening the Word document for which you want to manage properties.
- Launch Microsoft Word.
- Click on
Filein the top left corner. - Select
Openfrom the menu. - Navigate to your document’s location.
- Double-click the document to open it.
Step 2: Access Document Properties
To access and edit the document properties:
- Click on
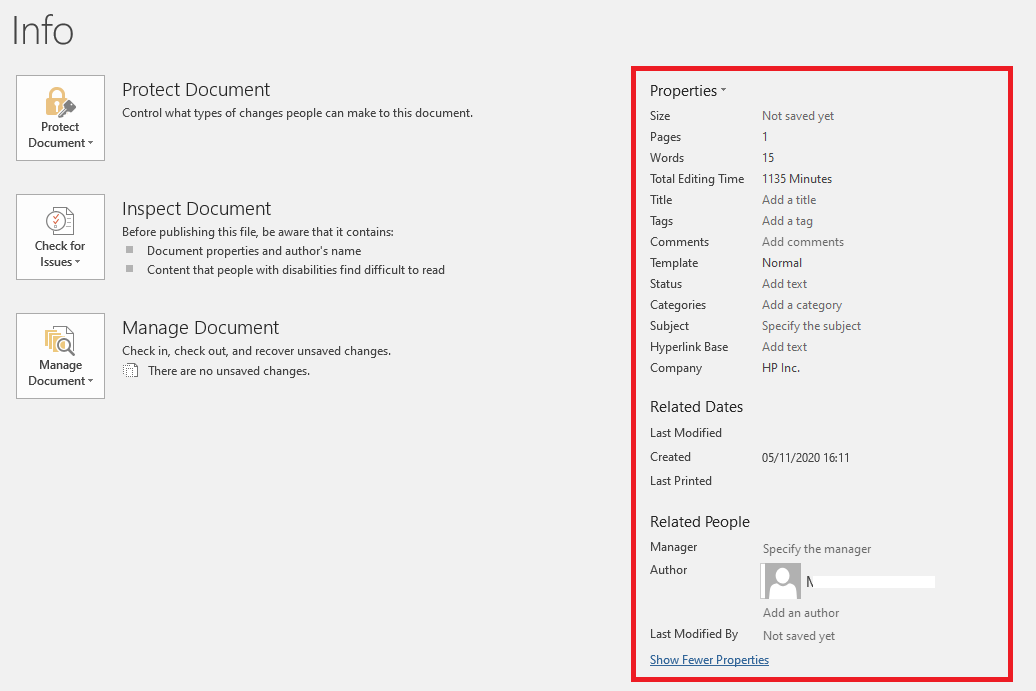
Filein the Ribbon to open the Backstage view. - In the Info section, you will see a section labeled
Propertieson the right.
Step 3: View Basic Properties
The Info section shows basic properties such as Title, Tags, Categories, Author, and Last Modified.
- Under the
Propertiessection, click onShow All Propertiesto expand and see more details. - Notice the fields for Title, Tags, Categories, and Author. These are where you can input metadata for better document management.

Step 4: Edit Document Properties
To edit the properties:
- Click on the field you want to modify (e.g.,
Title). - Enter the desired information.
- Press
Enterto save your changes.
Some properties, such as Author and Last Modified, may be updated automatically based on your Microsoft account and document activity.
Step 5: Add Custom Properties
You can create custom properties to add more specific metadata to your document.
- In the Properties section, click on
Properties(besideRelated Dates) and selectAdvanced Propertiesfrom the dropdown menu. - A dialog box will appear with multiple tabs. Click on the
Customtab. - In the
Namefield, enter a name for your new property. - In the
Typefield, select the type of value (e.g., Text, Date, Number). - In the
Valuefield, enter the property value. - Click
Add, thenOKto save the custom property.
Step 6: Use the Document Panel
For a more integrated way to manage properties without switching to the Backstage view:
- Click
File. - Select
Info. - In the Properties section, click
Propertiesand thenShow Document Panel. - A panel will open at the top of your document.
- Fill in or edit the properties as needed directly in this panel.
- After making changes, click
Save.
Step 7: Save and Close the Document
Ensure that all your changes are saved correctly.
- Click on the
Saveicon in the Quick Access Toolbar or pressCtrl + S. - Close the document by clicking the
Xbutton in the top-right corner or selectingFile > Close.
Get genuine Office Keys at unbeatable low prices for all your productivity needs!

