
Office Blog
How do you Create a Table with Merged Cells in Word?

Creating tables with merged cells in Word can be essential for customizing data presentation. This guide provides a detailed, step-by-step tutorial on how to create and merge cells in a Word table.
Step 1: Open Your Word Document
- Launch Microsoft Word: Open the Microsoft Word application on your computer.
- Open a Document: Go to “File” > “Open” to locate and open an existing document or “File” > “New” to create a new one.
- Position Your Cursor: Click on the spot in your document where you want to insert the table.
Step 2: Insert a Table
- Click on the Insert Tab: Navigate to the “Insert” tab in the top menu.
- Insert Table: Click on the “Table” button in the “Tables” group.
- Select Table Size: Use your mouse to drag across the grid to select the number of rows and columns you need, or click “Insert Table…” to manually enter the number of rows and columns.

Step 3: Populate the Table
- Enter Data: Click inside each cell to enter your data. Use
Tabto move to the next cell, or use your mouse to click inside each cell. - Complete Initial Data Entry: Enter the necessary content into all the cells of your table before proceeding to merge cells.
Step 4: Select the Cells to Merge
- Highlight Cells: Click and drag your mouse to highlight the cells you want to merge. Ensure the cells are adjacent to each other either horizontally, vertically, or in a block.
- Release Mouse Button: Once the desired cells are highlighted, release the mouse button.
Step 5: Merge Cells
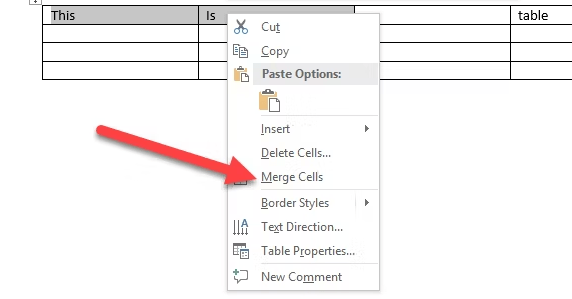
- Right-Click on Selected Cells: With the cells still highlighted, right-click to open the context menu.
- Select Merge Cells: In the context menu, click on “Merge Cells.” The selected cells will now be merged into a single cell.
- Verify the Merge: Check that your selected cells have successfully merged as intended.
Step 6: Adjust Table Alignment and Formatting (Optional)
- Align Text: Click inside the merged cell, go to the “Layout” tab under “Table Tools” and use the alignment tools in the “Alignment” group to set the text alignment within the merged cell.
- Adjust Cell Size: Click and drag the cell borders to adjust the size of the merged cells as needed.
- Apply Formatting: Use the options in the “Home” tab (e.g., font type, size, color) to format the text within the merged cells.
Step 7: Additional Merging and Customization (Optional)
- Merge More Cells: Repeat the process of highlighting cells and merging as needed throughout the table.
- Split Cells: If you need to split a merged cell, highlight it, right-click, and select “Split Cells” from the context menu. Specify the number of rows and columns for the split.
- Table Borders and Shading: Go to the “Design” tab under “Table Tools” to customize borders and shading to enhance the table’s appearance.
Step 8: Save Your Document
- Save Your Work: Click “File” > “Save” or use the shortcut
Ctrl + Sto save your document. - Save As New Version: If you wish to keep the original document unaltered, use “File” > “Save As” to create a new version with your edits.
Get genuine Office Keys at unbeatable prices on our website, offering fast and secure transactions for instant software activation.