
Office Blog
How do I Create Forms and Input Masks in Microsoft Access?

Forms and input masks in Microsoft Access can greatly enhance the user experience and ensure data integrity. In this step-by-step guide, we will show you how to create forms and input masks in Microsoft Access.
Step 1: Open Microsoft Access:
- Launch Microsoft Access on your computer.
- Create a new blank database or open an existing database.
Step 2: Design Form:
- Click on the “Forms” tab and select “Design View” to create a new form design.
- Add the desired fields and labels to the form by clicking on the corresponding tools in the “Design” tab.
- Customize the layout and appearance of the form using various design tools.
Step 3: Add Controls:
- Select the “Controls” group in the “Design” tab.
- Add text boxes, combo boxes, checkboxes, or other controls to the form by clicking on the corresponding button.
- Position and resize the controls as needed.
Step 4: Define Input Mask:
- Select a text box control on the form.
- In the “Properties” pane, navigate to the “Data” tab.
- Find the “Input Mask” property, and click on the ellipsis button.
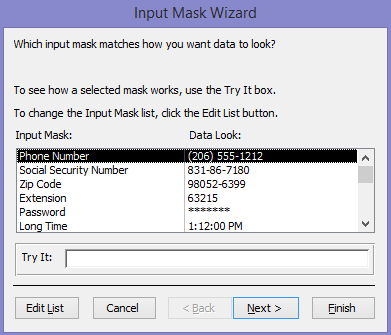
- In the “Input Mask Wizard,” choose from predefined input mask formats or create a custom input mask.
- Provide further instructions for the desired format, such as placeholders for letters, numbers, or symbols.
- Preview and test the input mask to ensure it meets your requirements.
Step 5: Set Form Properties:
- Right-click on the form in the navigation pane and select “Form Properties.”
- Customize properties, such as form title, background color, navigation buttons, and record selector.
- Save and close the form design.
Step 6: Test the Form:
- Go back to the Microsoft Access main window.
- Double-click on the form in the navigation pane to open it in Form view.
- Enter data into the form fields and observe how the input mask validates information.
Step 7: Fine-Tune the Form:
- If necessary, make adjustments to the form design or input masks by returning to Design View.
- Modify controls, adjust layout, or refine the input mask settings based on user feedback or specific requirements.
By following these step-by-step instructions, you can easily create forms and input masks in Microsoft Access. Tailor the form design to suit your needs, add controls for user input, then define and apply input masks for data validation.
Don’t have an Excel license? It’s not a problem. You can get one from our website, bundled within the Office Suite, which includes Office 2016, Office 2019, and Office 2021.