Office Blog
How do I Insert a Text Box with a Gradient Fill in Microsoft Word?
In Microsoft Word, text boxes can be a powerful tool for adding emphasis or highlighting important text. By adding a gradient fill to a text box, you can enhance its visual appeal and make it stand out in your document. This step-by-step guide will show you how to insert a text box with a gradient fill in Microsoft Word.
Step 1: Open Microsoft Word and Create a New Document
- Launch Microsoft Word on your computer.
- Click the “File” tab, then select “New” to create a new document.
Step 2: Insert a Text Box
- Place your cursor where you want to insert the text box.
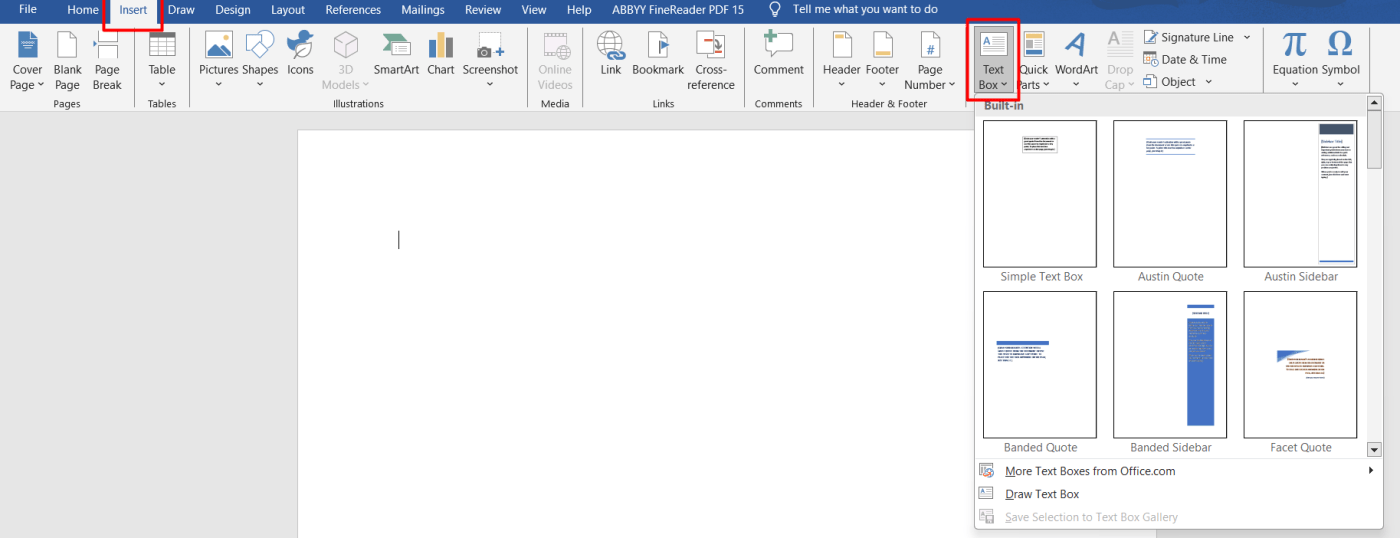
- Go to the “Insert” tab on the Word ribbon.
- Click on the “Text Box” button in the “Text” group.
- Choose a text box style from the options provided, or click “Draw Text Box” to create a custom-sized text box.

Step 3: Customize the Text Box
- Click inside the text box to activate it.
- Go to the “Format” tab on the Word ribbon.
- In the “Shape Styles” group, click on the “Shape Fill” button to open the fill options.
- Select “Gradient” from the fill options.
Step 4: Choose Gradient Fill Colors
- Click on the drop-down arrow next to the “Gradient Fill” button to open the gradient gallery.
- Select a preset gradient type that suits your design preference, or click on “More Gradients” at the bottom of the gallery to customize the colors further.
- In the “Gradient Stops” section, adjust the color, position, and transparency of each stop to create the desired gradient effect.
Step 5: Add Transparency or Texture to the Gradient Fill (Optional)
- To add transparency, select the “Transparency” option in the “Gradient Stops” section and adjust the slider to the desired level.
- To add texture, select the “Texture” option in the “Gradient Stops” section and choose a texture thumbnail from the available options.
Step 6: Apply Gradient Fill to the Text Box
- Once you have customized the gradient fill, click “Close” to apply it to the text box.
- Your text box will now have a gradient fill, adding visual interest to your document.
Step 7: Edit or Remove Gradient Fill
- To edit the gradient fill, select the text box and go back to the “Format” tab.
- Make the desired changes to the gradient colors, stops, transparency, or texture.
- To remove the gradient fill entirely, select the text box and click on the “Shape Fill” button, then choose “No Fill” from the options.
Conclusion:
With these step-by-step instructions, you can easily insert a text box with a gradient fill in Microsoft Word. By customizing the colors, transparency, and texture of the gradient fill, you can create visually appealing text boxes that grab attention and enhance your document design. Experiment with different gradient effects to make your Word documents more captivating and engaging.
Get an Excel license from our website, included in the Office Suite. Select from Office 2016, Office 2019, or Office 2021 based on your requirements.

