Office Blog
Tips for Protecting and Securing Excel Spreadsheets
In today’s data-driven world, protecting your information is more important than ever. Excel spreadsheets often contain sensitive data, such as financial records, personal information, or business performance metrics, and keeping this data secure is crucial. Fortunately, Excel offers a range of tools and best practices to protect your spreadsheets from unauthorized access, accidental changes, and data loss. Here’s a guide on top tips for protecting and securing your Excel files.
1. Set a Password to Open the Workbook
The first layer of protection for your Excel file is password-protecting the workbook. When you add a password, only users with that password can open the file.
To add a password:
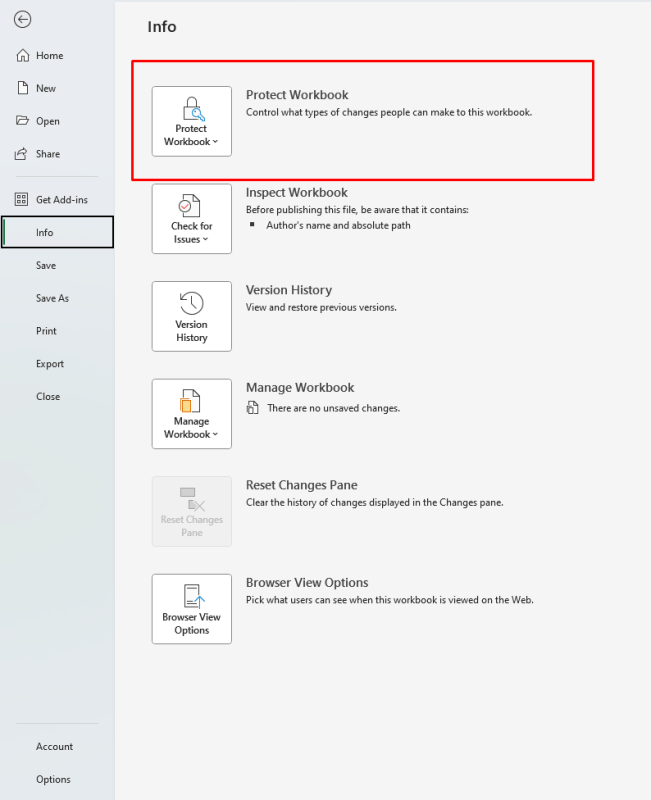
- Go to File > Info > Protect Workbook > Encrypt with Password.
- Enter a strong password and click OK.
- Remember to keep the password secure, as it cannot be recovered if lost.

2. Restrict Editing Access
If you want to allow others to view your spreadsheet but restrict editing, you can set specific permissions to limit what users can change.
To restrict editing access:
- Go to File > Info > Protect Workbook > Mark as Final. This sets the file to read-only, discouraging editing.
- Alternatively, select Protect Current Sheet to limit which cells or ranges can be edited.
3. Use Sheet Protection to Lock Specific Cells
If you only want to protect certain parts of a spreadsheet (e.g., formulas or headers), you can use sheet protection. This feature allows you to specify which cells are editable and which are not.
To lock specific cells:
- Select the cells you want to lock, right-click, and choose Format Cells.
- In the Protection tab, check Locked.
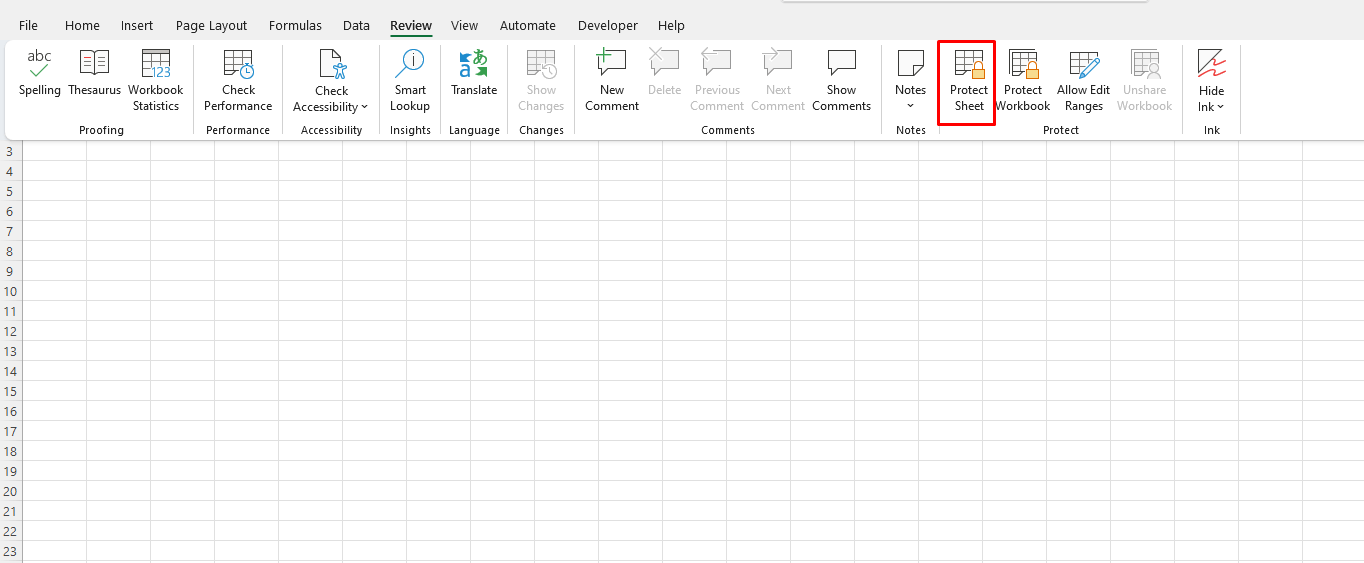
- Then, go to Review > Protect Sheet and set a password if desired. Only users with the password can unlock and edit protected cells.

4. Protect Your Workbook Structure
Excel’s workbook protection feature secures the structure of your workbook, preventing others from adding, deleting, or renaming sheets. This is useful for maintaining a consistent layout, especially if multiple users access the file.
To protect workbook structure:
- Go to Review > Protect Workbook.
- Select Structure and enter a password if needed.
5. Use Data Validation to Prevent Incorrect Entries
Data validation helps ensure data integrity by restricting the type of data that can be entered in specific cells. For instance, you can require a date, a list of options, or a number within a certain range.
To set data validation:
- Select the cells where you want to apply validation.
- Go to Data > Data Validation > Settings.
- Specify criteria, such as numbers only, dates only, or a predefined list.
6. Enable Track Changes for Collaborative Work
If multiple people work on the same file, tracking changes can help you monitor edits. This is particularly useful when reviewing changes made over time.
To enable Track Changes:
- Go to Review > Track Changes > Highlight Changes.
- Select Track changes while editing and specify preferences. Excel will mark any changes and allow you to review or accept them.
7. Use File Recovery Options to Protect Against Data Loss
Excel offers built-in file recovery options to protect your work in case of unexpected shutdowns or crashes. AutoSave and AutoRecover can help prevent data loss.
To enable AutoSave and AutoRecover:
- Go to File > Options > Save.
- Set the AutoSave interval (e.g., every 10 minutes) and enable AutoRecover.
8. Encrypt Data with BitLocker (for Windows Users)
For an additional layer of security, Windows users can encrypt their Excel files using BitLocker, which secures your file by requiring a password at the file system level.
To use BitLocker encryption:
- Right-click the drive where your Excel files are stored.
- Select Turn on BitLocker and follow the instructions to set up encryption.
9. Avoid Using Macros Without Protection
Macros can be powerful, but they may contain malicious code if obtained from an untrusted source. Make sure to protect macros by setting macro security levels to prevent unauthorized or harmful code from running.
To set macro security:
- Go to File > Options > Trust Center > Trust Center Settings > Macro Settings.
- Select Disable all macros with notification to prevent macros from running without your permission.
10. Back Up Regularly
Backing up your Excel files ensures that you have a secure copy in case of accidental deletion or corruption. Save copies in a secure cloud service or external storage to ensure your data is always accessible.
Get genuine Office Keys at affordable prices and enhance your productivity with premium Microsoft Office features—without breaking the bank!

