Office Blog
How to Create a Budget Tracker in Excel?
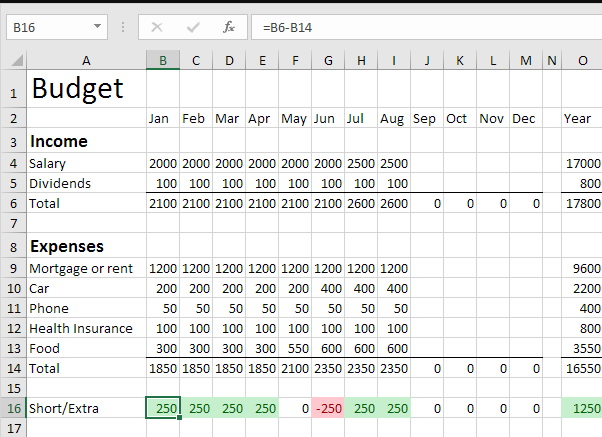
Managing your finances effectively is crucial for personal and business success. A budget tracker can help you monitor income, expenses, and savings goals, allowing you to make informed financial decisions. Excel is an excellent tool for creating a customizable budget tracker that fits your specific needs. In this guide, we’ll walk you through the steps to create a budget tracker in Excel, from setting up your spreadsheet to analyzing your financial data.
Step 1: Open Excel and Set Up Your Workbook
- Launch Excel: Open Microsoft Excel on your computer or use Excel Online.
- Create a New Workbook: Click on “New” and select “Blank Workbook” to start fresh.
- Save Your Workbook: Click on “File,” then “Save As,” and choose a name for your budget tracker (e.g., “Monthly Budget Tracker”).
Step 2: Define Your Budget Categories
To create an effective budget tracker, you need to establish categories for your income and expenses. Common categories include:
- Income: Salary, freelance income, rental income, etc.
- Fixed Expenses: Rent/mortgage, insurance, subscriptions, etc.
- Variable Expenses: Groceries, dining out, entertainment, etc.
- Savings: Emergency fund, retirement contributions, investments, etc.
Setting Up Categories in Excel
- Create a Category List: In Column A, start by listing your budget categories. For example:
- A1: Income
- A2: Salary
- A3: Freelance Income
- A4: Total Income (use a formula to sum up income)
- A6: Fixed Expenses
- A7: Rent
- A8: Insurance
- A9: Total Fixed Expenses (sum up fixed expenses)
- A11: Variable Expenses
- A12: Groceries
- A13: Dining Out
- A14: Total Variable Expenses (sum up variable expenses)
- A16: Savings
- A17: Emergency Fund
- A18: Retirement Savings
- A19: Total Savings (sum up savings)
- Format Your Category List: Bold the headers for each section (Income, Fixed Expenses, Variable Expenses, Savings) to distinguish them easily.

Step 3: Input Your Income and Expense Data
In the columns next to your categories, create a space to input your budgeted amounts and actual amounts.
Example Structure:
- Column B: Budgeted Amount
- Column C: Actual Amount
- Column D: Difference (Budgeted – Actual)
Example Setup:
- B1: (Leave empty)
- B2: Enter your budgeted salary amount (e.g., $3,000)
- B3: Enter your budgeted freelance income (e.g., $500)
- C2: Enter your actual salary amount (e.g., $3,200)
- C3: Enter your actual freelance income (e.g., $450)
Step 4: Create Formulas to Calculate Totals and Differences
- Calculate Total Income:
- In B4, enter the formula:
=SUM(B2:B3)to sum up your budgeted income. - In C4, enter the formula:
=SUM(C2:C3)to sum up your actual income.
- In B4, enter the formula:
- Calculate Total Expenses:
- For Fixed Expenses, in B9 enter:
=SUM(B7:B8), and in C9:=SUM(C7:C8). - For Variable Expenses, in B14 enter:
=SUM(B12:B13), and in C14:=SUM(C12:C13).
- For Fixed Expenses, in B9 enter:
- Calculate Total Savings:
- In B19:
=SUM(B17:B18), and in C19:=SUM(C17:C18).
- In B19:
- Calculate Differences:
- In D4, enter:
=B4-C4to see the difference for total income. - Repeat for total fixed expenses, variable expenses, and total savings.
- In D4, enter:
Step 5: Create a Summary Section
At the bottom of your budget tracker, create a summary section to view your overall financial health:
- Total Income vs. Total Expenses:
- In A21, type “Net Income.”
- In B21, enter:
=B4-B9-B14to calculate your net income based on your budget. - In C21, enter:
=C4-C9-C14to calculate your actual net income.
- Savings:
- In A23, type “Total Savings.”
- In B23:
=B19and in C23:=C19.
Step 6: Format Your Budget Tracker
To make your budget tracker visually appealing and easy to read:
- Use Cell Borders: Highlight your categories and totals, and apply borders for better separation.
- Color Coding: Use different fill colors for categories to enhance visual clarity (e.g., light green for income, light red for expenses).
- Conditional Formatting: Use conditional formatting to highlight negative values in red (e.g., if actual expenses exceed budgeted amounts).
Step 7: Review and Adjust
As you begin tracking your income and expenses, regularly review your budget tracker to identify trends and areas for improvement. Update your budgeted amounts as necessary, and analyze your spending habits to help achieve your financial goals.
Unlock the full Microsoft Office experience with the cheapest Office Keys available on our website—get productivity at unbeatable prices!

