Office Blog
How do you Remove Extra Spaces Between Words in Word?
Having extra spaces between words in your Microsoft Word document can affect its appearance and readability. This step-by-step guide will help you remove those unwanted spaces efficiently.
Step 1: Open Your Document
- Launch Microsoft Word on your computer.
- Click on “File” in the top-left corner.
- Choose “Open” and select the document where you want to remove the extra spaces, or create a new one by selecting “New.”
Step 2: Select the Affected Text
- To select the entire document, press
Ctrl + Aon your keyboard (orCommand + Aon Mac). - Alternatively, click and drag your mouse to highlight the specific section of text you want to modify.
Step 3: Open the Replace Tool
- Go to the “Home” tab on the ribbon.
- Click on “Replace” in the “Editing” group, or press
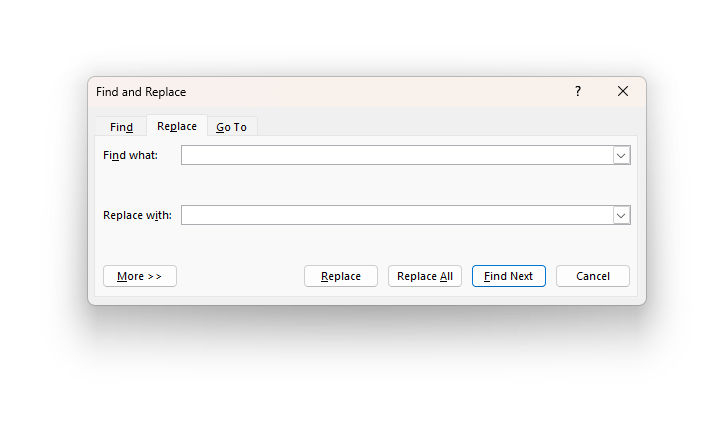
Ctrl + Hon your keyboard (orCommand + Hon Mac). This will open the Find and Replace dialog box.

Step 4: Find Extra Spaces
- In the “Find and Replace” dialog box, ensure you are in the “Replace” tab.
- In the “Find what” field, enter two spaces (press the spacebar twice).

Step 5: Replace with a Single Space
- In the “Replace with” field, enter a single space (press the spacebar once).
- Click on the “More>>” button to expand the options if needed.
Step 6: Replace All Extra Spaces
- Click on “Replace All” to remove all instances of double spaces with a single space throughout the selected text or the entire document.
- A dialog box will appear indicating how many replacements have been made. Click “OK” to confirm.
Step 7: Repeat if Necessary
- Extra spaces may sometimes exist as more than two consecutive spaces. Repeat Steps 4 through 6 until the message indicates “0 replacements were made.”
- Continue this process until no more extra spaces are detected.
Step 8: Use Advanced Options (Optional)
- If you still notice formatting issues or extra spaces, you can refine your search. In the “Find and Replace” dialog box, click the “More>>” button.
- Check the box labeled “Use wildcards.”
- In the “Find what” field, type
([ ]{2,}). This searches for multiple consecutive spaces. - In the “Replace with” field, type (a single space).
- Click “Replace All” and confirm the changes.
Step 9: Manual Inspection and Correction
- Scroll through your document to manually inspect if there are still any unwanted spaces left.
- If necessary, place your cursor before the extra space and press the “Delete” key or after the extra space and press the “Backspace” key to manually remove them.
Unlock the full potential of your productivity tools by purchasing genuine Office Keys for reliable software and seamless upgrades.

