Office Blog
How do you et up Double Sided Printing in Word?
Double Sided Printing can save paper and make your printed materials more professional. Here is a step-by-step guide to setting up double-sided printing in Microsoft Word.
Step 1: Open Your Document
- Launch Microsoft Word on your computer.
- Click on “File” in the top-left corner.
- Choose “Open” and select the document you want to print, or create a new document by selecting “New.”
Step 2: Access the Print Menu
- Once your document is open, go back to the “File” tab in the top-left corner.
- Select “Print” from the list of options. This will open the Print menu.
Step 3: Select Your Printer
- In the Print menu, make sure your desired printer is selected in the “Printer” dropdown menu.
Step 4: Open Printer Properties
- Under the printer selection, click on “Printer Properties” or “Printer Preferences.” The wording may vary depending on your printer model, but it is usually located under the printer name.
Step 5: Enable Double-Sided Printing
- In the Printer Properties or Printer Preferences window, look for a tab or section related to “Duplex,” “Double-Sided Printing,” or “Two-Sided Printing.”
- Check the box or select the option to enable double-sided printing. Here are some common variations you might see:
- “Print on Both Sides”
- “Flip on Long Edge”
- “Flip on Short Edge” (Choose the appropriate option depending on how you want the pages to flip)

Step 6: Adjust Additional Settings (if needed)
- You may have additional settings available, such as “Page Order” or “Binding Edge.” Adjust these settings as needed to fit your specific printing requirements.
Step 7: Confirm and Print
- Click “OK” or “Apply” to save your duplex printing settings and return to the Print menu.
- In the Print menu, review your settings to ensure everything looks correct.
- Click the “Print” button to start printing your document double-sided.
Step 8: Manual Duplex Printing (if necessary)
If your printer does not support automatic double-sided printing, you can print double-sided manually:
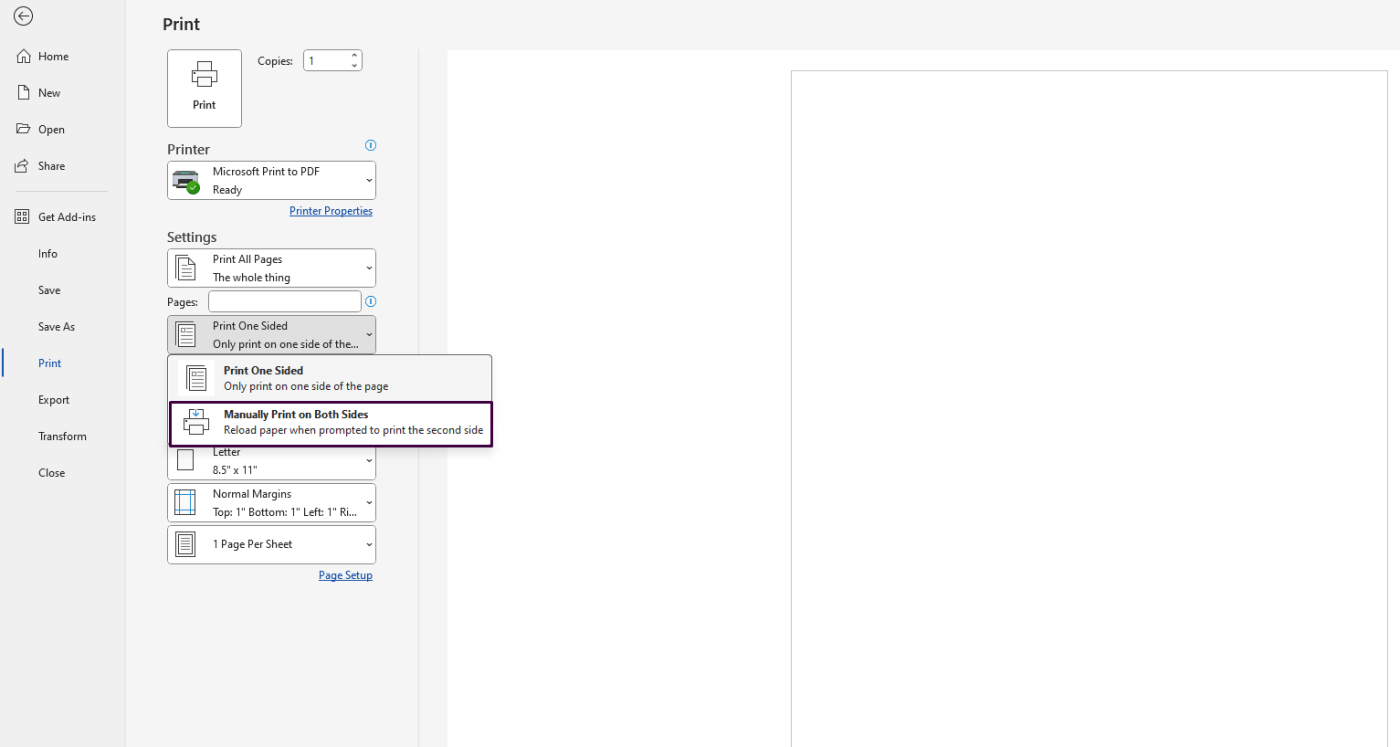
- In the Print menu, click on “Print One Sided” dropdown, and select “Manually Print on Both Sides.”
- Print the first side of the pages.
- Follow the on-screen instructions to reload the printed pages into the printer tray to print on the other side.
Step 9: Save Your Printing Settings as a Preset (Optional)
- If you frequently print double-sided, you might want to save your settings as a preset.
- Go back to the Print menu, and in the Printer Properties or Printer Preferences window, look for an option to save or name your current settings.
- Save the settings using a name like “Double-Sided Printing” for easy access in the future.
Get your genuine Office Keys today and enjoy lifetime access to the full suite of Microsoft Office tools at unbeatable prices.

