
Office Blog
How do you Create a Multi-level Numbered List in Word?

Creating a multi-level numbered list in Microsoft Word can help you organize complex information in a structured format. This guide will walk you through the process step-by-step, providing detailed instructions for each stage.
Step 1: Open Your Word Document
- Launch Word: Open Microsoft Word on your computer.
- Open a Document: Go to “File” > “Open” to locate and open an existing document or “File” > “New” to create a new one.
- Select a Location: Click where you want to insert the multi-level list.
Step 2: Choose the Multilevel List Option
- Click on the Home Tab: Navigate to the “Home” tab in the top menu.
- Find the Paragraph Group: Look for the “Paragraph” group within the “Home” tab.
- Click on Multilevel List: In the “Paragraph” group, click the “Multilevel List” button. It looks like a series of horizontal lines with various indentations.

Step 3: Select a Multilevel List Style
- Choose a List Style: A dropdown menu will appear. You can choose from several preset list styles. Click on the one that best suits your needs.
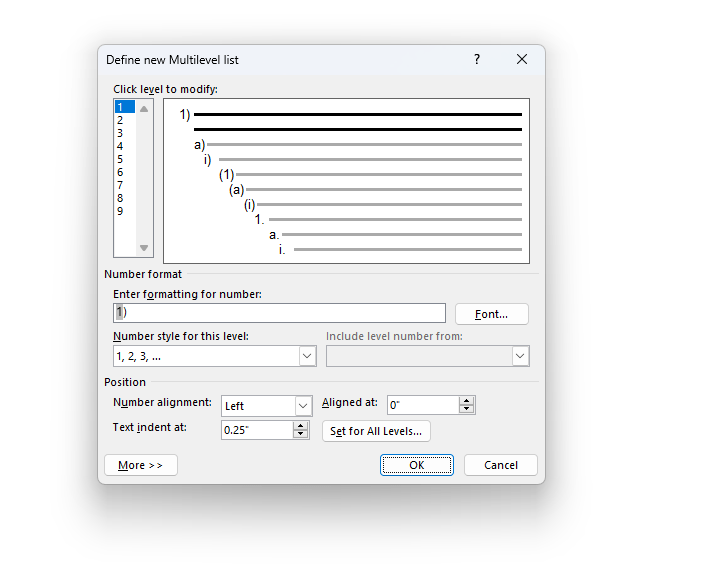
- Select: Define New Multilevel List (Optional): If you want to customize your list further, click “Define New Multilevel List.” In the dialog box, you can specify the number format, levels, and alignment.
Step 4: Start Typing Your List
- First Level Item: Start typing your first item. Press
Enterwhen you’re done with the first item. - Second Level Item: Press
Tabon your keyboard to demote the current item to a lower level. Type the second-level item and pressEnteragain. - Continue Typing: Continue this process for additional items. Use
Tabto create sub-levels andEnterto add new items.
Step 5: Adjust List Levels
- Promote a Level: If you want to move an item to a higher level, place the cursor at the beginning of the item and press
Shift + Tabon your keyboard. - Demote a Level: To move an item to a lower level, place the cursor at the beginning of the item and press
Tab. - Change Levels Using Multilevel List Button: Alternatively, you can use the “Multilevel List” button to promote or demote levels by selecting the line, clicking the button, and choosing the desired level.
Step 6: Customize the Numbering Format (Optional)
- Select Define New Number Format: If you need to customize the numbering, click “Multilevel List” > “Define New Number Format.”
- Adjust Number Style: In the dialog box, you can change the number style (e.g., Roman numerals, Arabic numerals, letters).
- Set Up Number Position: Specify where the numbers should appear and click “OK” to apply changes.
Step 7: Fine-Tune List Indentation (Optional)
- Open Paragraph Dialog Box: Click the small arrow in the bottom-right corner of the “Paragraph” group to open the dialog box.
- Adjust Indentation: In the dialog box, adjust the “Indentation” settings to fine-tune how far each level is indented.
- Click OK: Apply the changes by clicking “OK.”
Step 8: Save Your Document
- Save Your Work: Click “File” > “Save” or use the shortcut
Ctrl + Sto save your document with the new multi-level list. - Save As New Version: If you wish to keep the original document unaltered, use “File” > “Save As” to create a new version with your edits.
Get genuine Office Keys at unbeatable prices on our website, offering fast and secure transactions for instant software activation.