
Excel Blog, Office Blog
How do you Apply the DATEDIF Function in Excel?

he DATEDIF function in Excel is a versatile tool that enables users to calculate the difference between two dates in various units (days, months, years). Despite being a hidden gem as it doesn’t appear in the function list, DATEDIF can be incredibly useful in a variety of date-related calculations.
In this step-by-step guide, we’ll show you how to use the DATEDIF function effectively.
Step 1: Open Your Excel Workbook
First, open the Excel workbook where you want to apply the DATEDIF function. You can either create a new workbook or use an existing one.
- Launch Excel.
- Open an existing workbook or go to
File > Newto create a new one.
Step 2: Enter Your Dates
To use the DATEDIF function, you need two dates: the start date and the end date. Enter these dates into two separate cells in your worksheet.
- Click on the cell where you’d like to enter your start date (e.g., A1).
- Type the start date (e.g.,
01/01/2022). - Click on the cell where you’d like to enter your end date (e.g., B1).
- Type the end date (e.g.,
12/31/2022).
Step 3: Select the Cell for Your DATEDIF Formula
Choose the cell where you want to display the result of the DATEDIF function. This is where the function will be applied.
- Click on the cell where you’d like the DATEDIF result to appear (e.g., C1).
Step 4: Enter the DATEDIF Formula
Now, you will enter the DATEDIF formula to calculate the difference between the two dates.
- Click on the formula bar and type in the following formula:
=DATEDIF(A1, B1, "Y")Here’s what the formula components mean:
- A1: The cell containing the start date.
- B1: The cell containing the end date.
- “Y”: The unit of time you wish to calculate (in this case, years).
- Press
Enterto apply the formula.
Step 5: Change the Unit of Measurement
The DATEDIF function allows you to calculate the difference in several units, such as days, months, or years. Here are the units you can use and how to change them:
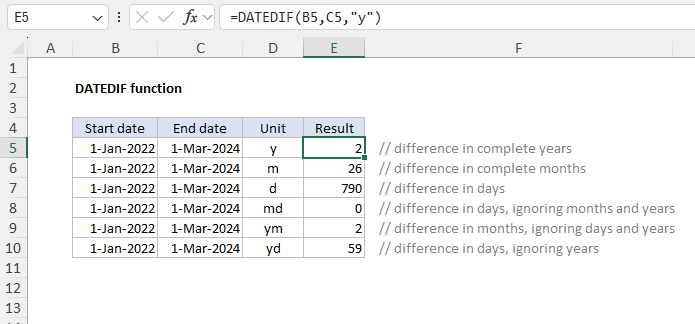
- Years (“Y”): Calculates the number of full years between the two dates.
=DATEDIF(A1, B1, "Y")- Months (“M”): Calculates the number of full months between the two dates.
=DATEDIF(A1, B1, "M")- Days (“D”): Calculates the number of days between the two dates.
=DATEDIF(A1, B1, "D")- Days Ignoring Years (“MD”): Calculates days between dates, ignoring years.
=DATEDIF(A1, B1, "MD")- Days Ignoring Months (“YD”): Calculates days between dates, ignoring months.
=DATEDIF(A1, B1, "YD")- Months Ignoring Years (“YM”): Calculates months between dates, ignoring years.
=DATEDIF(A1, B1, "YM")Simply replace "Y" in the initial formula with any of the above units to change the calculation.
Step 6: Verify Your Results
After applying the formula, check the result to ensure it calculates the difference correctly. Excel should now display the difference in the unit you specified.
Step 7: Handle Errors
If Excel returns an error, ensure both dates are valid and formatted correctly. Common issues include:
- Incorrect date format.
- The end date is earlier than the start date (DATEDIF requires the end date to be greater than or equal to the start date).
Unlock the full potential of your productivity tools by purchasing genuine Office Keys for reliable software and seamless upgrades.