
Windows Blog
How do you access Safe Mode in Windows?

Accessing Safe Mode in Windows can be an essential step in troubleshooting various issues, from software conflicts to malware infections. Safe Mode allows you to start Windows with a minimal set of drivers and services, which can help you isolate problems and perform repairs. In this guide, we will walk you through the different methods to access Safe Mode in Windows 10 and Windows 11.
What is Safe Mode?
Safe Mode is a diagnostic mode that starts Windows with only the necessary files and drivers. This limited environment allows you to troubleshoot issues without interference from third-party software, services, or drivers that may be causing problems. Once in Safe Mode, you can perform tasks such as uninstalling problematic software, running antivirus scans, or restoring system settings.
Methods to Access Safe Mode
Method 1: Using the Settings App
- Open Settings: Click on the Start menu and select the Settings gear icon.
- Go to Update & Security: In the Settings window, click on Update & Security.
- Select Recovery: In the left sidebar, click on Recovery.
- Advanced Startup: Under the Advanced startup section, click on the Restart now button. Your PC will restart and take you to the recovery menu.
- Troubleshoot: Select Troubleshoot from the options.
- Advanced options: Next, click on Advanced options.
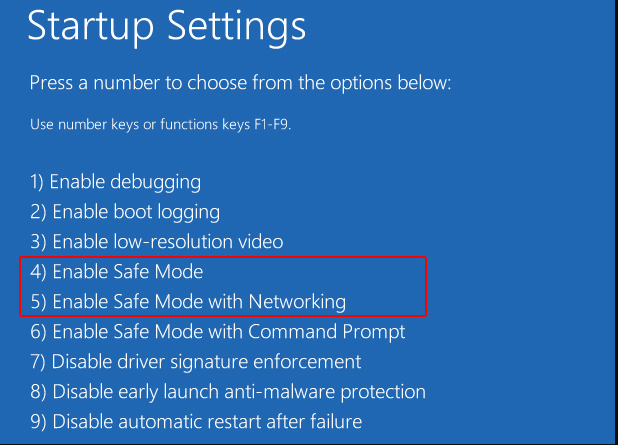
- Startup Settings: Click on Startup Settings.
- Restart: Press the Restart button. After your PC restarts, you will see a list of options.
- Choose Safe Mode: Press the corresponding number key for the Safe Mode option you wish to use (usually 4 for Safe Mode or 5 for Safe Mode with Networking).
Method 2: Using the Sign-in Screen
If you can’t access Windows normally, you can enter Safe Mode from the sign-in screen:
- Restart your PC: On the sign-in screen, hold down the Shift key while clicking the Power button in the lower-right corner and select Restart.
- Follow Steps 5 to 9: Once your PC restarts, follow the same steps outlined in Method 1 from the Troubleshoot option onward.
Method 3: Using the F8 Key (Legacy Method)
For older versions of Windows, you could press F8 during startup to access Safe Mode. While this method is less common in Windows 10 and 11, some systems may still support it.
- Restart your PC: If your PC is turned off, turn it on.
- Press F8 repeatedly: As soon as the computer starts, repeatedly press the F8 key until the Advanced Boot Options menu appears.
- Select Safe Mode: Use the arrow keys to select Safe Mode or Safe Mode with Networking and press Enter.
Method 4: Using Installation Media
If you are unable to boot into Windows, you can use a Windows installation media (USB or DVD) to access Safe Mode.
- Insert Installation Media: Connect the USB drive or insert the DVD containing the Windows installation files.
- Boot from Media: Restart your computer and boot from the installation media.
- Select Repair your computer: Choose the Repair your computer option on the install screen.
- Troubleshoot: Click on Troubleshoot and follow the steps from Method 1, starting from the Advanced options.
What to Do in Safe Mode
Once you are in Safe Mode, you can troubleshoot and fix various issues:
- Uninstall Recent Programs: If you recently installed software that may be causing problems, uninstall it.
- Run Antivirus Scans: Use your antivirus software to scan for and remove malware.
- Update Drivers: Check for driver updates that may resolve hardware issues.
- Perform System Restore: If your system was functioning properly before a recent change, use System Restore to revert to a previous state.
Get the best deals on cheap Windows keys and unlock your system’s full potential without breaking the bank!