
Windows Blog
How do I create Virtual Machines in Windows 11 Pro?
Creating virtual machines in Windows 11 Pro is a powerful way to run multiple operating systems on a single device. With the help of Hyper-V, a built-in feature in Windows 11 Pro, you can set up virtual environments for testing software, running older operating systems, or isolating applications. Here’s a step-by-step guide on how to create virtual machines (VMs) in Windows 11 Pro.
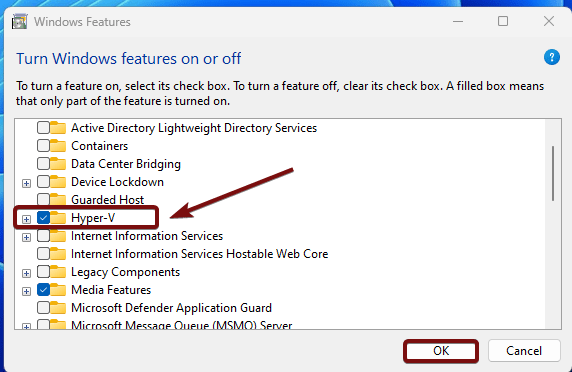
Step 1: Enable Hyper-V in Windows 11 Pro
Before creating a virtual machine, you need to enable Hyper-V. To do this:
- Open Control Panel by searching for it in the Start menu.
- Go to Programs > Programs and Features > Turn Windows features on or off.
- Scroll down and check Hyper-V, then click OK.
- Restart your computer to complete the installation.
Step 2: Open Hyper-V Manager
Once Hyper-V is enabled, you can access it through Hyper-V Manager:
- Search for Hyper-V Manager in the Start menu and open it.
- You’ll see the Hyper-V Manager interface, where you can create and manage virtual machines.
Step 3: Create a New Virtual Machine
To create a virtual machine:
- In Hyper-V Manager, right-click on your computer’s name and select New > Virtual Machine.
- This will open the New Virtual Machine Wizard. Click Next to begin.
Step 4: Specify the VM Name and Location
Enter a name for your virtual machine and choose where to store it. You can either use the default location or specify a different folder on your hard drive.
Step 5: Allocate Memory and Processor Resources
- Set the amount of memory (RAM) you want to allocate to your VM. It’s a good idea to start with at least 2 GB for basic use.
- Allocate the number of virtual processors based on your needs. For basic tasks, one processor is enough, but you can allocate more if you require extra computing power.
Step 6: Configure Networking
Select an existing network connection if you want your virtual machine to access the internet or local network. Otherwise, you can choose Not Connected if you don’t need network access.
Step 7: Create a Virtual Hard Disk
You will be prompted to create a virtual hard disk (VHD) for your VM:
- Choose the size of the hard disk (20-50 GB is a good starting point).
- You can create a new virtual disk or attach an existing one if you have already set up a VHD.
Step 8: Install the Operating System
- You can choose to install an operating system later, or you can install it from an ISO file, CD/DVD, or bootable USB.
- If using an ISO file, select Install an operating system from a bootable CD/DVD-ROM and choose the ISO file location.
Step 9: Finish and Start the Virtual Machine
Once all the settings are configured, click Finish. Your new virtual machine will be listed in Hyper-V Manager. To start the VM, right-click on it and choose Start. You can connect to the VM’s console by selecting Connect.
Get your cheap Windows 11 Pro Key today and unlock premium features for business and productivity at the best price!