
Windows Blog
How do I Create a Virtual Machine in Windows 10 Pro?

Creating a virtual machine (VM) in Windows 10 Pro allows you to run multiple operating systems on a single physical machine. This is particularly useful for software testing, development, or running applications that are not compatible with your current OS. Here’s a step-by-step guide to creating a virtual machine using Hyper-V, which is included in Windows 10 Pro.
Step 1: Enable Hyper-V
- Open Control Panel: Press Windows key + X and select Control Panel.
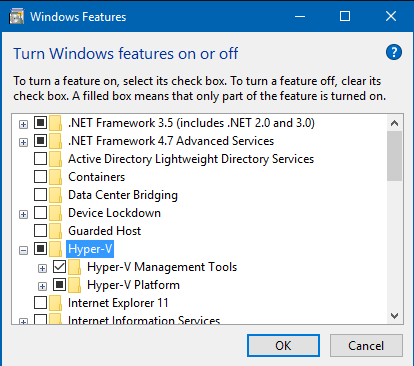
- Access Programs and Features: Click on Programs, then select Turn Windows features on or off.
- Enable Hyper-V: In the Windows Features dialog, check the box for Hyper-V. Ensure that both Hyper-V Management Tools and Hyper-V Platform are selected.
- Restart Your Computer: Click OK and restart your computer to apply the changes.
Step 2: Open Hyper-V Manager
- Launch Hyper-V Manager: Press Windows key + S and type Hyper-V Manager. Click to open it.
- Select Your Computer: In the Hyper-V Manager, you will see your computer name in the left panel.
Step 3: Create a New Virtual Machine
- Start the New VM Wizard: In the Actions panel on the right, click on New, then select Virtual Machine.
- Follow the Wizard: Click Next to begin the configuration.
- Specify Name and Location: Enter a name for your virtual machine. You can also choose to store the VM in a different location if desired.
- Select Generation: Choose between Generation 1 (supports 32-bit and 64-bit) and Generation 2 (only supports 64-bit). Generation 2 VMs are recommended for newer operating systems.
Step 4: Assign Memory
- Allocate Memory: Specify the amount of memory (RAM) to allocate to the VM. A minimum of 2048 MB is recommended for Windows 10.
- Enable Dynamic Memory (optional): You can check the option for Use dynamic memory for this virtual machine to allow the VM to adjust its memory allocation based on demand.
Step 5: Configure Network
- Connect Virtual Network: Choose a network switch to connect your VM to the internet or local network. If you haven’t created a virtual switch yet, you can do that later.
- Click Next to proceed.
Step 6: Create a Virtual Hard Disk
- Specify Hard Disk: You can create a new virtual hard disk or use an existing one. If creating a new one, specify the name, location, and size.
- Click Next to continue.
Step 7: Install Operating System
- Choose Installation Method: You can install an operating system from an ISO file, a bootable USB drive, or from a network. Select the appropriate option.
- If using an ISO file, browse to locate the file on your computer.
- Click Next to review your settings.
Step 8: Finish and Start the VM
- Review Settings: Ensure all the settings are correct. Click Finish to create the virtual machine.
- Start the Virtual Machine: In Hyper-V Manager, right-click on your new VM and select Connect. Then click the Start button in the top menu.
- Install the Operating System: Follow the prompts to install the operating system in the virtual machine.
Get the best deals on the cheapest Windows 10 Pro keys—unlock premium features for your PC at an unbeatable price today!