Office Blog
Creating Custom Margins and Layouts in Word
When it comes to document formatting, Microsoft Word provides a range of options to ensure your content looks polished and professional. Custom margins and layouts allow you to create a document that meets specific requirements, whether for business, school, or personal use. In this guide, we’ll walk you through the process of setting custom margins and layouts in Word, ensuring that your documents stand out for all the right reasons.
Why Use Custom Margins and Layouts?
Custom margins and layouts can improve the readability of your document and allow you to adhere to specific guidelines required for submissions, such as:
- Business Reports: Ensuring a professional appearance.
- Academic Papers: Meeting submission criteria for universities.
- Newsletters and Flyers: Designing attractive and engaging materials.
By customizing margins and layouts, you can maximize space, create visual balance, and enhance the overall presentation of your document.
Step 1: Setting Custom Margin
To set custom margins in Microsoft Word, follow these steps:
- Open Your Document: Launch Microsoft Word and open the document you wish to format.
- Access the Layout Tab: Click on the Layout tab in the Ribbon at the top of the window.
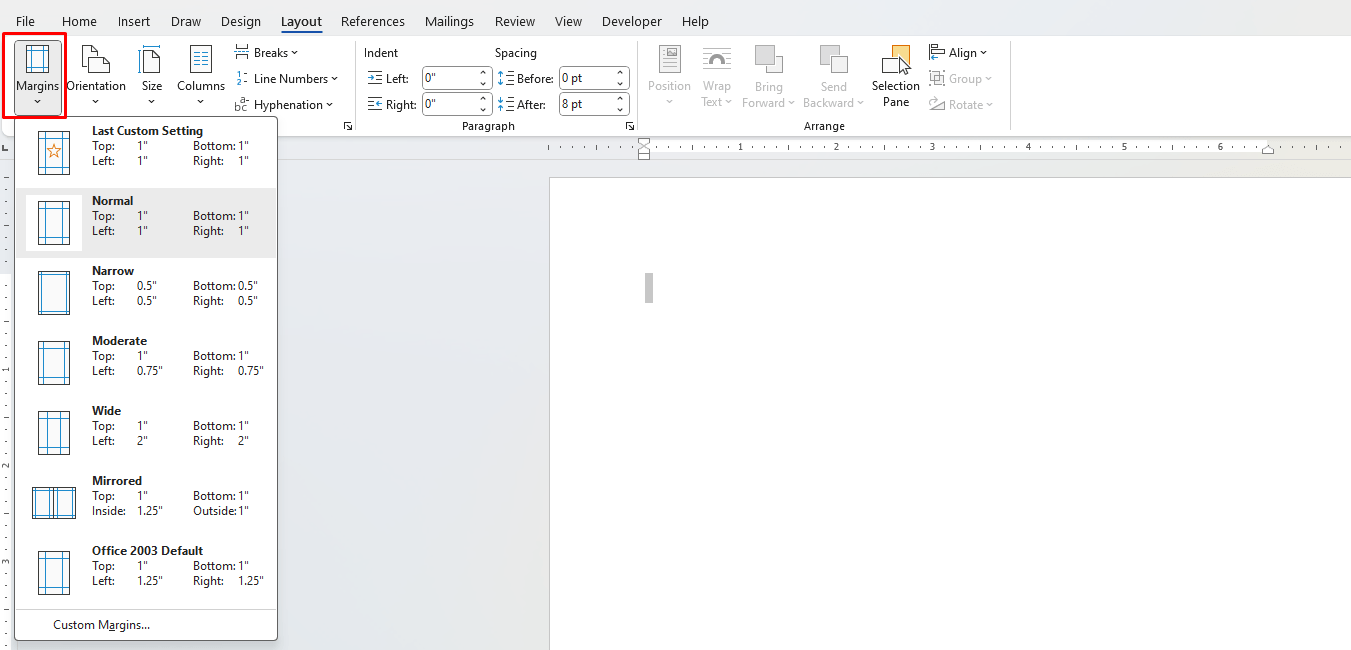
- Select Margins: In the Page Setup group, click on the Margins button. This will display several preset margin options.
- Custom Margins: To create your own, select Custom Margins at the bottom of the dropdown menu. This opens the Page Setup dialog box.
- Adjust Margins: In the Page Setup dialog box, you can set the top, bottom, left, and right margins. Enter the desired values (in inches or centimeters), and you’ll see a preview of how these changes will affect your layout.
- Apply Changes: Once you’ve set your custom margins, click OK to apply the changes to your document.

Step 2: Changing Page Orientation
The layout of your document can also be affected by the orientation you choose. Word allows you to switch between portrait and landscape orientations:
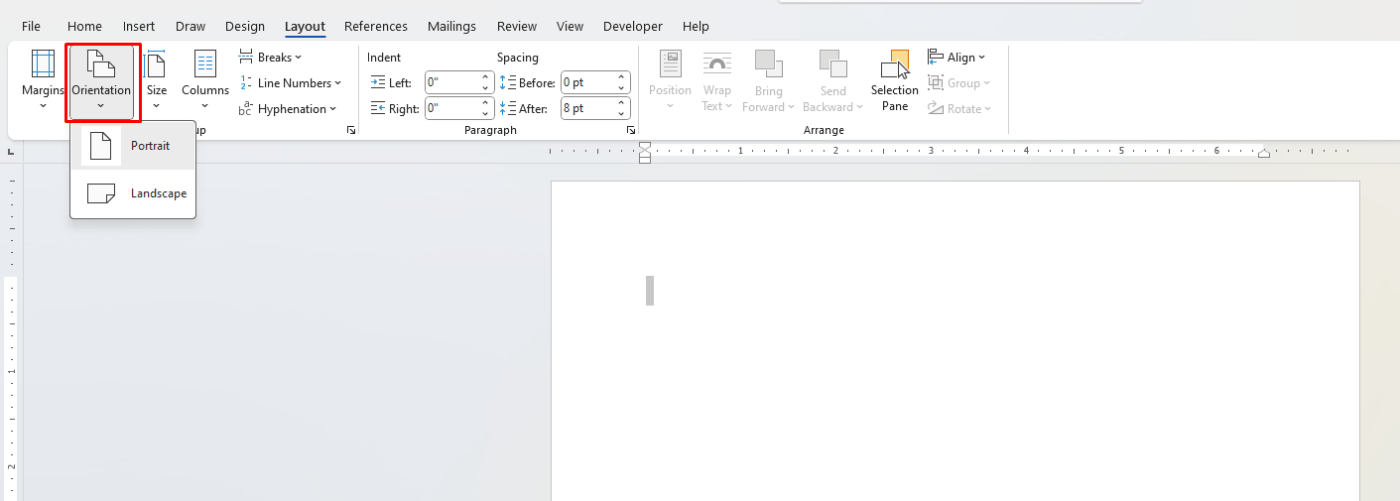
- Still in the Layout Tab: Click on the Orientation button in the Page Setup group.
- Choose Orientation: Select either Portrait (vertical) or Landscape (horizontal) to suit your content needs.

Step 3: Setting Up Custom Page Size
If you need a specific page size, you can also customize this in Word:
- Open Page Setup: Return to the Layout tab and click on the small arrow in the bottom-right corner of the Page Setup group to open the Page Setup dialog box.
- Choose Paper Size: In the Paper tab, you’ll find a dropdown menu for Paper Size. Select Custom Size if your required size is not listed.
- Define Custom Size: Enter the width and height for your custom paper size.
- Apply Changes: Click OK to apply your custom page size.
Step 4: Adding Columns for Layout Variety
If you want to create a more dynamic layout, consider using columns:
- Select the Layout Tab: Click on the Layout tab in the Ribbon.
- Columns: In the Page Setup group, click on the Columns button. You can choose from one of the preset options (One, Two, Three) or click on More Columns for additional customization.
- Set Custom Columns: If you select More Columns, you can specify the number of columns, the spacing between them, and whether you want a line between columns.
- Apply to the Whole Document or Section: Decide if you want the columns applied to the entire document or just a selected part by choosing the appropriate option.
Step 5: Creating Headers and Footers
Headers and footers can enhance the layout by providing consistent information across pages, such as titles, page numbers, and dates.
- Insert Header/Footer: Go to the Insert tab and select either Header or Footer.
- Choose a Style: Select a predefined style or choose Edit Header/Footer to create a custom design.
- Add Content: Type in your desired text or insert page numbers by going to Page Number in the Header & Footer Tools tab.
- Close Header/Footer: Click on Close Header and Footer when finished to return to the main document.
Step 6: Save Your Custom Layout as a Template
If you’ve created a layout that you find particularly useful, consider saving it as a template:
- Go to File: Click on File in the Ribbon.
- Save As: Select Save As and choose a location on your computer.
- Choose Template Format: In the Save as type dropdown, select Word Template (*.dotx).
- Name Your Template: Give your template a name and click Save. You can now use this template for future documents, maintaining your custom layout and margins.
Unlock your productivity with our genuine Office Keys, providing you access to all the essential Microsoft Office applications for seamless work and creativity.

