Office Blog
Best Ways to Format Long Documents in Word
Formatting long documents in Microsoft Word can be a daunting task, especially when you’re dealing with large amounts of text, numerous sections, and various elements like tables, images, and footnotes. However, with the right strategies, Word can help you organize your work, making it look professional and easy to read. Let’s explore the best ways to format long documents in Word to ensure your document is well-structured and visually appealing.
1. Use Styles for Consistent Formatting
One of the most powerful tools in Word for formatting long documents is the use of Styles. Styles allow you to apply consistent formatting throughout your document for headings, subheadings, body text, and more. Rather than manually adjusting fonts, sizes, and spacing for every heading or paragraph, applying styles can save you time and ensure uniformity.
Here’s how to use styles:
- Go to the Home tab in the Ribbon.
- Under the Styles group, choose from predefined styles like Heading 1, Heading 2, Normal, etc.
- Customize these styles by right-clicking on a style and selecting Modify.
- Apply the styles to your text by selecting the text and clicking the desired style.
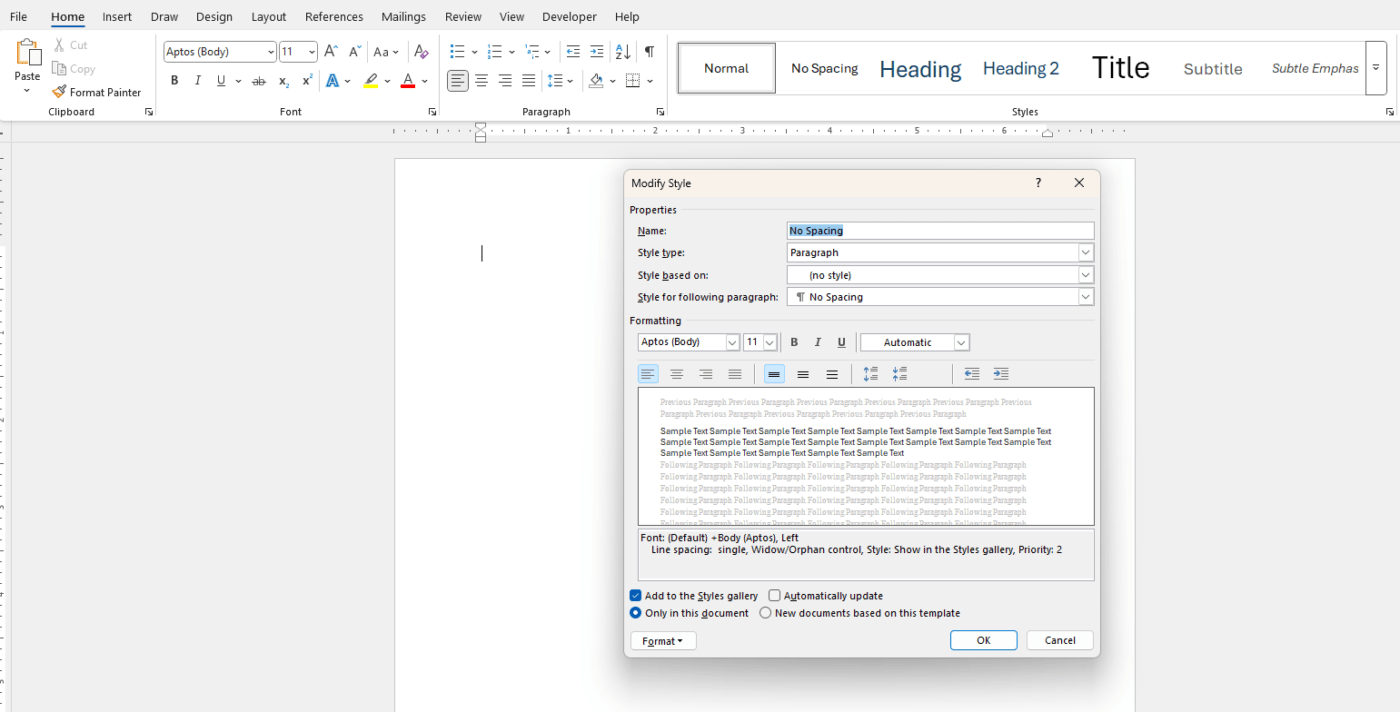
By using styles, you not only maintain a consistent look but also make it easier to navigate your document.
2. Create a Table of Contents
For long documents, a Table of Contents (TOC) is essential to help readers navigate through the sections. Word allows you to automatically generate a TOC based on the headings you’ve applied throughout your document.
Here’s how to insert a TOC:
- Place your cursor where you want the TOC to appear (usually at the beginning of the document).
- Go to the References tab.
- Click on Table of Contents and choose a style from the dropdown.
- Word will generate the TOC based on your Heading styles, and it will update automatically as you make changes to the document.
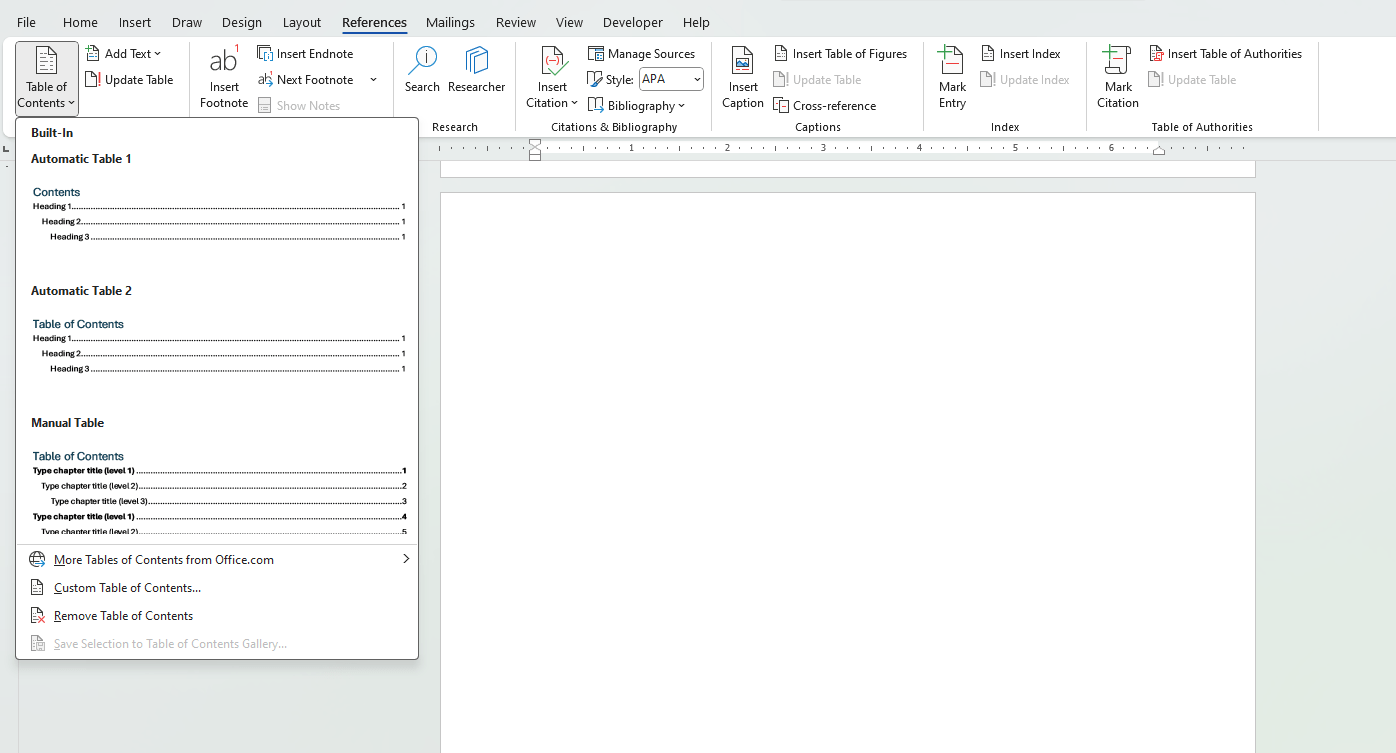
Having a TOC not only improves the readability of your document but also makes it much easier to navigate.
3. Use Section Breaks for Better Structure
When working with long documents, it’s important to divide your content into sections for better organization. Section breaks allow you to create different formatting within the same document, such as changing page orientation, header/footer styles, or margins for specific sections.
Here’s how to insert section breaks:
- Place your cursor where you want to insert a break.
- Go to the Layout tab.
- Click Breaks, then choose Next Page, Continuous, or another type of break depending on your needs.
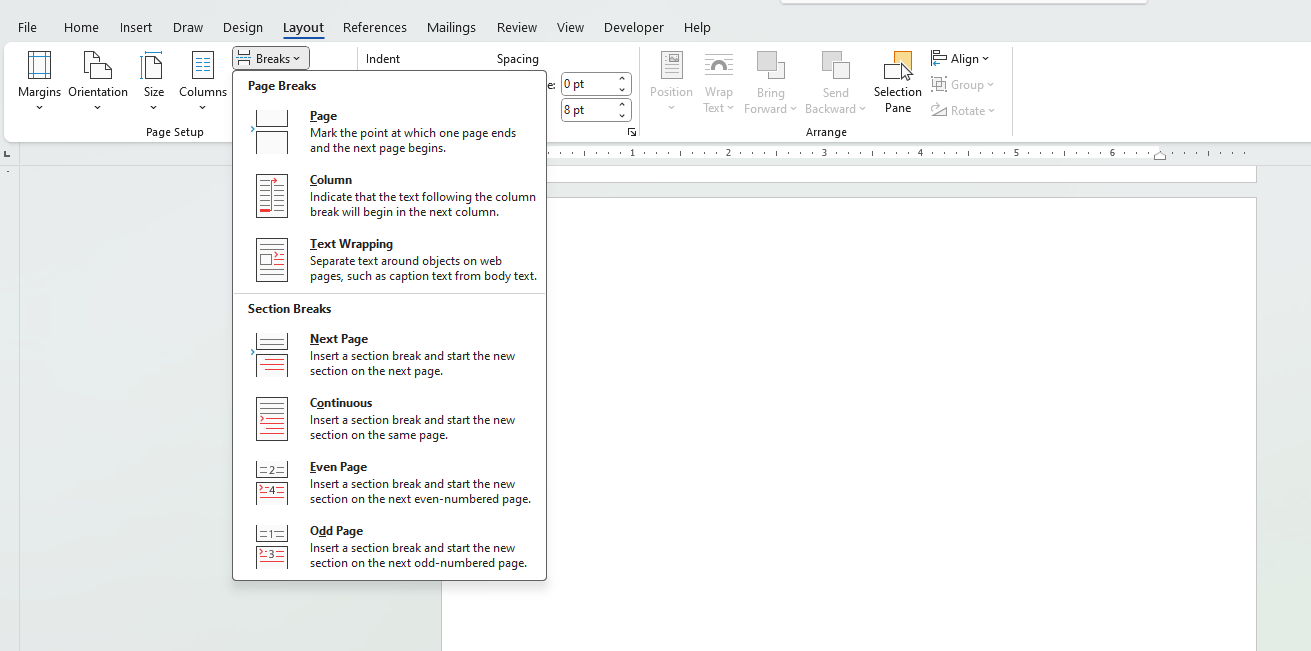
By using section breaks, you can apply distinct formatting options to different parts of the document, making your content more flexible and easier to manage.
4. Use Footnotes and Endnotes
For academic or technical documents, footnotes and endnotes are often essential for providing references or additional information. Word allows you to easily add footnotes and endnotes without disrupting the flow of your document.
To insert a footnote or endnote:
- Place your cursor where you want the note to appear.
- Go to the References tab.
- Click Insert Footnote or Insert Endnote.
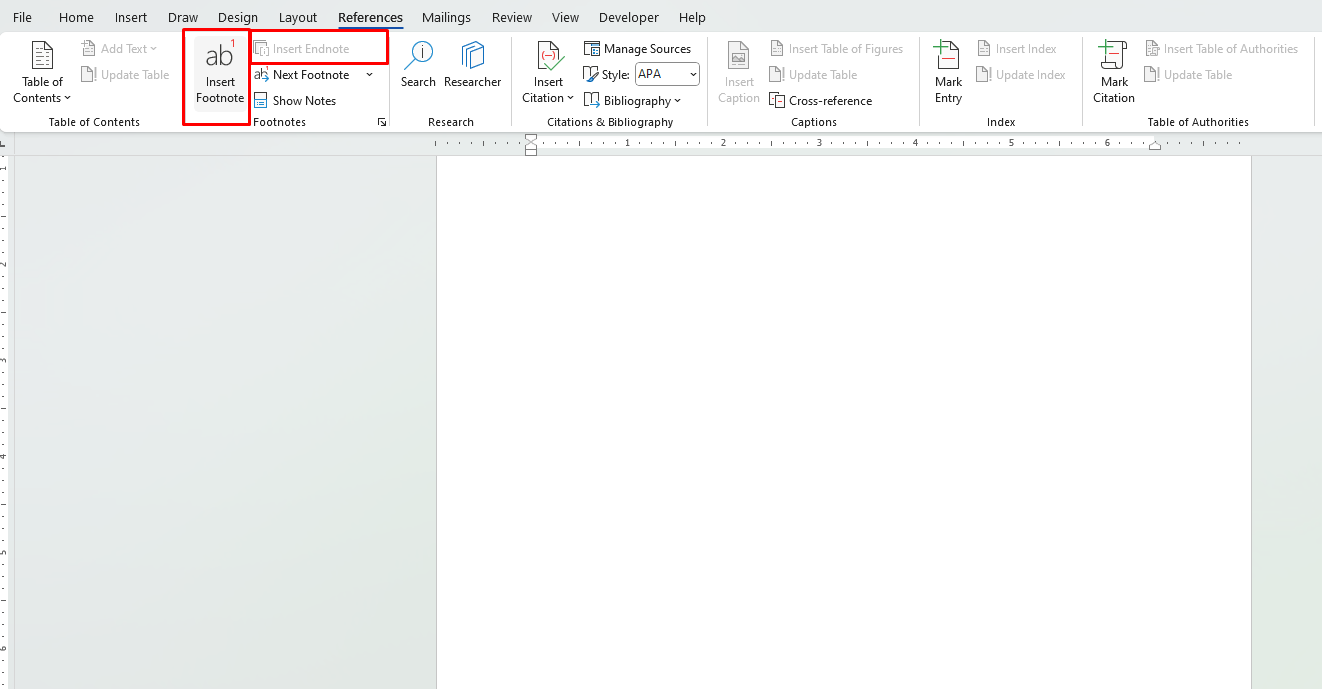
Word will automatically number the notes and allow you to add the relevant information at the bottom of the page (for footnotes) or at the end of the document (for endnotes). This feature is particularly useful in long documents with many references.
5. Utilize Columns for Organized Layouts
In some cases, long documents, such as newsletters or brochures, can benefit from a multi-column layout. Word makes it easy to split your document into columns to give it a more organized, magazine-style look.
To create columns:
- Select the text you want to format (or select the entire document).
- Go to the Layout tab.
- Click on Columns and choose from preset options or select More Columns for custom settings.
Columns can be particularly useful for documents like reports, newsletters, and marketing materials, giving them a clean, professional appearance.
6. Insert Page Numbers and Headers/Footers
For long documents, page numbers, headers, and footers help provide context and organization. Page numbers allow readers to easily reference specific sections, while headers and footers can contain important information like document titles, chapter names, or author names.
To add page numbers:
- Go to the Insert tab.
- Click on Page Number, then choose the position and style you prefer.
To insert headers and footers:
- Go to the Insert tab.
- Click Header or Footer, then choose a style.
- You can customize your headers/footers with document title, chapter headings, or other relevant details.
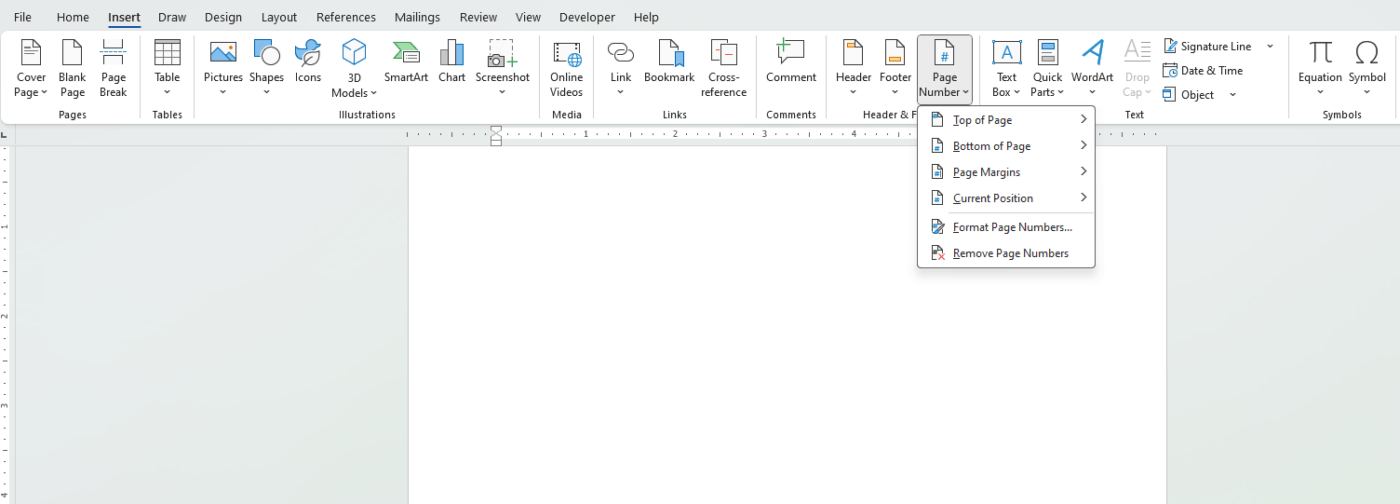
Headers, footers, and page numbers improve the navigation and organization of a long document, making it easier to read and reference.
7. Use Track Changes for Collaboration
When collaborating on a long document with others, Track Changes is a useful tool to keep track of edits, comments, and suggestions. This feature allows you to see who made what changes, making collaboration more efficient.
To enable Track Changes:
- Go to the Review tab.
- Click Track Changes to turn on the feature.
- Any changes made to the document will be marked, and you can accept or reject them as needed.
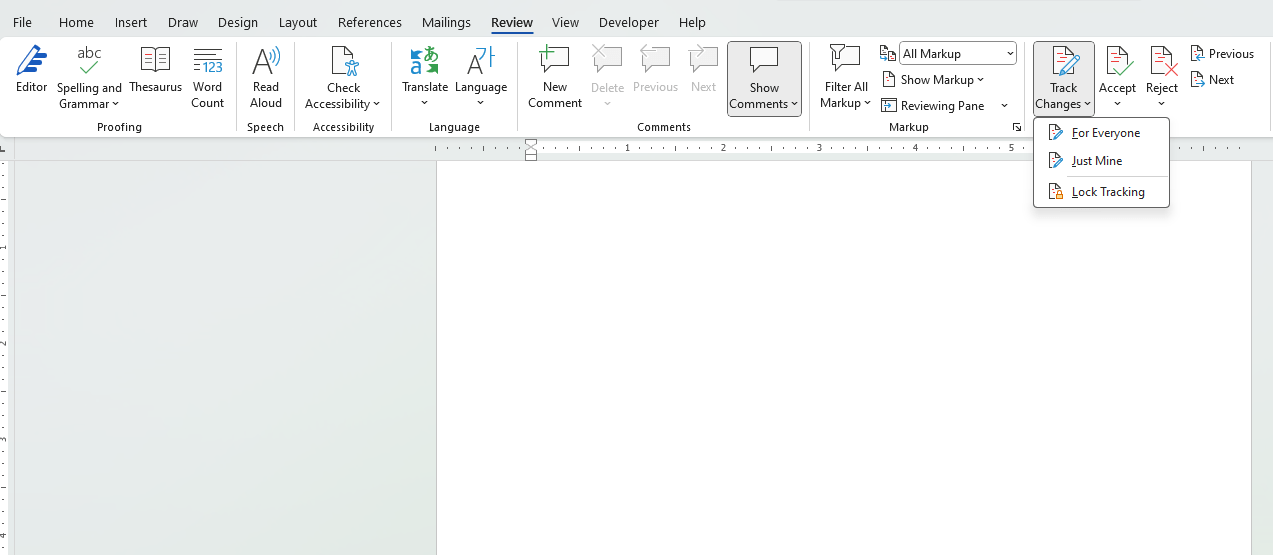
Track Changes is a valuable tool for ensuring accuracy and clarity, especially when multiple people are working on the same document.
Get the cheapest Office keys delivered instantly via email for seamless activation and incredible savings!

