
Office Blog
How to Use PowerPoint’s Zoom Feature Like a Pro?

PowerPoint is a powerhouse when it comes to creating engaging presentations, and one of its most underutilized features is the Zoom feature. Often overlooked, this tool can drastically enhance your presentations, making them more dynamic, interactive, and visually appealing. Whether you’re presenting a business proposal, an educational lesson, or simply trying to impress your audience, learning how to use PowerPoint’s Zoom feature effectively can elevate your presentation to the next level.
In this blog, we will walk you through how to use the Zoom feature like a pro and take your presentations to new heights.
What Is PowerPoint’s Zoom Feature?
The Zoom feature in PowerPoint allows you to create interactive, non-linear presentations, where you can quickly navigate to different sections of your slide deck and return to your starting point with ease. Instead of following a traditional slide-to-slide flow, you can jump around to specific slides, making the presentation feel more like a story where the audience is in control.
PowerPoint Zoom offers several options:
- Summary Zoom – Creates a table of contents that allows you to jump to specific sections of your presentation.
- Section Zoom – Zooms directly into a section of your presentation.
- Slide Zoom – Allows you to zoom into any specific slide within your deck.
Why Use PowerPoint’s Zoom Feature?
Before we dive into the how-to, let’s look at why the Zoom feature is worth your time and attention.
1. Improve Audience Engagement
The Zoom feature helps break away from the traditional linear format of a presentation. By offering a dynamic navigation experience, you can make your presentation feel more like a story rather than a simple slide deck. This makes it easier for your audience to follow along and stay engaged.
2. Stay Organized and Flexible
Zoom lets you organize your presentation into sections and subsections, which is especially helpful for longer presentations. It allows you to cover multiple topics without worrying about the traditional slide sequence. You can jump between topics as needed, offering a more flexible and tailored experience.
3. Create Professional, Seamless Transitions
With Zoom, you can transition between slides and sections with a smooth zooming effect that looks professional and sophisticated. These transitions make your presentation visually appealing and polished.
Step-by-Step Guide: How to Use PowerPoint Zoom
Step 1: Set Up Your Sections
Before using the Zoom feature, you’ll want to organize your presentation into sections. This is crucial for both Summary Zoom and Section Zoom, as it helps to categorize the content.
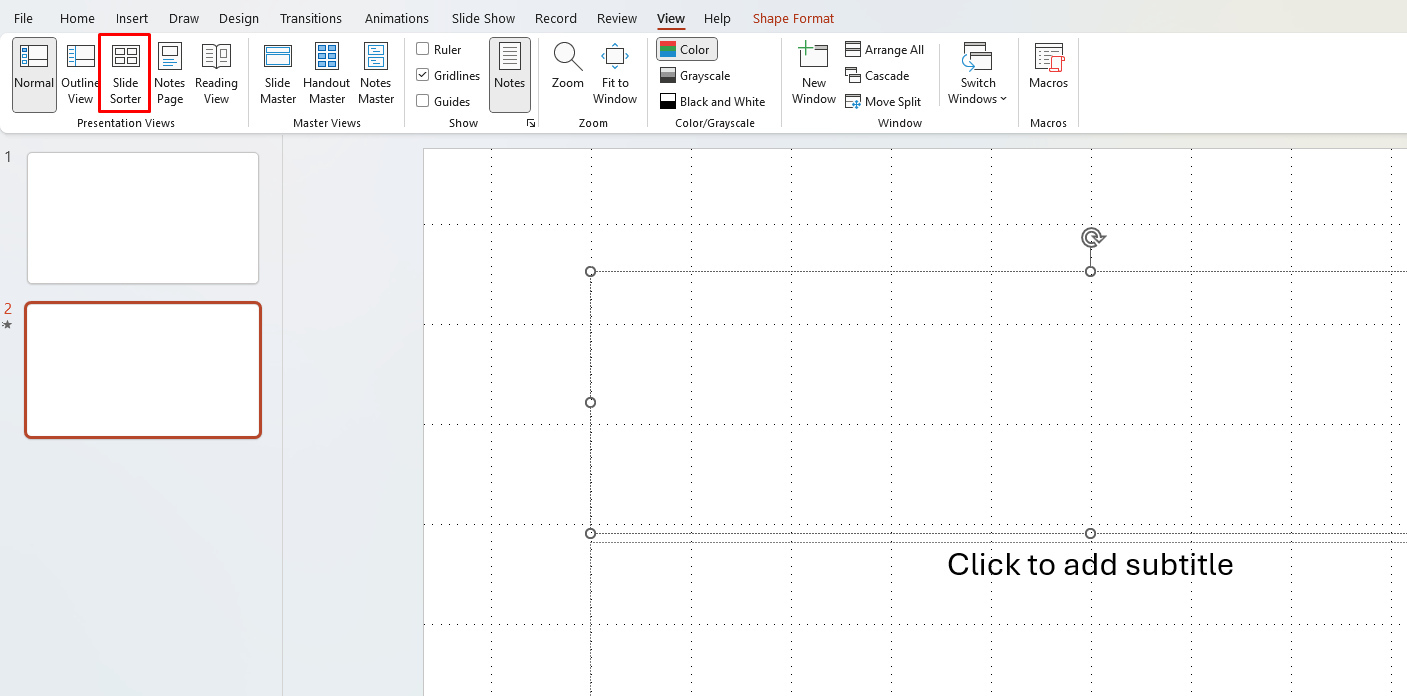
- Go to the “View” Tab – In PowerPoint’s ribbon, go to the View tab and select Slide Sorter.
- Create Sections – To create sections, right-click on a slide and select Add Section. This will group your slides into distinct segments for easier navigation.
Step 2: Add Summary Zoom
Summary Zoom gives your presentation a non-linear structure, allowing you to jump between sections without flipping through every slide in sequence.
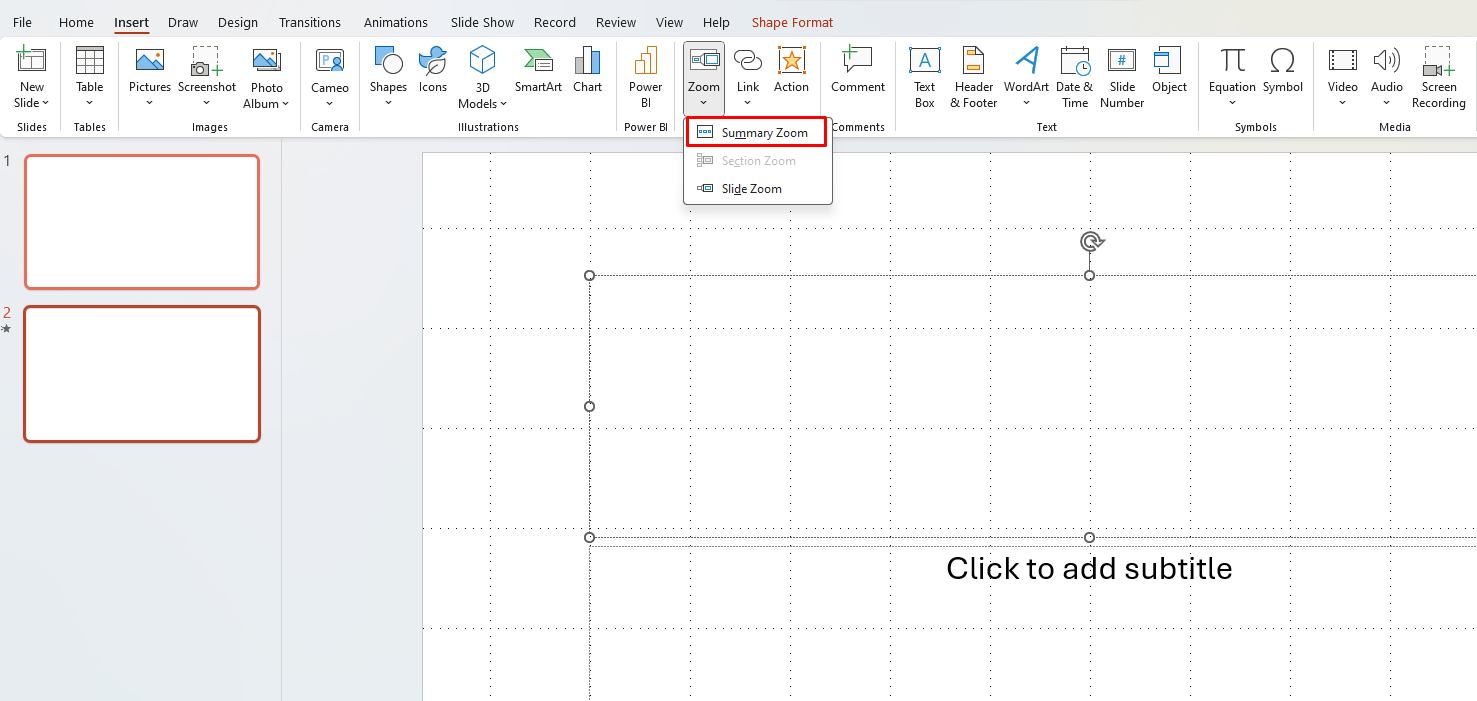
- Go to the “Insert” Tab – In the ribbon, click on Zoom and then choose Summary Zoom.
- Select the Slides to Include – PowerPoint will display a list of all the sections you’ve created. You can choose the sections you want to include in the Summary Zoom.
- Insert the Zoom Link – Click Insert to add the Summary Zoom to your slide deck. A thumbnail of each section will appear on the slide.
- Customize the Zoom Link – Resize and position the thumbnails as needed. You can also add effects like fade or zoom-in animations to make transitions more engaging.
Now, when you present, clicking on any of the section thumbnails will take you directly to that part of your presentation, while also giving you the option to return to the summary at any time.
Step 3: Add Section Zoom
If you want to zoom in on a specific section during your presentation, this feature is for you.
- Go to the “Insert” Tab – Click on Zoom and select Section Zoom.
- Choose a Section – PowerPoint will display a list of all your sections. Select the section you want to zoom into.
- Customize the Zoom Link – Once inserted, the thumbnail of your section will appear on the slide. You can move it around and adjust the size to fit your design.
When you click on the section thumbnail during your presentation, it will zoom directly into that section, offering a visually smooth transition. When you’re done, click the Return to Summary button to navigate back.
Step 4: Add Slide Zoom
If you want to zoom in on specific slides (instead of entire sections), the Slide Zoom feature is ideal.
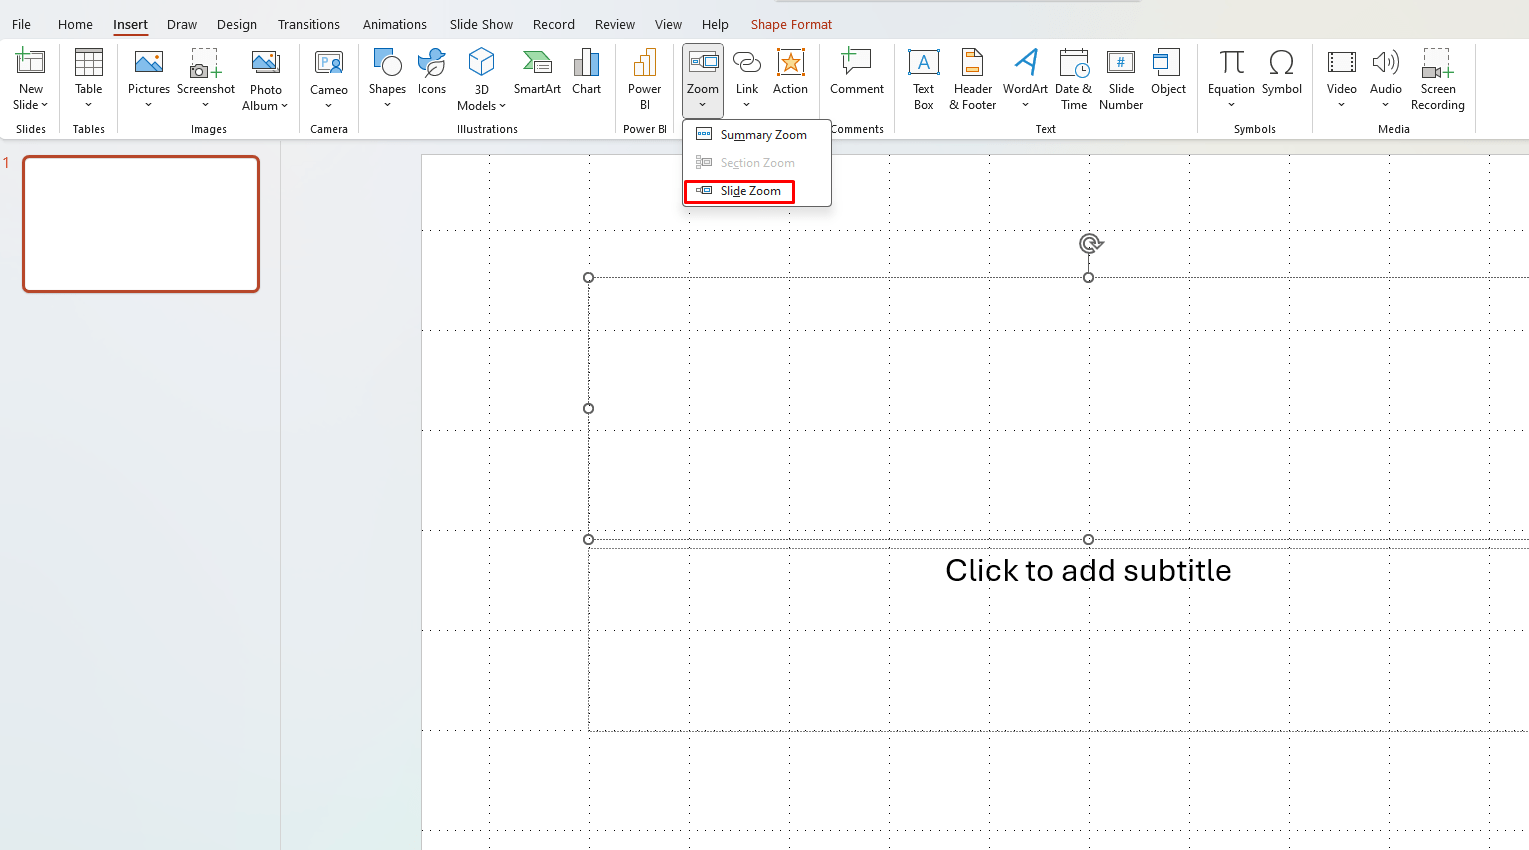
- Go to the “Insert” Tab – Click on Zoom and choose Slide Zoom.
- Select the Slide – PowerPoint will show you a list of all slides in your presentation. Choose the one you want to zoom into.
- Insert the Zoom Link – Once selected, the thumbnail of the chosen slide will appear on your slide. Resize and position it as you like.

Now, when you click the thumbnail during your presentation, PowerPoint will take you directly to the selected slide, providing a fluid transition.
Pro Tips for Using Zoom Like a Pro
1. Keep It Simple
Don’t overdo it with too many zoom links. Focus on creating a clean, easy-to-follow structure with only the most important sections or slides zoomed in.
2. Use Zoom with Transitions
Combine Zoom with smooth transitions to create a seamless and professional experience. For example, use a fade transition to introduce a new section.
3. Experiment with Animations
Use animations in combination with Zoom to make your presentation feel dynamic. Animating the elements on your Zoom slides can make the presentation feel more engaging.
Get the best deals on Office keys with our unbeatable prices—genuine licenses at the lowest cost guaranteed!